Part 2: Extract Lines & Tones
Hello everyone, in this second tutorial I will show you methods to extract lines and tones (halftones) from 3D material and photos in Clip Studio Paint EX and PRO. Please, be aware if you are using PRO the “Extract Line” option will not available but you can follow the techniques to get tones and shape outlines from a photo but not directly for 3D materials. You can also get a 30 days free license to try EX and follow this tutorial methods and more.
So, let's continue!
Intro to Tones (halftones)
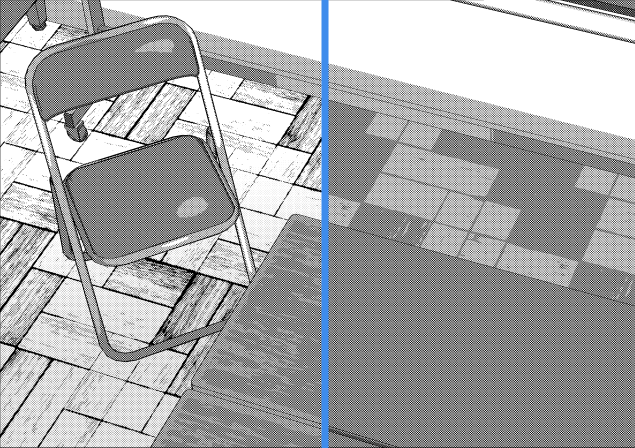
Tones in Clip Studio Paint are similar to the halftone technique used for printing where “dots” are used varying in size and space (frequency) to simulate a continuous-tone in an image that is printed with only one color of ink. When “dots” are small and separate from each other the human eye perceived light tones and when “dots” are big and closer to each other the human perception tends to noticed dark tones.
In Clip Studio Paint it is really easy to add tones to different images and 3D material. You can also work with different shapes of “dots” besides the standard circle form.
Photo-Step 1: Adjust contrast
I am going to use a photo that I took of a hearing/noise protection. For this tutorial let's call it “headphones” -if you want to use this photo for commercial work please contact me first. You can download or copy the images directly from this post -right click- over the photo and copy or save the image. If you copy the image create a new document [1280x1280 pixels] with a Resolution of 300 to paste it.
Now, in order to get better and fast results from photos it is a good practice to add contrast, in this case to separate the object from the background. You can go to [ Layer > New Correction Layer > Brightness/Contrast ] to adjust the values until you get enough contrast. For the “headphone” photo let's bring the Brightness and Contrast up to 40.
▼ Before contrast.
▼ After contrast.
■ Make sure to merged the photo and the correction layers when you finish.
NOTE: You can also paint white over the shadows. This will allow you to isolated even more the object from the background. For the borders I recommend you to use the [Airbrush] tool.
Photo-Step 2: Resolution
So, now that you have your photo with enough contrast let's start to extract outline shapes, lines and tones. Remember that you need a flatten image. You can flatten your image from [ Layer > Flatten image ].
Now, let's go to [ Edit > Change Image Resolution ] and set the resolution to 300 (if is lower is important to select Fix pixel (C)) this will affect the size of the “dots” when using “tones”. If you have a lower resolution the “dots” are going to look smaller and right now we don't want that.
Photo-Step 3: Organize Layers
The first thing that we want to do is to duplicate the “headphones” photo 2 times from [ Layer > Duplicate layer ] or from the Top left Corner Menu. You can also drag the layer over the [New Raster Layer] in the Layer Window.
Now change the names of the duplicated layers. Double click over name and call the first “Line” and the second “Tone”. Then create a vector layer from [ Layer > New Layer > Vector Layer ] and name it “Outline”.
Photo-Step 4: Outline Selection
Now hide the “Line” and “Tone” layer and select the “headphones” layer. With the [Auto select] tool selected (shortcut W) click over the white background and hold SHIFT to add more selections. You need to invert the selection from [ Select > Invert selected area ] or use the icon that appears when you make a selection.
Let's select the “Outline” vector layer and with any color selected go to [ Edit > Outline Selection ]. Select [Drawn on border] and bring the Line width to 1.20 mm or its equivalent.
With vector layers you can adjust the brush size, color or edit the lines as you like from the [Tool Property] panel.
Photo-Step 5: Extract Lines & Binarization
For the next step please choose your version of Clip Studio Paint -EX or PRO- to extract lines:
[A] In Clip Studio Paint EX, select the “Line” layer and hide “Tone” and “headphones” layers.
Go to [ Layer Property ] and select [ Extract Line ]. Set both Threshold values to 40. Now the photo is going to look like a basic ink drawing similar to those found on comics and pop art examples. Feel free to try different values or even use the [Extract after posterization] to get different results in your own projects.
Now to clean the white background go to [ Edit > Convert brightness to opacity ] and this will remove all the white (brightness) from the layer. You can still adjust the values from the [Extract Line] panel if you like. Now let's rasterize the image from [ Layer > Rasterize ] this will allow you to apply [Extract Line] again to add more details to the image. You can also leave it at it is now. It´s important to know that once you apply Rasterize you will not be available to edit values on the panel.
[B] In Clip Studio Paint PRO, select the “Line” layer and hide “Tone” and “headphones” layers.
Go to [ Layer > New Correction Layer > Binarization... ] bring up the Threshold to 40. Now the photo is going to look like a basic ink drawing similar to those found on comics and pop art examples. It is important to know that although it looks similar it is not exactly the same result that you can get from [Extract Line] in Clip Studio Paint EX.
Now select the “Line” layer and the Correction Layer and merge the layers from [Layer > Merge selected layers]. You can also draw some lines in a new vector layer if you want to add more detail to the image.
Now to clean the white background go to [ Edit > Convert brightness to opacity ] and this will remove all the white (brightness) from the layer.
Photo-Step 6: Tones
Now we are going to extract tones from the photo in a really fast and easy way. This method works the same for Clip Studio Paint PRO and EX.
Select the “Tone” layer and on the [Layer Property] change [Expression color] to Gray. Then remove the white background from [ Edit > Convert brightness to opacity ].
Now in the [Layer Property] panel select [Tone] and set the number of screen frequency to 16.
As you can see now the light areas are showing small “dots” and the darker sections are fill with big circles as explained above in the intro. By default the “dots” shape is set to Circle. Feel free to explore the other shapes. For this image I am going to keep the Dot Settings in Circle.
Congratulations you have successfully extracted lines, tones and shape outline from the “headphone” photo.
3D material: Extract Line and Tones (only in Clip Studio Paint EX)
Let's create a New Document for Illustration, [Width 1920 px, Height 1280 px] and Resolution 300. Remember the resolution is going to influence in the size of the “dots” when using Tones.
For this tutorial you can download this free “Motorcycle (American)” 3D material ▼
Now from [ Windows > Material > Material [Material] ] select and drag the “Motorcycle (American)” to the document. Then click over the top right corner arrows to minimize the window.
With the [Operation tool] selected (shortcut O) click over the background to move the 3D Motorcycle. You can also use the different icons that appears with the 3D object.
On the [Tool property] you can go to [Sub Tool Detail] palette and change the scale, position and rotate the selected object. I going to bring down the scale to 72.
You can duplicate the layer and hide it in case you need a backup. And then you can go to [ Layer Property > Extract Line ] and change the values as you like. I am going to set [Threshold of fill black] to 40, [Correction line width] to 2 and [Threshold of edge] to 24 and click over the Up arrow icon.
Now the 3d OBJECT is going to look like a basic ink comic drawing similar to those found on comics and pop art examples. Feel free to try different values or even use the [Extract after posterization] to get different results in your own projects.
Now click on [Execution of LT conversion of layer]. If you want to edit the outline later as a vector select [Vector layer] and then press OK.
As you can see suddenly the appearance has changed. Also you have a [New Layer Folder] with 6 layers inside. Don't worry about it we just need to make some adjustments.
First, hide the Tone 1 layer then select Tone 2 layer and in the [Layer Property] bring the [Number of screen frequency] to 24 and [Density] to 24. And for the Tone 3 layer bring the [Number of screen frequency] to 24 and [Density] to 80.
■ Remember the density is related with the space among the “dots” as we review above in the intro.
Congratulations you have successfully extracted lines, tones and outline from the “Motorcycle (American)” 3D material, do not forget to saved the file and feel free to join me in the next tutorial.


Comment