
Hi! I'm Sadbh (Going by SwordsandSpectacles online), and today I'm going to tell you how I make looping animated illustrations using keyframes in Clip Studio Paint.
Overview

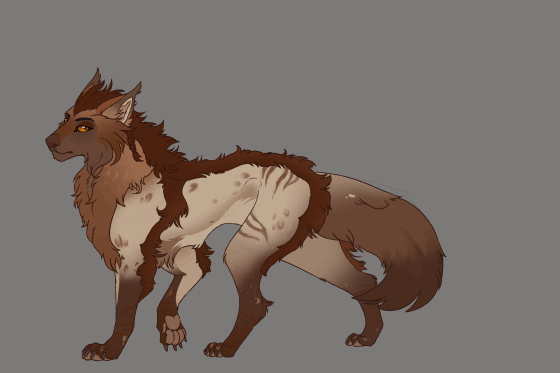
This is the .gif we're going to be making today; a keyframe animated character with an animated background.
Sketch & Rough Animation
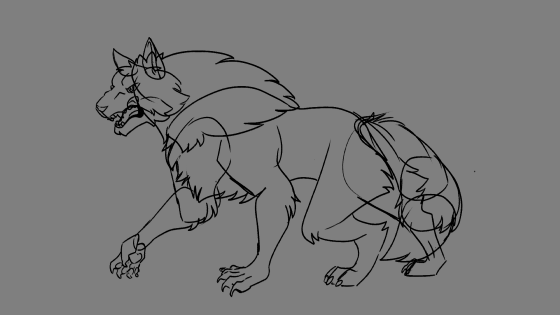
First, create a canvas and grab your favourite brush; and sketch out your character on your first layer.
Now, go over the character again, but draw each part you want to be able to move on a new layer. Name these layers, so that you can keep track of what body part is on which layer. This makes everything MUCH easier in the next step, where you begin to animate your character.
Go Window > Timeline to bring up the timeline on the bottom of your screen, and Animation > Timeline > New Timeline.
For this animation I set my timeline to 12 Frames per second (FPS), and 24 Frames playback; so, a 2 second animation loop.
Now you can see in the timeline that all of your layers are present; This is why it is so important to name them all.
Pay attention to these two buttons; the one on the right enables keyframes on a layer, and the one on the left ads a new keyframe, based on the location of items on the canvas at this moment in time.
Click on the "Operation" Tool, and then "Object."
Insure you are at the first frame on the timeline (The Vertical red line will show you this)
Select your top layer (in this case, the top jaw of the character), and move the little crosshairs from the centre of the canvas to wherever the natural joint on the character would be; for the head, this is where the spine connects to the skull.
This will make your rotations far more natural, as it simulates real movements better.
Navigate to the end of the timeline, and before your add anything more, click 'add keyframe'
This means that the start and the end keyframes are the exact same, and your animation is a perfect loop.
This will be the basis for all of the animation in this tutorial.
Once you have these two identical keyframes set, you can navigate to any point between them, and rotate , move or scale your piece. For this, I only rotated to make his mouth open a bit.
Now, I copy and paste these keyframes for every other piece of the head, by clicking and dragging until the little diamond keyframes are highlighted in red, then going
Animation > Edit Track > Copy
Moving to the next layer down, and clicking Animation > Edit Track > Paste.
You may also do this by right-clicking on the frames.
The reason I am copy pasting all of the frames for the head is so that it moves as one piece.
Once this is done, I can add more keyframes between the start and end to make his mouth open or close, or his ears twitch.
Once all my keyframes are copied and pasted, the head looks as if it has only one layer....


... But by editing all of the rotations on the parts of his head, the motion becomes far more dynamic.
Remembering the earlier points about moving the centre of the rotations to where the nautral joints are placed, I quickly animate the arm and tail as well; unlike the head, these require no copy-and-past-ing at all.

Once this is done, I place all of the sketches in their own layer folder, to keep my layers panel tidy.
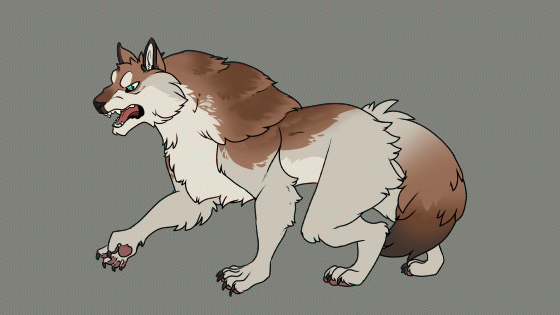
Lineart and Colour
Now, on to the lineart.
The lineart is split up just like the sketch is, but into named folders rather than onto separate layers.
This makes colouring much easier.
Lineart and colour are the part of this tutorial that are most up to you! I'd encourage you to line in your own style, though there are a few things I would reccomend you do.
- Don't have everything with complete lineart the whole way around; you can disguise joints by having sections of colour overlapping one another (I do this on the wrist, elbow, upper jaw and tail particularly).
-Leave lots of overlapping space; this can give your character a greater range of movement! You can give a character multiple animations with the same set of drawings if you're clever about it.
You can see that I've used a lot of round shapes for the overlaps in my drawings; it helps me visualise where the rotation points go much more easily.
To colour your character pieces, create a new layer inside of the folder for the body part you wish to colour.
Set your lineart layer to be a reference layer by selecting the lineart layer, and then hitting the little lighthouse icon.
Then select your colour layer. Pick the magic wand (Auto-select) tool and insure that "Area scaling" is set to about 3 (this may need to be higher or lower, depending on your line thickless), and that "refer multiple" is on, and the lighthouse icon is selected.
What this means is that you can draw to fill in gaps in the lines on the colour layers, but when you click outside of your lineart, it will select the entire outside area. ignoring all other layers except the line and colour layers on this particular part of your drawing.
You can then invert and fill the selection. Area scaling makes the edge of the colour sit in the middle of your lineart, so there are no stray pixels around the edges, and everything looks nice and clean.
At this stage, I like to fill my layers in with different bright colours, so that it is clear where each segment starts and ends. On areas where fur overlaps, I use a jagged fur-edge texture, so that if it shows up in the coloured version, it looks a bit more natural; but on areas like the face where I know the split will be hidden, I just leave the lines smooth.
Now, you can choose to animate the character now, or later, after you've coloured it in.
I like to animate it now, as I can see errors and fix them quickly.
Now, while keyframes are enabled on a layer, you cannot edit the drawing; but you can hit the 'enable keyframes' button at any point to turn them off and edit your layer or folder normally. This does not affect the keyframes, as they will be right back the moment you turn them back on.
I will not be covering colouring in this tutorial, as I'd encourage everybody to colour their animations the way they colour their usual drawings; but i will give a few tips to make the process smoother!
Final Animation Tricks
Here is a map of all the rotation points on the character; the process is the exact same as animating the sketch, but i spent more time getting everything just right, and insuring that all parts of the puppet flowed together properly.
As you can see from my coloured version, I've hidden the majority of the 'breaks' in the character by keeping the colours the same on both sides of the break. This didn't quite work out on the tail, but seeing as this fellow is fairly fluffy, it still looks quite nice.
A general rule of thumb; try to avoid having all the movements on the character happening at the same time; for example, the head of our werewolf here moves back a moment before his hand starts to move back, and his tail is doing it's own thing entirely.
The lower jaw has two movement keyframes, one to close it, and one to open; little movements like that can all really help an animation out.
If you want to find out how to make more natural character animations, look up the 12 principles of animation. They are not the focus of this tutorial, but they are a handy thing to be aware of for anyone with an interest in animating.
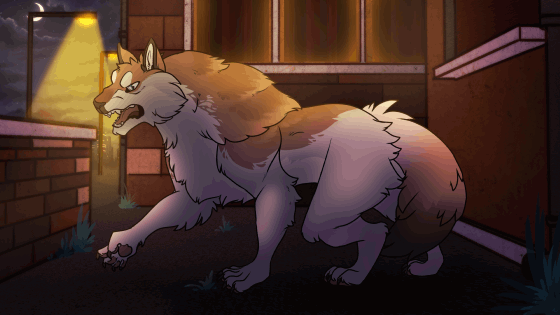
Backgrounds (subtle details & opacity keyframes)
So, on to backgrounds...
First, draw a background in your usual way! (It sounds so easy when you put it like that....)
I've made use of some of the materials that came with clip for the far background, and textures on the walls and ground (they really are lifesavers!)
Now, place all your animated parts in a folder, and clip two layers to the folder with the clipping mask button. This means they only show up where they intersect with your character! These layers are not affected by keyframes, but by regularly playing your animation back as you work, you can get all the shading and highlights for your character with just these two layers.
My dark blue shading layer is set to the 'Multiply', and my yellow is set to 'Add (glow)'
Here is what the layers look like without the clipping mask and blending modes, to give an idea of their range...
.... Let's just put those back the way they were.
Anyhow! The streetlamps in the background have their beams on seperate layers (Set to Add (Glow).
We're going to go to this layer on the timeline, and enable keyframes, and then click on this little + button to the left of the layer name.
Now, you can see an 'Opacity' track; and as you change the opacity, it will save these changes as keyframes.
I used this in a slightly demented-looking pattern of very small opacity changes to give a flickery streetlight; very atmospheric!
I like to do this with big soft blobs of colour as well, set to 'soft light' or 'overlay' ; I'd encourage you to look into animated lighting effects for your illustrations!
The final thing I want to do is add some grass.
First I add several grass tufts around the illustration; these are intended to stay still. I shade them to fit the scene.
After this, I add the grass tufts I want to move. These are placed each on their own layer beneath the still grass, to hide the bottoms from view. I colour-pick the shaded and highlighted grass so everything looks cohesive.
It is very important that every grass tuft is on it's own layer.
After this, you can just keyframe your grass like the rest of the illustration! As ever, regularly play back your animation to see how it's looking.
After this, just add any final touches and adjustment layers that you usually would... and you're done!
Final Thoughts & Other Examples of my work
I wanted to keep this illustration pretty simple; but I thought I'd show a few more things that this technique is capable of doing. I regularly combine keyframes and frame-by-frame animation in order to get a little bit more life into my animations, so here are a few of those.
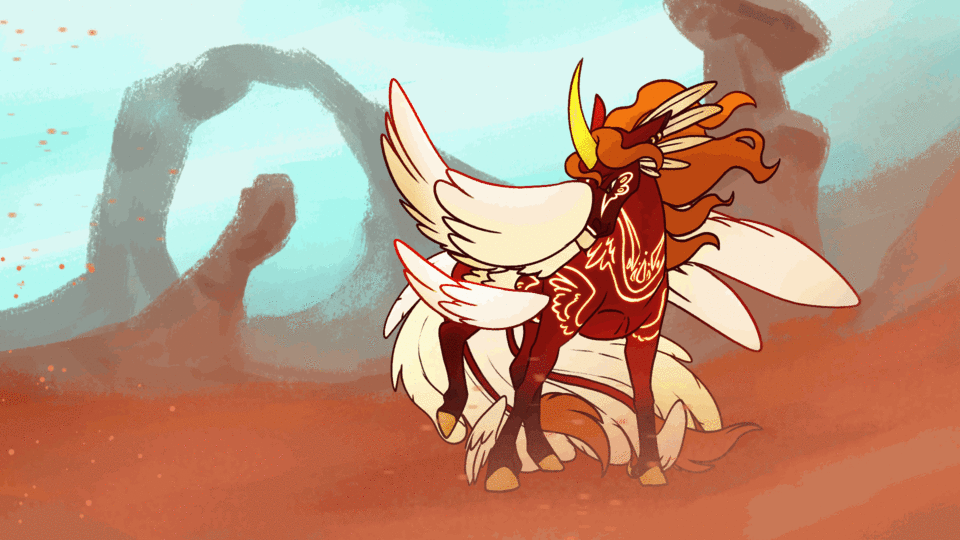
In this, the wind is just regularly hand-drawn animation.
The mane is frame-by-frame, and the frinnge is frame-by-frame alongside keyframes so it matches the movement of the head.
Here, the eye is on an animation layer, but everything else is keyframed.
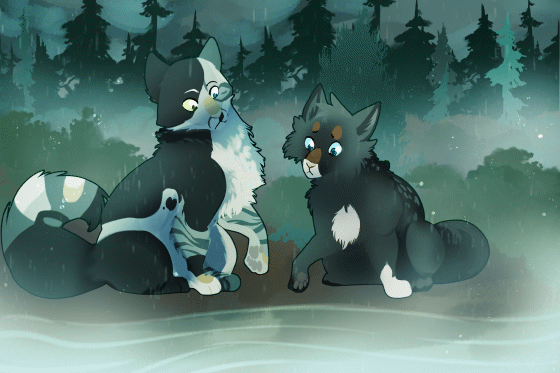
Here, the rain, river and splash are frame-by-frame.
The characters are 100% keyframed, and I placed them in layer folders to get the outline effect on them.
The trees in the background has been keyframed with a tiny bit of rotation to give the impression of a windy day.
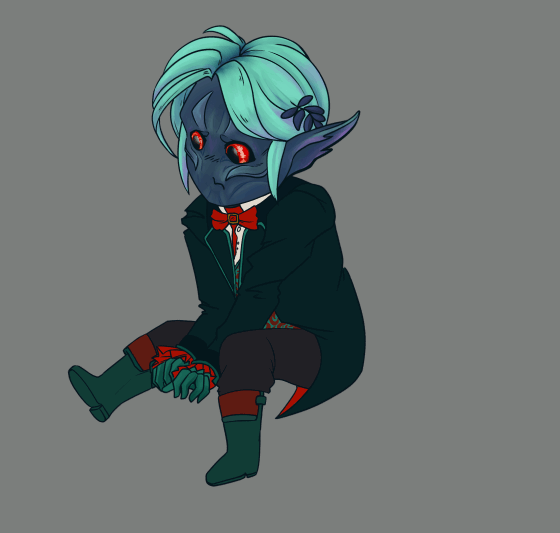
This one is very very simple, and shall be my last example for today; I simply drew the head and leg of this chibi separately so I could have a tiny little loop.
I hope my tutorial helped you! Thanks a million for reading, and take care!
Users who liked this post


Comment