
Introducción
Desde que empezamos a dibujar usamos la linea como recurso para crear formas y separarlas unas de otras, pero en ocasiones queremos lograr lo mismo sin utilizar la linea y nos vemos obligados a experimentar nuevas técnicas y encontrar nuevos recursos para hacer una ilustración lineless.
En este articulo te contaré los conceptos básicos y te mostraré los recursos que utilizo para crear personajes sin contorno.
Conceptos Básicos
Hay diferentes formas de crear formas y representar su área, a mi me gusta pensar que existen estas tres:
1. Lineart:
Es la linea que utilizamos para crear contornos y separa las formas entre si, este es muy utilizado en las series animadas y comics.
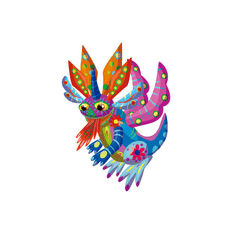
2. Ilustraciones sin contorno (Lineless art):
Este tipo de ilustración se caracteriza por utilizar formas planas y colores para delimitar el área de cada forma.
3. Texturizada:
En el predomina una serie de patrones que pueden ser agregados a nuestra ilustración para crear resultados más interesantes, la mayoría de veces nos apoyamos de pinceles especiales o personalizados para aplicar la texturas deseada.
Herramietas
Ahora que conocemos los conceptos básicos te mostrare las herramientas y el proceso que utilizo para crear formas utilizando Clip Studio Paint, existen herramientas similares en otros softwares de dibujo y la mayoría de consejos listados aquí pueden ser fácilmente aplicados en estos softwares.
Pinceles: Esta herramienta emula los materiales que solemos utilizar al dibujar de forma tradicional como los lápices, marcadores, brochas y más.
Personalmente me gusta separar los pinceles en tres categorías basándome en el borde que tiene cada pincel.
1. Pincel de borde duro: Se caracteriza por dibujar lineas con un color uniforme y con bordes definidos. En Clip Studio Paint puedes encontrar varios pinceles con está características en la sección "PEN".
2. Pincel de borde suave: Se caracteriza por pintar zonas borrosas creando un degradado y fundiendo los colores, creando figuras uniformes. En Clip Studio Paint puedes encontrar varios pinceles con está características en la sección "Airbrush".
3. Pincel con textura: Estos pinceles pintan patrones de forma continua o aleatoria logrando emular varias texturas como las que podemos observar en medios tradicionales, como la textura del papel, el grafito, telas y muchos más. En Clip Studio Paint puedes encontrar varios pinceles con está características en la sección "Pencil" y "Brush".
Lasso y Polyline: Se utilizan para crear una selección que limite el área en el que trabajaremos y todo lo que se encuentre por fuera no se verá afectado.
Fill: También conocida como bote de pintura, está herramienta nos ayuda llenar de color contornos existentes creados con pinceles o las herramientas de selección.
Puedes utilizar estas combinaciones para crear formas planas con la herramienta fill.
Lasso/Polyline + Fill
Puedes presionar la tecla SHIFT para sumar área a una selección previa y puedes presionar la tecla Alt para restar área a una selección previa.
Pincel + Fill
Vamos a pintar un personaje: proceso para crear personajes LineLess
Genial! ya conocemos todo lo que necesitamos para crear ilustraciones sin contorno, ahora te describiré cual es el proceso que yo utilizo para pintar mis personajes.
Sketch
Muchos artistas empiezan sus ilustraciones con un boceto, este es una guía que nos ayuda a plasmar la idea que tenemos, recuerda que esta es una etapa de exploración, así que siéntete libre hacer todas las modificaciones que gustes y no te preocupes por la calidad de la linea porque no sera visible en el resultado final.
Para realizar mi boceto utilizo un pincel texturizado con opacidad variable, la opacidad variable es controlada por la presión que ejercemos en nuestra tableta gráfica, lo que significa que mientras mas fuerte presionemos será mas opaco el trazo y con menor presión sera más transparente el trazo, ayudando a crear diferentes tonalidades sin necesidad de escoger un color desde el selector.
Clip Studio Paint tiene la opción de color transparente, el cual hace que el pincel que estamos utilizando funcione como un borrador, eliminando los colores opacos y respetando la configuración actual del pincel.
Bloque de Colores
Cuando tengamos nuestro sketch definido procedemos a crear bloques de colores haciendo uso de las herramientas de selección, pinceles y el balde de pintura o fill.
Reduciremos la opacidad de la capa en la que se encuentra nuestro sketch, normalmente coloco la opacidad con un 30%. Ahora con un pincel de borde duro dibujamos la silueta del personaje con el color predominante, en este caso el naranja. Luego rellenamos la silueta con la ayuda de la herramienta fill.
Es hora de agregar el resto de colores, debemos crear cada color nuevo en una capa diferente porque nos ayudara a navegar fácilmente entre nuestros bloques. Crearemos cada color sobre la capa que contiene la silueta y lo vincularemos a la capa de nuestra silueta con la propiedad de capa "Clip to layer bellow"
La propiedad clip layer bellow limita el área que podemos editar a los pixeles opacos de la capa inferior, cuando esta propiedad esta activa se mostrará una linea vertical de color rosa en el lado izquierdo de la capa.
Texturas
Con nuestros bloques creados ya podremos empezar a agregar texturas a nuestro personaje.
Para ello usaremos una nueva propiedad de capa llamada "Lock transparentes pixels" la cual evita que se modifique cualquier área transparente, y solo podremos pintar dentro de los pixeles opacos que se hayan realizados cuando está opción se encuentra desactivada.
Bloqueamos los pixeles transparentes en todas las capas de color y podemos empezar a agregar textura con el pincel de nuestra elección. Intenta variar las tonalidades usando colores claros para las áreas de luz y colores un poco más oscuros en las áreas de sobra, de esta manera generar contrastes que ayuden a crear volumen y delimitar cada parte nuestro personaje.
Para este proceso utilizo un pincel con textura y opacidad variable, la configuración es similares al pincel de que utilizo para el sketch, con la única diferencia que la textura es distinta.
En la imagen de abajo te muestro las áreas que considero son importantes contrastar para que el personaje se vea interesante y voluminoso.
Detalles Finales
Genial, estamos cerca de terminar nuestro personaje, solo queda agregar los detalles finales para hace que nuestro personaje resalte un poco más.
En el vestido pintaremos una vía láctea, para ello utilizaremos las herramientas polyline y fill para dibujar la primera estrella, luego duplicaremos la capa de la estrella utilizando los atajos de teclado CTRL + J, modificaremos la posición y el tamaño utilizando el atajo de teclado CTRL + T y variaremos el tamaño y la rotación del objeto.
Luego pintamos un par de formas nebulosas ayudándonos de pinceles texturizados para generar un fondo mas colorido.
Para finalizar dibujaremos pequeñas estrellas representadas por puntos de colores, para ello utilizaremos un pincel de borde duro y colocaremos pequeños puntos variando la presión para generar diferentes tamaños.
Ahora agregaremos Highlights a nuestro personaje en una nueva capa, para ello utilizamos la herramienta lazo y la herramienta fill para crear la forma que tendra nuestra luz con colores saturados. Luego con la ayuda de los blending modes seleccionaremos la que consideremos que se ve mejor, en este caso he decidido utilizar le blending mode "Overlay".
Para finalizar dibujaremos una superficie en la cual descanse nuestros personaje, trataremos de emular una superficie que nos haga recordar el suelo reflectante de un aeropuerto. Para ello dibujaremos un ovalo con una cuadricula en su interior, ahora con un color mas oscuro dibujamos la sombra que se proyecta en el suelo.
Para agregar el reflejo duplicaremos a nuestro personaje, reduciremos la opacidad de la capa y la voltearemos de forma vertical para acomodarla en nuestro suelo.
Para finalizar crearemos un fondo monocromático, buscaremos un color que contraste con nuestro personaje para que él sea el protagonista de la pieza.
Eso es todo, hacer ilustraciones sin contorno suele generar muchas dudas cuando recién empezamos, y por esta razón he decidido escribir este articulo para ayudar a entender como funciona este tipo de arte. Espero que este articulo te haya sido de utilidad.
Recuerda que al pintar existen varias formas de alcanzar un resultado, así que siéntete libre de experimentar y divertirte.
Si te gustó el artículo házmelo saber, en los comentarios.
¡Gracias por leer!
Sigueme en instagram:
Users who liked this post


Comment