
Hi, this is Mana!
This is the first exercise of this small series; this is BEGINNER BASIC on Animating an Illustration.
We’ll talk about simple things first;
• Blinking
• Light
• Keyframe Interpolation
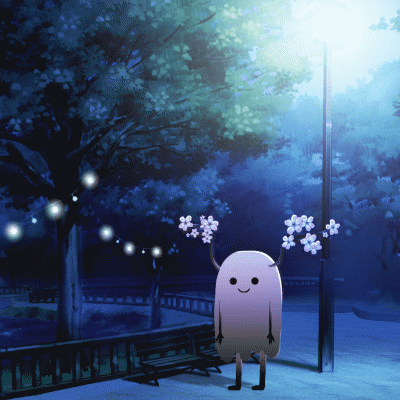
We’ll be working on my mascot, POCHI. The design is simple so the editing will also be very easy and simple.
We will do something like this:

This project is done in Clip Studio Paint PRO, we’ll use this version so majority of people can follow. You can also use the EX version for this, much better.
The video version of this is right here:
The raw files and final files of this project will be at the link below.
You can download that so you can follow along.
CUTTING THE DRAWING
First off, let’s open our Illustration.
CTRL O on your keyboard or click the icon on the canvas tab.
Click OPEN when you're done.
And this is our image:
Okay! As you can see this image is on JPG and it’s a one layer image.
Also, this is POCHI and the background that I use is from the Clip Studio Assets; you can get that here if you want:
The lights brushes at the back are these:
First things first; what’s the animation that we have in mind?
• Blinking
• Lighting
For Lighting, we don’t really need to redraw or cut anything for that, and so we’ll move to Blinking.
For the Blinking, we need to separate the eyes from the body.
To separate that, use a [Selection] Tool > use whatever selection tool that you want.
I usually use [Lasso] and [Selection Pen]
And just select that whole eyes area
When you’re done; CTRL X to Cut and then CTRL V to Paste to a New Raster Layer.
Remember to Rename that Layer.
I renamed that as Open_Eyes
Now we have to get back to the Main Illustration layer; we need to redraw this empty area where the eyes were previously was.
I’m just going to get a [Selection Pen] and select the middle where the eyes were.
CTRL C to Copy and then CTRL V to Paste on a New Raster Layer.
Move that newly pasted area to the blank hole.
Do the same with the other area.
Just duplicate the current selected portion; go to [Layer] > [Duplicate Layer]
And move that portion to the other hole.
Okay, when both holes (?) are covered just remember to combine all the Main Illustration together – except for the eyes, of course!
So now we have the eyes, separated from the body – let’s work on the eye expression next.
EYE EXPRESSION
Next, let’s work on doing Eye Expression.
What we are doing next is we are making another Eye Expression – because this eye, that we extracted from the Main Illustration is actually our Open Eye:
And now, we need to make a Blink or a Close_Eye.
We will make a New Raster Layer or CTRL Shift N on your keyboard.
To make a Close Eye, I'm going to use my [Selection Tool] > [Rectangle] > and just make a thin rectangle and fill that with color
⭐ TIP! Lower the Opacity of Open_Eye layer so that you have a reference for the position of the Close_Eye
Since the design is very easy, we just need to make one.
Then go to Layer > Duplicate Layer
And just adjust this duplicated eye copy to the other eye.
Merge this two Close Eyes or CTRL E on your keyboard.
Make sure this Layer is renamed as Close_Eye.
And that’s it. We now have our Eye Expressions.
⭐ Some Eye Expressions can range up to 6 or more expressions, it usually depends on what kind of animation you’re doing, but since we’re doing a very very basic animation.
A quick Open and Close eye is okay.
Alright!
Let’s go animating now.
ANIMATION: Timeline
So, let’s get our Timeline.
Go to [Window] > [Timeline]
Or if you have a workspace for it; please load that.
Now click this icon on the Timeline tab; let’s make a New Timeline or a Sequence.
We'll then get our Timeline Settings:
• Rename this Timeline as POCHI
• Frame Rate: 12 FPS
• Playback Time: 24
• Image Interpolation: I’m going Smooth
• Frame Start: let’s go starting from 1; so it’s easier to follow.
Click OK when you’re done.
ANIMATION: Light Ver 1
First, let’s do the Light Animation.
As you can see, I labeled this as Version 1; I’ll make two versions.
First is Light Flickering
Second is Light Going ON and OFF
This first one will be Flickering.
Now, let’s make a New Raster Layer or CTRL SHIFT N on your Keyboard.
Let’s rename this Light_1
Let’s get our [Gradient] Tool > Make sure it’s on [Foreground to Transparency].
Change the shape to Circle or Ellipse, I’m going [Ellipse].
Pick the color of this street lamp, or Hold ALT on your Keyboard.
The mouse changes into an eyedropper > and let’s get the color.
OK. Now we make a LIGHT.
Click at the middle of this light source > Drag your mouse and try to make a circle
Fix the angle > then Click again to let go.
Ok?
We can change the Blending Mode to match it more with the drawing; I’m going Overlay.
Now let’s go here on the Timeline area.
Make sure the Light_1 layer is selected > and then we click [Enable Keyframes on this Layer]
You’ll see this ‘transform’ on the naming of the layer,
This means this Layer is now Keyframe ready.
To start, make sure you’re on [Operation] Tool > under [Object] Sub Tool
On the [Tool Property] > Under the [Transform] Options
Let’s go here to [Layer Opacity]
Before we begin, make sure you check your Keyframe Interpolation.
We will be working on Light_1 layer using [SMOOTH] interpolation.
Now drag your Playhead to the very beginning of your timeline.
FRAME 1 – Add a [Layer Opacity] keyframe
If you want to see your keyframes on the timeline, click the + icon beside the Light_1 layer.
Now we go to FRAME 6th and go back again to [Layer Opacity]; move this slider to atleast 50% -- and it gets a Keyframe.
Now on FRAME 12 let’s make this value back to 100; it automatically gets a Keyframe by just moving the slider.
Ok.
Try playing that.

Light is changing Opacity, right?
Let’s continue.
⭐ If you want to Copy and Paste some Keyframes.
You have to select the Keyframe > Right Click Copy > then Go to the time that you want > Right Click Paste
OR
⭐ Select the Keyframes that you want to COPY;
For example, the 50% and 100% > Hold ALT on your Keyboard
Drag the Keyframes to the location that you want.
And just let go.
We now Copy Pasted our Keyframes.
Ok.
Let’s try playing this again.

Looks good.
Good Job.
Again,
Move the end Keyframe to the very end of the timeline, especially if you want to make a loop.
Why do we need to do that?
⭐ Because the beginning Key is half a frame and the ending Key is the same value but is playing at 1 frame. And so the same value is playing at 1 and a half frame.
That’s kinda long, especially if you're aiming loop.
⭐ And so when we move the ending Key to the end of the timeline, it’s now half a frame, the same with the beginning.
Making the two keyframes (First and Last) with the same value to play at one frame.
OK?
And then I just move the other keyframes to be aligned with the marks on the timeline because it was bothering me and it makes the time more synchronized.
When you play this:

The change is subtle but it helps if you want to create a loop without having a freeze frame.
ANIMATION: Light_Ver2
Now let’s make Light_2
We’ll animate these lights at the back.
This is the Light ON and OFF
Again, make a New Raster Layer or CTRL Shift N; rename this as Light_2
Get your [Gradient] Tool > [Foreground to Transparency] > Shape; [Ellipse]
*At this point, you should still have the same Foreground color as the Street Lamp.
***I don’t know how to explain this in English.
Make alternate small lights for these at the back.
Alternate!
✦ OPTIONAL: Change the Blending Mode to [Color Dodge] or whatever Lighten or Contrast Blending Mode you want.
✦ You can change the Hue if you want as well.
Just go to Hue and Saturation or CTRL U on your Keyboard > change the Hue Slider
Now, make a New Raster Layer again; CTRL Shift N on your Keyboard;
Rename that as Light_2 1 – this layer will be for the alternate light that we skipped on earlier.
Get your Gradient Tool > Foreground to Transparency > Shape Ellipse and just add Gradient on the remaining Lights.
---------------------------------------------------------
Now we animate.
Click on [Enable Keyframes on this Layer] on both Light_2 and Light_2 1
Make sure your on [Operation] Tool > [Object] Sub Tool > On the [Tool Property] > [Layer Opacity]
BUT WAIT.
Change the Keyframe Interpolation; right here. This arrow. Click this; change this to HOLD.
⭐ HOLD Interpolation Holds the Keyframe until you change it to another value.
And so we’ll be using HOLD for this Light.
Let’s start now. Make sure you’re at the beginning of your timeline; FRAME 1.
On Light_2 – add a Keyframe at 100%
On Light_2 1 – add a Keyframe at 0%
Now we move; let’s go to FRAME 7.
On Light_2 – change the value of Layer Opacity to 0%
On Light_2 1 – change the value of Layer Opacity to 100%
Let’s try scrolling our Playhead.
See?

⭐ Let’s talk about Hold Interpolation for a bit.
Let’s hide the Light_2 1 layer
On Light_2
The value of the 1st frame is 100% and it will HOLD that value until the next keyframe of a different value which is here on 7th which is 0%
Ok? Simple right?
Now let’s unhide Light_2 1
And just Copy and Paste these values
⭐ Select the Keyframes and Hold ALT on your Keyboard
Drag the keyframes to your desired location
Make sure to do the same with Light_2 layer!
That’s it.
Play that:

ANIMATION : Blinking
Let’s go now to Blinking
We’ll work on the Eye Expressions that we did earlier.
Click [Enable Keyframes on this layer] on both Open_Eye and Close_Eye.
Make sure you’re on [Operation] Tool > [Object] Sub Tool > Under the [Tool Property] > [Layer Opacity]
We will stay at HOLD interpolation by the way.
Ok?!
To begin adding keyframes.
⭐ We don’t necessarily need to always start at the beginning of the timeline, okay?
We can start at somewhere random, example at FRAME 5
Let’s add a Keyframe for Open_Eye and Close_Eye on FRAME 5
The animation will start with Pochi’s eyes open.
Open_Eye will be 100%
Close_Eye will be 0%
Then we’ll move to the FRAME 9; because Pochi will blink now.
So, Open_Eye will be 0%
And Close_Eye will be 100%
Let’s scroll that:

Can you see? Simple right?
Let’s continue, ‘cause Pochi needs to open her eyes
Let’s say frame 11;
Open_Eyes will now be 100%
And Close_eye is now 0%
Let’s play that:

Pochi wants to blink again?
Copy paste these two keyframes on Close_Eye; 100% and 0%
Copy paste these two as well from Open_Eye; 0% and 100%
⭐ Again; select the keyframes > Hold ALT and drag to copy and paste.
*Make sure to do the same with Open_Eye layer.
Let’s play that.

Okay. That’s it. It’s pretty simple right?
⭐ Let’s recap that.
FRAME 21 – If Pochi wants to Blink
Open_Eyes must be 0% or hidden.
So that Close_Eyes will be visible or 100%
And when Pochi wants to open her eyes
FRAME 23 – Close Eyes must be hidden now
So that we can turn Open_Eyes visible.
Did you get it?
Let's try playing that now~

And now Pochi blinks
(she's blinking a lot...)
EXPORTING Animation.
For exporting animations; my most preferred method is Image Sequence.
I prefer doing the GIF and Movie on my own so I can control everything.
To export;
Go to [File] > [Export Animation] > [Image Sequence]
Image sequence will export my animation Frame by Frame; so it will be images and not a video type.
These settings looks intimidating, but just make sure that you select your Export destination.
Check your image type; Jpeg is okay.
Check your size.
Also check your frames and frame rate.
Then just click OK when you’re done.
The images will then be on the folder destination, and you can throw these at whatever software you have that can do GIF or video editing.
I usually make GIF on Photoshop.
Movie or Video on Premiere Pro.
There are online sources too
For GIF; https://gifmaker.me/ and https://ezgif.com/maker
For Video; you can try using MakeAVI http://makeavi.sourceforge.net/
Or Easy video maker https://www.easymakevideo.com/
DONE! | Files to download | Next exercise →
Okay! That’s it for this Beginner Basic exercise.
Next exercise will be Beginner Animation; we’ll talk about Anime Blinking.
Some simple mouth movements, simple hair animation. Working with shadows and lights. Importing and using stock footages and we’ll also handle some problem solving, okay?!

That will be very long so hang on.
Again, the files for POCHI are here below
Feel free to download them so you can try these out yourself.
⭐⭐ THE NEXT TOPIC WILL BE DELAYED ⭐⭐
I had a little medical emergency.
The next topic is already recorded, just need to assemble them.
I really wanna share the next topic cause it's really cute and easy!!
(ノ◕ヮ◕)ノ*:・゚✧ ✧゚
PLEASE WAIT FOR IT!
Stay Safe, Wear a Mask. Wash your hands.
I’ll see you on the next topic.
Cheers!
Users who liked this post


Comment