Kaleidoscope in movie

-
 MVP ◆This user has contributed greatly to the management of the community, by posting many great responses to the questions asked. Once every three months, MVPs are determined based on the points earned during that period and will be recognized accordingly.
 -
 New Valuable Player (NVP) ◆These are the next-best contributors to the community after MVPs. This is awarded to users who have not yet won an MVP award, based on the number of points they have earned.
 -
 Official Expert ◆Chosen out of all MVP awardees, who are already proof of excellence, this is a testimony of outstanding correspondence in the community. After careful screening, they are appointed by CELSYS and assume their position.Note: Formally called “Evangelists”
 -
 CELSYS official moderators ◆Moderators are official CELSYS staff members who are fluent in Japanese as well as various other languages. As moderators are not experts on software or creative work, they will not be able to directly answer your questions. However, moderators will provide communication and language support to ensure that everyone can smoothly communicate with each other.
 -
 CELSYS officialThis is the official administrator account.
It is an animation using a file object that is a movie processed like an illustration.
It is a continuation of the previous "Kaleidoscope"
I made a "kaleidoscope" using a movie
The frame rate is 8, but it's painful (8 seconds)
It is important to reduce the number of colors in order to make a movie an animated GIF of 10 MB or less.
However, the number of colors is not actually reduced as much as it looks.
Prepare a movie
You need to prepare a movie for "Kaleidoscope"
It's good to shoot somewhere from now on, but it's a hassle at night and I couldn't think of what to shoot, so I gave up.
I remember taking a picture of the scenery seen from the Shinkansen a few years ago.
I thought it was just right because it was a small size (640 x 480px)
There is no long one as the soundproof wall will quickly obscure anything.
Load a movie
This time, we also include an experiment to eliminate missing dots in the selection range.
Create a "new illustration" of (480 x 480px)
Display "Grid"
Set "Grid ruler origin" to (center) in "Grid ruler settings"
Set the "Grid setting" interval to (120) px and the number of divisions to (4).
Changed interval to 120 instead of 100
Load the movie on the canvas
Select "Movie" from "Import" in the "File" menu.
It seems that "movie" is also treated as a file object
Create a "New Timeline" in the "Timeline" palette
Set the frame rate to (8) and the playback time to (8 + 0).
Determine the display position of the movie
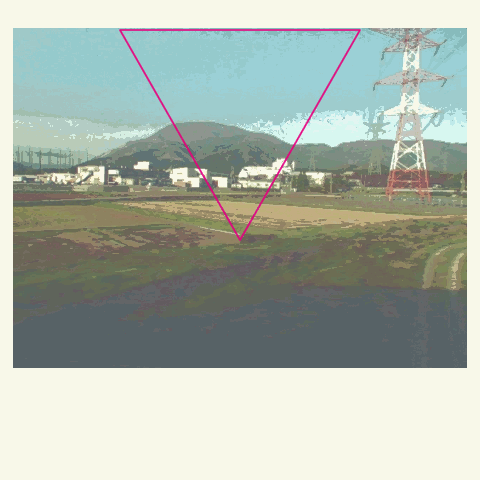
First, draw the range displayed as the Kaleidoscope.
Draw a red triangle on the vector layer (line color is free)
Draw a triangle connecting the points "center", "120px from the center to the left and 210px above" and "120px from the center to the right and 210px above".
It looks like an equilateral triangle, but it's a similar isosceles triangle.
It only plays for 8 seconds, so look for a good-looking start.
I shifted the movie so that it starts from the part where the tower crosses
Resize the movie so that the tower crosses the triangle nicely
"Expansion rate" was set to (71)
Press the "Enable Layer Keyframes" icon on the "Timeline" palette
"Keyframe spacing" does not repeat, so it doesn't matter whether it is "constant velocity" or "smooth"
"Add keyframe"
The "Magnification" of the "Tool Property" palette has been changed without permission.
Is it a malfunction?
Shows the end of the playback frame
Moved the position of the movie to (80) with "magnification" so that the tree is at the center.
You can correct the deviation of the "magnification rate" value, but it will not be corrected.
Of course you can fix it
Adjust the color by reducing the number of colors
Add "Tone Correction Layer" above the "Movie" layer on the "Layer" palette.
Select "Gradation" from "New Tonal Correction Layer" in the "Layer" menu.
Set "Gradation number" to (6) (not 6 colors)
Set the "Composite Mode" of the layer on the "Layer" palette to "Brightness" at the bottom.
This is a big discovery!
If you select "Gradation", things that are familiar with the color will be sandwiched.
I solved it by selecting "Brightness" in the layer composition mode.
This can be used! !! !!
"Black" is created by "gradation"
I tried to suppress it with "Gradient map" of "New color correction layer" of "Layer" menu.
Check the "Mixing ratio curve" of the "Black to white" gradation map.
Raise the "left node". Keep the original state from the center to the right as much as possible.
This also sets the "Composite Mode" of the layer on the "Layer" palette to "Brightness" at the bottom.
Adjust the overall color with "Hue / Saturation / Brightness" of "New Tone Correction Layer" in the "Layer" menu.
There is "gray", but it seems strange
I would like to add color here
Select "Tone Curve" from "New Tonal Correction Layer" in the "Layer" menu.
Select "Blue" and lift the "dark area" on the left
Keep the area from the center to the right close to the original state.
Save the file name as (480 x 480.clip)
Close the canvas
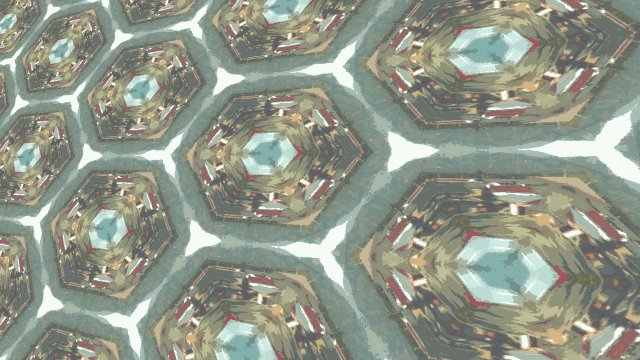
This is the animation so far
The triangular part is the part displayed by the kaleidoscope
Create a file for tiling
Create a canvas (720 x 840px) with "New Illustration"
Display "Grid"
Set "Grid ruler origin" to (center) in "Grid ruler settings"
Leave "Interval" in "Grid Settings" at (120) and "Number of Divisions" at (4).
Select "Create File Object" from "Import" in the "File" menu.
Load (480 x 480.clip)
Appears in the center of the canvas
Duplicate the (400 x 400) layer on the "Layer" palette to make 6 layers.
Select the top layer
Select the line according to the triangle of the canvas with "Line selection" with antialiasing of "Sub tool" turned off.
"Layer mask"
Choose the second layer
Select "Object" in "Sub Tools"
Set "Rotation angle" on the "Tool property" palette to (120).
Select the line according to the triangle of the canvas with "Select line" of "Sub tool".
"Layer mask"
Choose the third layer
Select "Object" in "Sub Tools"
Set the "Rotation angle" of the "Tool property" palette to (-120).
Select the line according to the triangle of the canvas with "Select line" of "Sub tool".
"Layer mask"
Choose the 4th layer
Select "Object" in "Sub Tools"
Press the "Flip upside down from the center of rotation" icon on the "Tool Properties" palette.
Select the line according to the triangle of the canvas with "Select line" of "Sub tool".
"Layer mask"
Choose the 5th layer
Select "Object" in "Sub Tools"
Press the "Flip upside down from the center of rotation" icon on the "Tool Properties" palette.
Set "Rotation angle" to (120)
Select the line according to the triangle of the canvas with "Select line" of "Sub tool".
"Layer mask"
Choose the 6th layer
Select "Object" in "Sub Tools"
Press "Flip upside down from the center of rotation" on the "Tool Property" palette.
Set "Rotation angle" to (-120)
Select the line according to the triangle of the canvas with "Select line" of "Sub tool".
"Layer mask"
Combine the duplicated file objects in the "Layer" palette into one folder
Named the folder "Center"
- Please save it as (720 x 840.clip) here. I forgot to attach it. sorry
Hide Atari's triangles and line up the hexagons on the canvas
Open (400 × 400.clip)
Hide the "Triangle" layer in the "Layer" palette
"Save" and close the canvas
When I return to the canvas I'm creating, I think the "triangle Atari" has disappeared.
If it has not disappeared, select "Update All File Objects" from "File Objects" in the "Layer" menu.
Close the folder on the "Layer" palette and duplicate the folder
Arrange the hexagons without any gaps
Press "New Timeline" on the "Timeline" palette
Set "Frame rate" to (8) and "Playback time" to (8 + 0).
Save the file as (720x840.clip)
Close the canvas
Animated GIF so far
You can see the tower crossing. The second half is messed up.
Since the file size is already large, it is reduced
I couldn't confirm it because it was reduced, but the missing dots were also fixed.
A kaleidoscope of 8 seconds!
Create a canvas (1280 x 720) with "New Illustration"
Select "Create File Object" from "Import" from the "File" menu.
Open (720 x 840.clip)
(720 x 840.clip) is displayed while sticking out to the center of the canvas
Set "Sub Tool" to "Object"
Set "Transformation Method" on the "Tool Property" palette to "Free Transform"
Check "Tiling"
Manipulate the points at the four corners of the file object on the canvas to add a cool perspective.
Create a "New Timeline" in the "Timeline" palette
"Frame rate" is (8), "Playback time" is (8 + 0)
Save with the file name (Kaleidoscope 8 seconds Shinkansen edition .clip)
The finished animated GIF
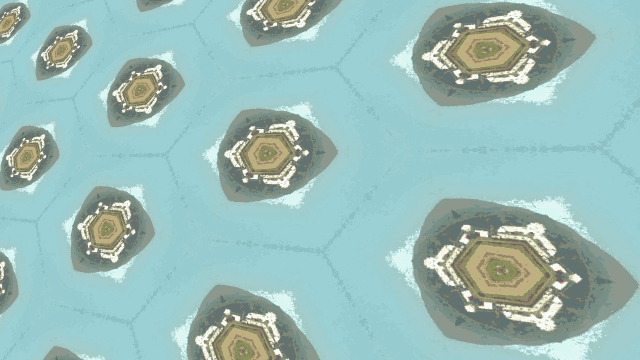
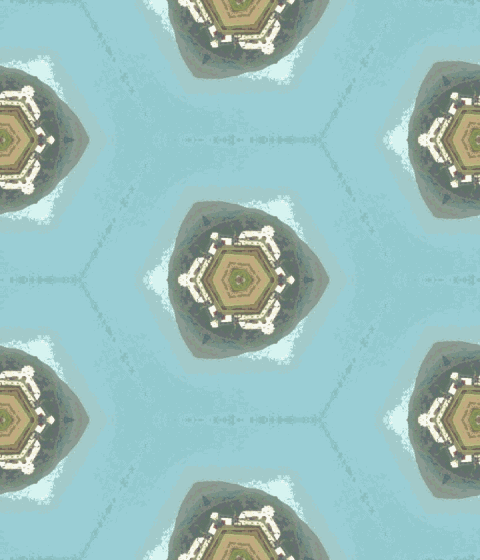
With no dither but no color reduction (480 x 480)
With the actual size illustration flavor reduced color version (PNG image) of the Kaleidoscope when completed
Arrange full-color (PNG images)

summary
If you don't need an animated GIF (probably most of this)
You don't have to lower the frame rate, worry about playback time, or reduce the number of colors.
You can make it mp4 without thinking about anything
You can create a Kaleidoscope as it is
Or rather, it may be almost impossible to create a Kaleidoscope using CLIP STUDIO PAINT.
I think that you can create it quickly with the editing application for it
What is this summary! !!
It has become a trilogy, but what I want to do is to play with CLIP STUDIO PAINT.
It all started when I wrote a kaleidoscope and something appropriate in the movie ... well, that's the way it is.
Thank you for watching
Users who liked this post


Comment