Animation Overview: Basics of Animating in Clip Studio Paint
Introduction and Tutorial in Video Format
Hi there! My name's Sarrah, and this tutorial is going to cover the basics of animation in Clip Studio Paint. I'll have additional tutorials up soon that dive into more detail!
Here's the animation overview tutorial in video format. There's also a full text version below.
Cels, Frames, and Frame Rates
First, let's talk about some definitions.
One second of animation is divided into a series of frames, and the image being shown can change each frame. The number of frames in one second of animation is called the frame rate.
The image above would have a frame rate of 4, for example, because one second is divided into four frames. The frame rate is also called the FPS, or frames per second.
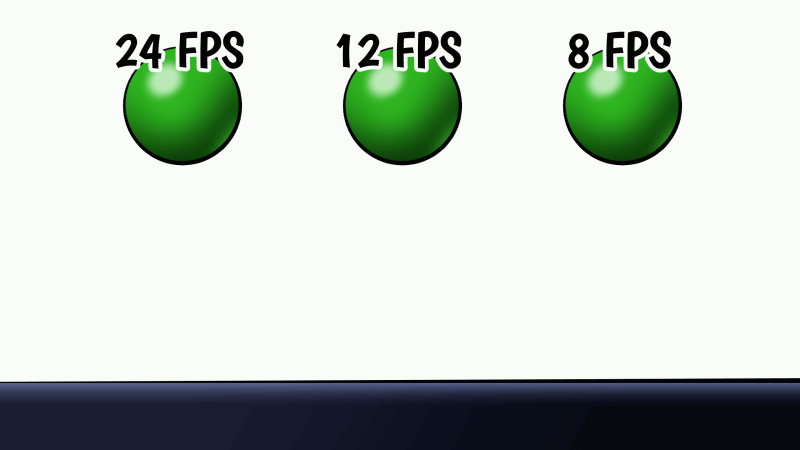
24 FPS, or frames per second, is common in hand-drawn animation. A lower FPS like 12 or 8 is choppier, but that might be the look you want.
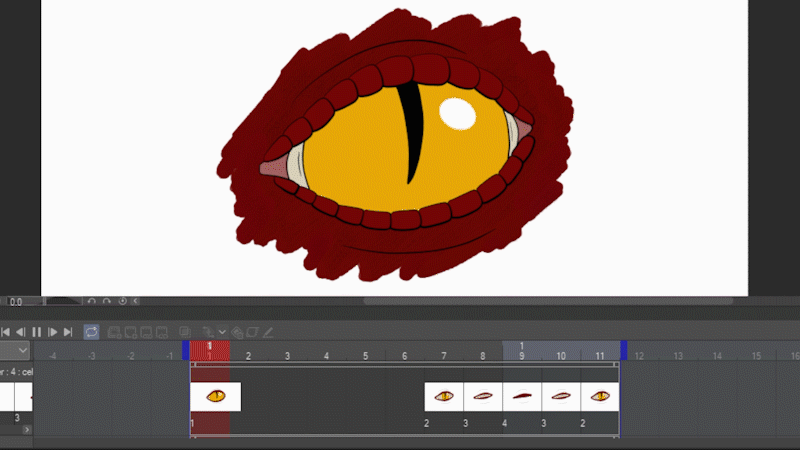
A cel is an individual image in the animation. You can have a cel on every frame, or you can make a cel last more than one frame if the image doesn't need to change.
With that sorted, it's time to jump into Clip Studio Paint!
Create a Blank Animation File
To start a new animation file, go to the File menu and choose New.
Next to Project, select Animation. (It's the icon that looks like a play button within film.)
The New Animation dialog box has a lot of options, many of which have to do with setting up guides and blank working space that won't be exported with your animation.
For the sake of this tutorial, I'm leaving most of the settings as default, just changing the frame rate to 12, and the playback time to 12 frames. Click OK to create the animation file.
IMPORTANT NOTE: Clip Studio Paint Pro is limited to 24 frames per timeline. Clip Studio Paint EX, on the other hand, allows an unlimited number of frames.
The Timeline
You control your animation using the Timeline.
It may already be at the bottom of your screen, but if you don't see it, click on the Window menu and choose Timeline.
You'll start with a single cel of animation nested in a clip that spans your entire playback time. I'll talk more about clips shortly. The playback time is indicated by blue brackets. The currently active frame is indicated by the red playhead.
You can click and drag the blue brackets to change the playback time*, and you can click and drag the red playhead to change the currently active cel.
*Again, if you're in Clip Studio Paint Pro, you will not be able to drag past frame 24.
To zoom in, you can either use the magnifying glass buttons, or hold down Ctrl (Cmd on a Mac) and the spacebar while you click and drag. Dragging left zooms out, and right zooms in.
TIP: If your animation is long, you can also hold down just the spacebar to bring up the hand tool. You can then click and drag to navigate.
Your cel is actually a layer inside of a special Animation folder in your Layers panel.
Cels get numbered by default, but you can change it to whatever you want in the Layers panel. I've renamed it to "Bird 1". It's a good idea to leave a number at the end; you'll see why in a moment.
Example Animation and Onion Skin
The clip is a container that does two things: One, it groups a set of cels together, and two, it determines how long each cel will show. With the clip covering the whole animation, if I draw something on this first cell, it'll just show the whole time.
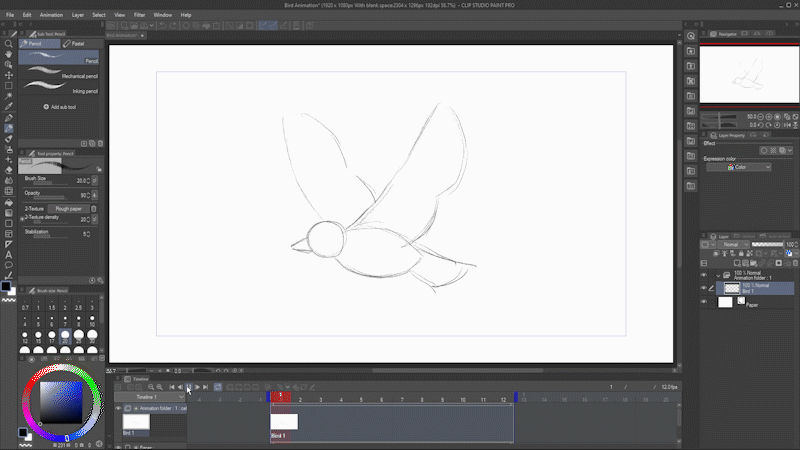
I'll make the clip shorter by clicking and dragging the handle.
Now, my drawing only shows for part of the animation.
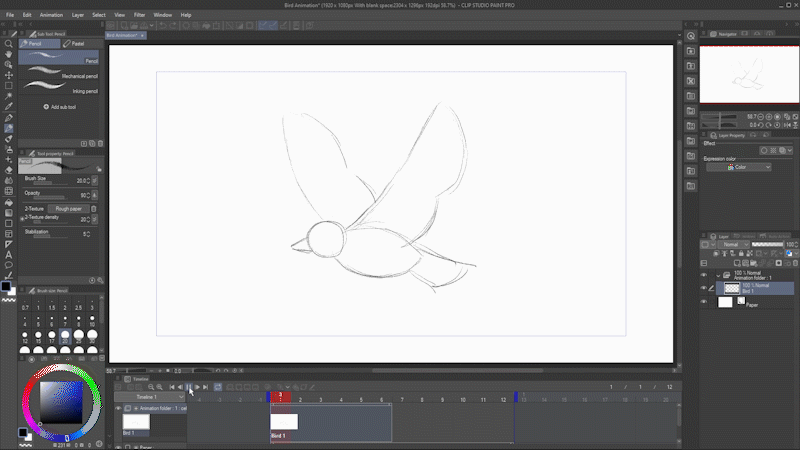
Drag the handle back out so the clip covers the entire playback time once more. Place the playhead halfway along the clip (frame 7) and click New Animation Cel to add a second cel on that frame.
Note that a new layer also appears, and CSP will try to give it an appropriate name automatically.
Hint: Auto-naming works best if you leave a number at the end of your cel names. Naming with just letters may produce unexpected results!
Click Enable Onion Skin.
Onion Skin allows you to see the previous cel in pale blue, and the next cel in pale green. Since we only have one previous cel right now, you can see it in blue.
Hint: Go to Animation -> Show Animation Cels -> Onion Skin Settings to change the colors and the number of frames shown.
I'll draw a second sketch here, using the faint Onion Skin view of the first cel as a guide.
Now, when I press play, you can see it switching between the cels.
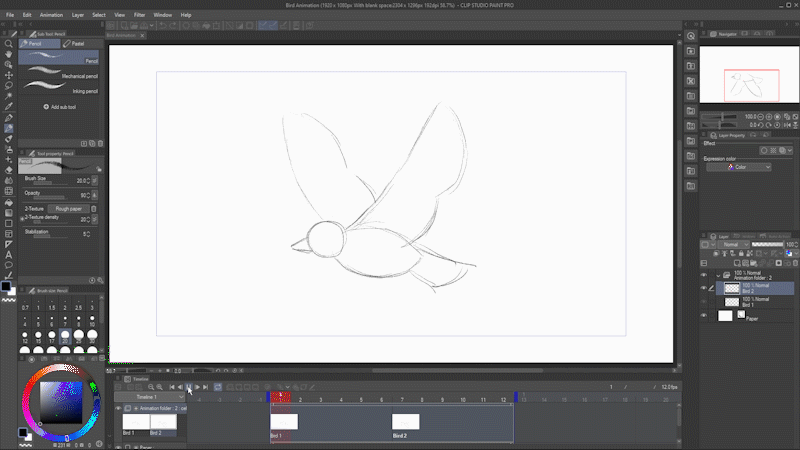
I'll add a new cel halfway between these two. Now that we have a cel on either side, you can see Onion Skin showing both the previous cel in blue and the next cel in green. I'll draw the new cel in-between using them both as guides.
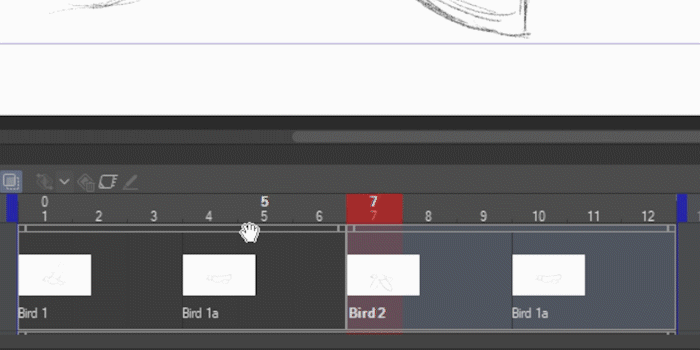
Hold down the Alt key while clicking and dragging to duplicate a frame. This is reusing the same cel, as you can see by the name.
Hint: That also means if you make a change on one frame that uses a particular cel, it'll be reflected in both. Remember, they are both the same layer!

You can delete a cell by clicking to select it and pressing Remove Cel. Be aware that the cel still exists in the animation folder, it's just no longer played on the timeline!
If you right-click on a frame in the clip, you can see all the cels in the animation folder; clicking on one will add it to the timeline.
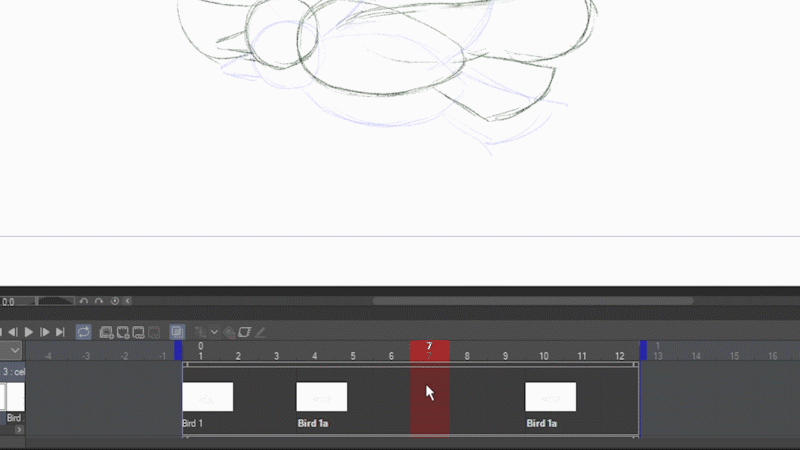
All of these cels are inside the same clip, which makes sense as they're all part of the same animated sequence. With multiple cels together in one clip, you can move them around as a group.

To create a separate clip, you can create a new animation cel AFTER any current clips on the timeline. (If it's before another clip, it will be added to that clip instead.)
You can split the current clip into two separate clips by right-clicking a frame and selecting Split Clip.
Now the cels in this separate clip can be moved independently.

To merge clips, hold down Ctrl and click to select multiple clips, then right click and choose Merge Clips.
Only one thing in an animation folder can show at a time, but you can create multiple animation folders. Click New Animation Folder on the Timeline's toolbar to add a second one.
Say I wanted to use my original drawings as references for my final animation. I'll turn on the layer color on the whole folder to change the color of all drawings within to blue (or whatever color you choose). I'll also turn the folder's opacity down.
Remember how I said only one thing in the folder shows at a time? It doesn't have to be a single layer. Folders work too!
A subfolder within an animation folder is considered a single cel. This is great if you want to keep your ink and color on separate layers.
Right-click on a frame in the Timeline. You'll see the folder's name as a cel you can add to the Timeline.
Here I've drawn the first frame of my bird animation using my original sketch as a guide, with the ink and color on their own separate layers.
The best part is, when you add a new cel to this animation folder, Clip Studio Paint will imitate the previous cel's folder structure.
Hint: Be sure to use the New Animation Cel button on the Timeline. It won't work if you just add a new layer in the Layer panel.
Using a combination of the Onion Skin feature and the sketches I made earlier as guides, I've added the remaining cels and finished up my bird animation.

Here's how the individual frames in the sequence look.
Non-Animated Backgrounds
You can use the Layers panel as normal to set up non-animation art, like your background.
All layers will still appear as clips on your timeline, so if you change the number of frames of your animation, make sure to adjust their clip accordingly so they don't disappear.
I'll paint in a simple background on this layer using Clip Studio Paint's pens and brushes.
Keyframes, Tweening, and File Objects
I want to have a tree move across the bottom of the screen as though the bird is flying past it. I could copy and paste the tree on different cels, but there's an easier way that lets the program do the animating for you: Keyframes!
Keyframe animation is a little different, because you don't need to create an animation folder. I've just drawn my tree on a normal layer.
NOTE: There's a LOT to cover with keyframe animation. I'm just going to cover the basics here, and dedicate an entire tutorial to it soon.
Select the tree layer on the timeline and click Enable keyframes on this layer.
Go to the Operation tool and select the Object subtool.
The layer is now being treated as a keyframeable object which you can move, rotate, and more.
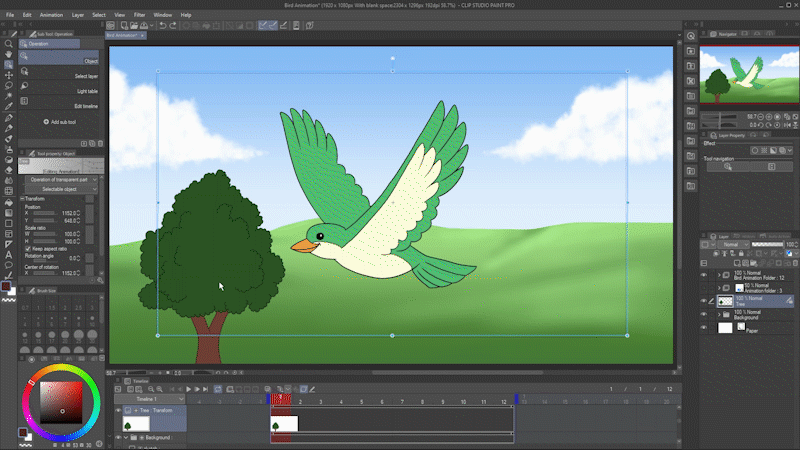
It'd be easier if the object was just the tree, though. Right-click on the tree layer and choose File Object - Convert Layer to File Object.
Make sure Area is set to Drawing Area and uncheck Keep Original Layer. Hit OK.
You'll be prompted for a save location. Save the file object somewhere convenient. The tree will be saved as a separate file by itself in Clip Studio's .CLIP format, so be sure you remember where you saved it!
You may see this notification with some useful tips about working with file objects in Clip Studio Paint. Read through it, and hit OK.
Now the tree is a separate file object and the bounding box surrounds it directly!
Because making the tree a file object technically created a new layer, you'll need to click Enable keyframes on this layer again.
Make sure your playhead is on frame 1. Click the Keyframe Interpolation dropdown, and select Create Keyframe: Linear Interpolation. Then, click Add Keyframe.

I'll talk more about this in a dedicated tutorial, but the interpolation type controls how your object moves between keyframes. Linear moves an equal amount every frame, smooth slows down the beginning and end, and hold just pops from one extreme to the other.
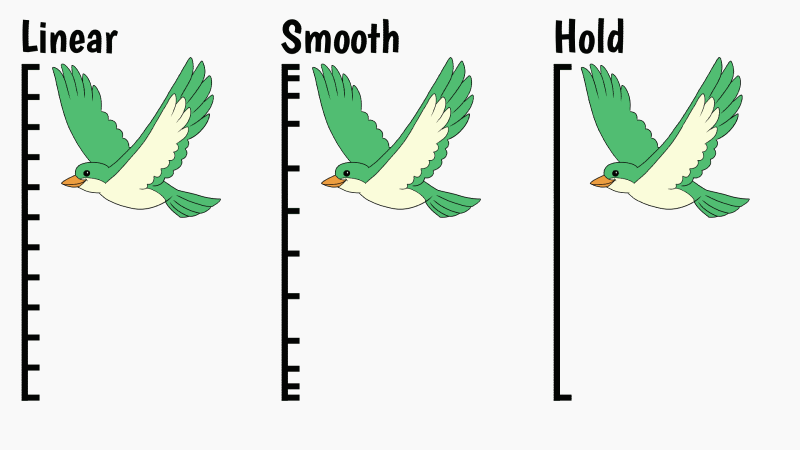
In this case, the tree's just going to go from one side of the frame to the other, no slowdown needed, so we want linear interpolation.
On frame 1, use the Object tool to move the tree outside of the animation.
Then, on the last frame, move the tree to the other side. Hold down Shift as you move it to keep it on the same horizontal plane.
When you have keyframes enabled on, moving the object will automatically add a new keyframe.
When you hit play, the program determines where to place the tree on every frame in-between the two keyframes. It's as easy as that!
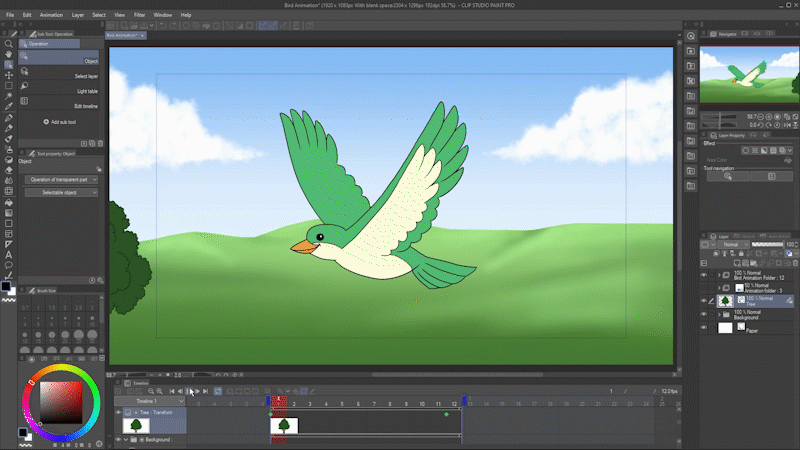
I want the tree to go a little slower, so I'm going to double the length of the animation to 24 frames. The easiest way to do this is to right-click on the last frame and select Insert Frame.
Fill in the number of frames you want to add - 12 in this case - and un-check Selected Layers Only so all the layers are affected.
Left-click the keyframe to select it and drag it out to the last frame to slow the tree's animation down.

I like the speed of the tree now, but I also need to repeat my bird's motion, since it stops animating after frame 12.

I'll click and drag to select all of my bird animation cels, then hold down the Alt key while I click and drag to duplicate them to the second half of the animation.

I've added a couple more trees the same way. With that, the animation is done!

Exporting an Animation
Now that you've made some fun animations, there's just one thing left - exporting. Fortunately, it's very easy! Go to File - Export Animation. You can choose an image sequence, animated GIF, animated PNG - called Animated Sticker (APNG) in the menu - or a movie in MP4 or AVI format.
Export Image Sequence
An image sequence gives you each frame of your animation as a separate, numbered still image.
They're great for long animations, so you don't have to start over at the beginning if something goes wrong during the export.
Note that you can also export a series of PNG files with transparency. As an example, you can use them in a video editing program to overlay on another video.
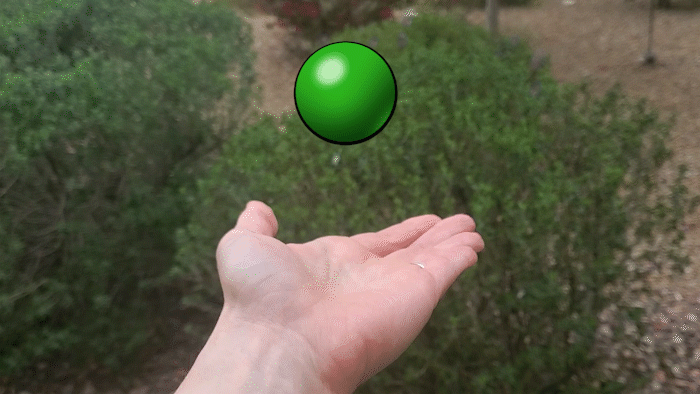
When you select File -> Export Animation -> Image Sequence, you'll get the following dialog.
Choose the folder you want to export to at the top.
Under File Name Settings, give your file sequence a name and choose how you want it to be numbered.
In Advanced Settings, choose the image type. You can export as PNG, BMP, JPEG, Targa, or TIFF. PNG is ideal as it retains a relatively small file size while still giving you full color, and it supports transparency.
In Size Settings, choose which part of the image you want to be exported (typically just the Output frame). Pick the width and height for your exported image sequence. I haven't covered 2D cameras yet, but if your animation uses one, make sure that box is checked. Otherwise, you can ignore it.
In Frame Export, select which frames you want to export. You can export all frames, or pick a specific series. If you're planning to use the result in a video editing or compositing program, make sure you set the export frame rate to match your final project so your animation plays at the right speed.
Hit OK, and your image sequence will be saved into the folder you picked.
IMPORTANT NOTE: My animation is 2 seconds long. In Clip Studio Paint, it's 24 frames at a frame rate of 12 FPS, but because I exported at a frame rate of 30 FPS, I get a total of 60 files in my sequence.
This is important because if I'm importing my image sequence into a video editing program like Premiere, and my project there is set to 30 FPS, the sequence will play at the right speed. If I exported at 12 FPS (resulting in 24 images in my exported sequence), it'd play much too fast in Premiere.
Export Animated GIF or Animated Sticker (APNG)
The settings for Animated GIF or PNG files are almost identical, so I'll cover them together. When you select either one, you'll be prompted to give a save location and name.
You'll then get the following dialog with save settings for Animated GIF.
Choose the dimensions, range, and frame rate of your file, and how many times it loops. You can just match the same frame rate as your animation.
The dithering option may make your exported file look better, but can increase the file size. Try it out if your colors or gradients don't look good without it.
As I mentioned, the options for Animated PNG are very similar, with only the Export Options box at the bottom changing.
The Delete Blank Spaces checkbox is only applicable if your animation has a transparent background, and will get rid of everything outside of the animation area. If you're not exporting with transparency, it doesn't matter if it's checked or not.
Color Reduction is similar to the Dithering option for Animated GIF - it will reduce your PNG to 256 colors, and may also reduce the file size.
So, when should you use GIF vs PNG?
Animated GIFs are more widely used, but the image quality is not great. Clip Studio Paint does not export animated GIFs with transparency.
Animated PNGs never gained wide support, though most modern web browsers will display them fine. The image quality is good, and they support full transparency.
Clip Studio Paint saves APNGs with the .PNG file extension. If the program you open with doesn't support them, you will just see the first frame instead of the full animation.
Export Movie - MP4 or AVI
When you export a movie, you'll be prompted for a save location and name, and you can also choose from two options - MP4 or AVI.
Choosing either one will give you slightly different options. The dialog for MP4 files looks like this:
Simply choose the width and height you wish to export, and the frame rate.
If you're uploading straight to social media or Youtube, you can just match your frame rate to your animation. Otherwise, like with the image sequence, if you plan to use the result in a video editing program, match your frame rate to your final project's settings.
And again, if your animation makes use of a 2D camera, make sure that box is checked.
As the note says, you're limited to a 1920px by 1080px file when you export as MP4.
The settings for AVI are similar, with a couple of additions.
You can export as AVI 1.0 or AVI 2.0.
AVI 1.0 is more widely supported but limited to videos smaller than 2GB in size. Your videos can be very large, as big as 7680px by 4320px in dimension.
AVI 2.0 can be larger than 2GB in size, but is not supported by as many programs. Your video's dimensions can be up to 3840px by 2160px.
AVI supports transparency in most cases, though it may not work with certain settings. The most reliable way to export video with transparency is to use an image sequence as described above.
Saving as AVI will also give you some compression options. You'll get the left dialog with AVI 1.0 and the right dialog with AVI 2.0.
AVI is most often used for the highest possible quality, and so you will likely want to export an uncompressed file. Therefore, I won't be diving into the compression options here.
Closing
That's the basics of animation in Clip Studio Paint! Like I said, I have more tutorials in the works. Please feel free to follow me here on Clip Studio Tips or subscribe on YouTube. Let me know if there's anything you'd like to see me cover, and if you found this useful, please tag me with your animations @MsRedNebula on Twitter or Instagram. I'd love to see what you come up with.
Happy animating!







Comment