How to use 【Shading Assist】 to draw the shadow of Webtoon
Welcome to turn on CC subtitles, but English subtitles are machine translation.
foreword
Shading Assist is a new function introduced by CLIP in version 2.0.
This article is based on my main requirement of drawing color bar manga (Webtoon),
To think about whether using the automatic shadow (Shading Assist) function will help me complete the work more smoothly, and I have made a test experience.
So when it comes to the automatic shadow (Shading Assist) function, the usage and suggestions are very subjective, but maybe it can bring you some references.
I also wrote an article about [Drawing Shadows] before, which helps to quickly integrate the subject of the picture into the environment. If you are interested, you can take a look.
By the way, the official introduction to the Shading Assist function
Content subject
How to tell the theme of this time actually gave me a bit of a headache, because I have to arrange the sequence of information in a reasonable way, otherwise it will make readers feel that the article looks messy, but if I start from the beginning, I won’t see the point for a while.
And I finally decided to quickly take a look at what I did with the [Shading Assist] function. It is also convenient for readers to consider whether to continue reading the article.
Basically it will produce an effect like the picture below. Produces cast-on, non-localized, non-subtle shadows.
Get started with a quick walk through the steps:
1. Original image
2. Use Shading Assist
Mainly need this layer of blue color block, layer blending mode - linear burn (linear burn)
(The layer blending mode can be adjusted at this time, or it can be changed later)
Lower the opacity when shadowing. (There is no way to adjust the transparency when Shading Assist makes layers)
3. Manually fine-tune the shadow range and change the color. (Refer to the right side for the changed color)
4. Turn off the shadow you just made, and continue to use Shading Assist.
This time I need the purple part for the light. (The focus is on the range, the color can be changed later)
5. Move the obtained purple block above the previously made shadow,
Change the color to yellow, and change the layer blending to screen (Screen) = スクリーン
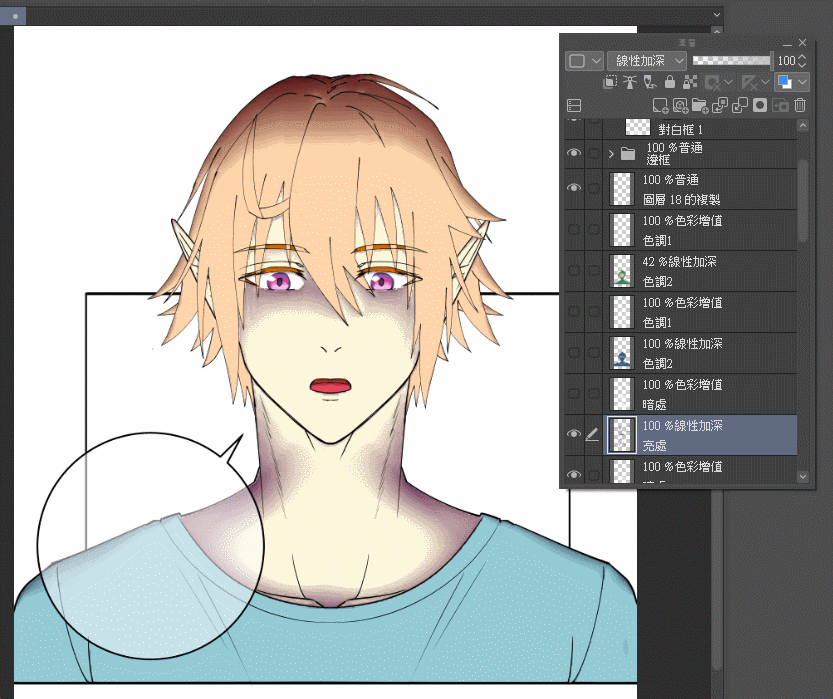
You will get the desired effect.
Then see if you want to add a few layers of shadows to the details. ↓↓
✨ To put it simply, I will use Shading Assist to create roughly the shadow block I want.
As for my personal suggestion, the key point to consider whether to use this function is-【How fast is the time for the user to modify the shadow】.
Easy to understand the automatic shadow (Shading Assist) function
For a more detailed introduction, you can slide up and read the official article.
I will use the ball here, and briefly talk about [my own] usage method.
You can also follow along,
The circle can be drawn with graphic tools, and the background color is separated from the circle (edge).
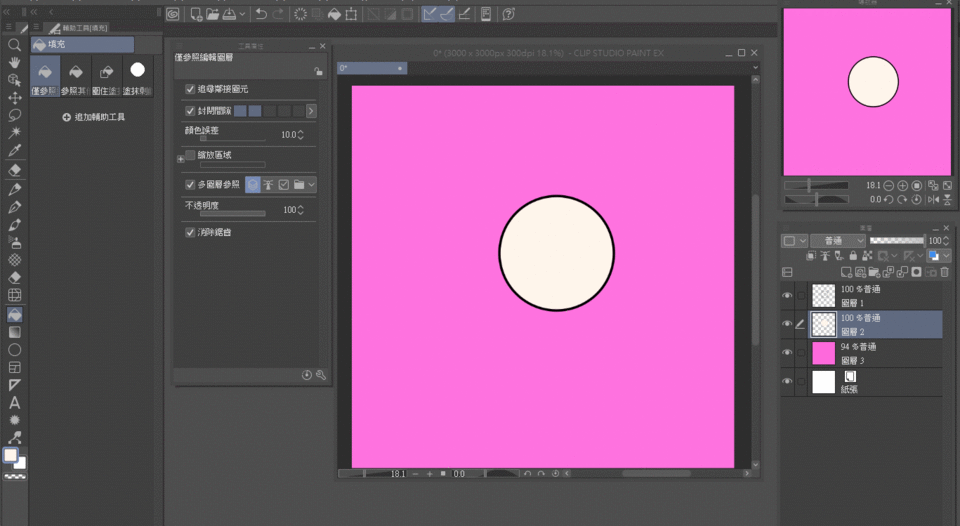
To use the Shading Assist function on the drawn circle,
It's still 1-2 steps away.
1. Set the edge (line draft) [set as a reference layer]
After the setting is successful, when you click on other layers, you can see the mark.
2. Put the line draft and background color under the same folder, and select the folder with the mouse.
p.s. In fact, neither of these two items is a rigid condition for using the function. (If you want to use it, you can directly select the base map)
    But it's a basic operation.

    Because when it is actually used, the base map must have more than one layer (with different colors), and the line draft may also have more than one layer.
Now, we can start using the automatic shadow (Shading Assist) function!
It can be found under the Edit field.
I use [Evening] from Preset as an example.
Because it can appear up to 4 colors.
✨ The blue center point, dragging can change the position of the light source.
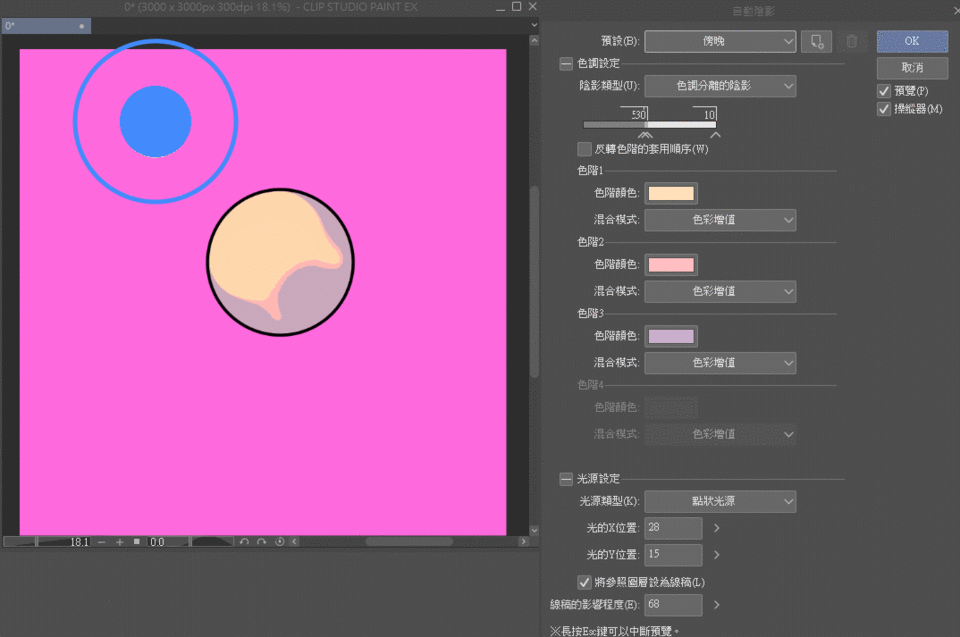
✨The outer blue circle is to increase or decrease the intensity of the light source
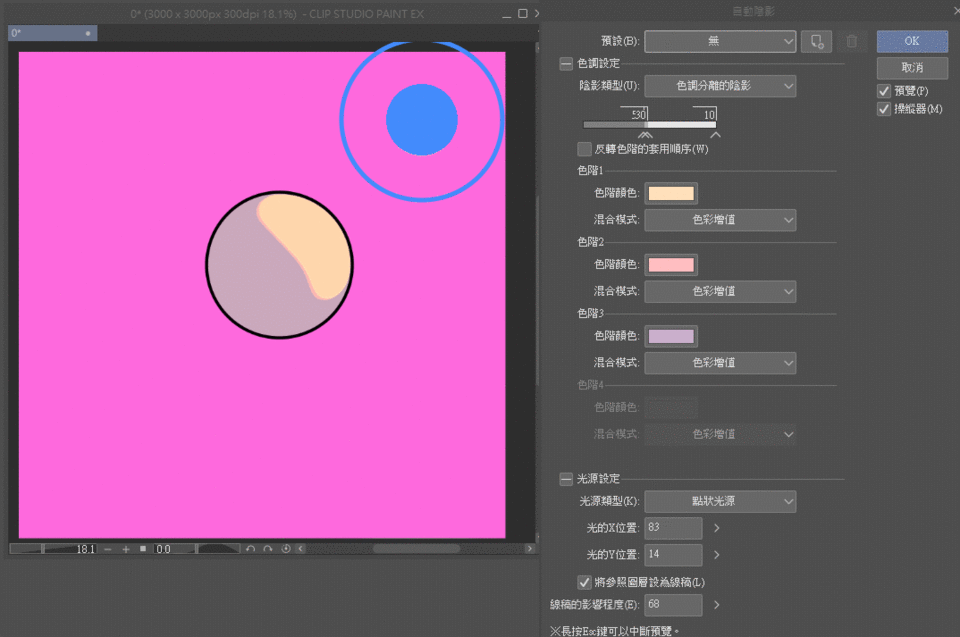
Pay attention to the panel, as the light source is different, the area of the divided color will also be adjusted accordingly.
Sometimes on the panel, the colors of level 3 and level 4 will not appear, which is the reason.
I changed the color so you can see it more clearly.
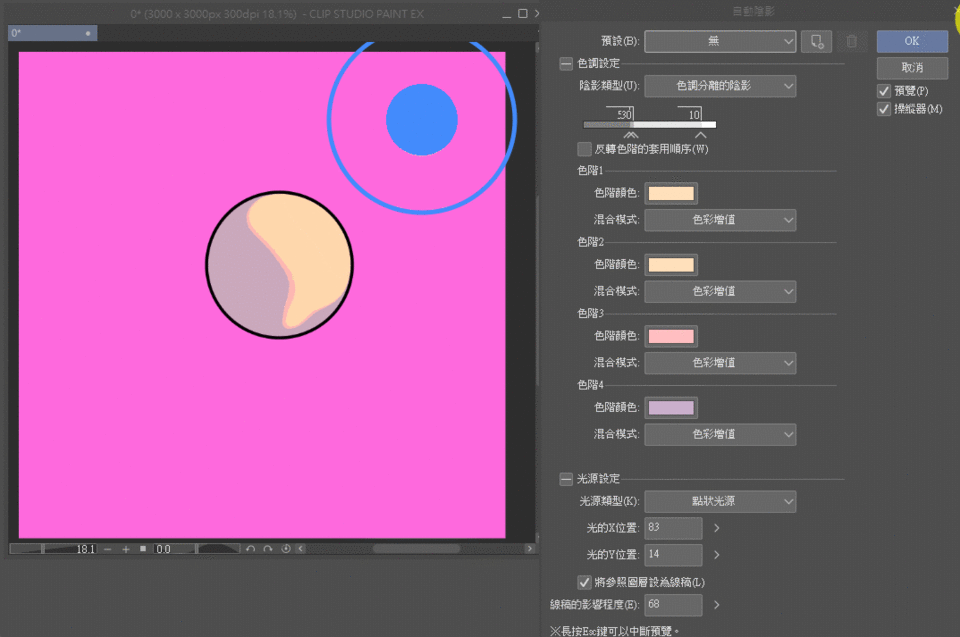
Press OK.
Since there are four colors, four layers will be generated above the folder.
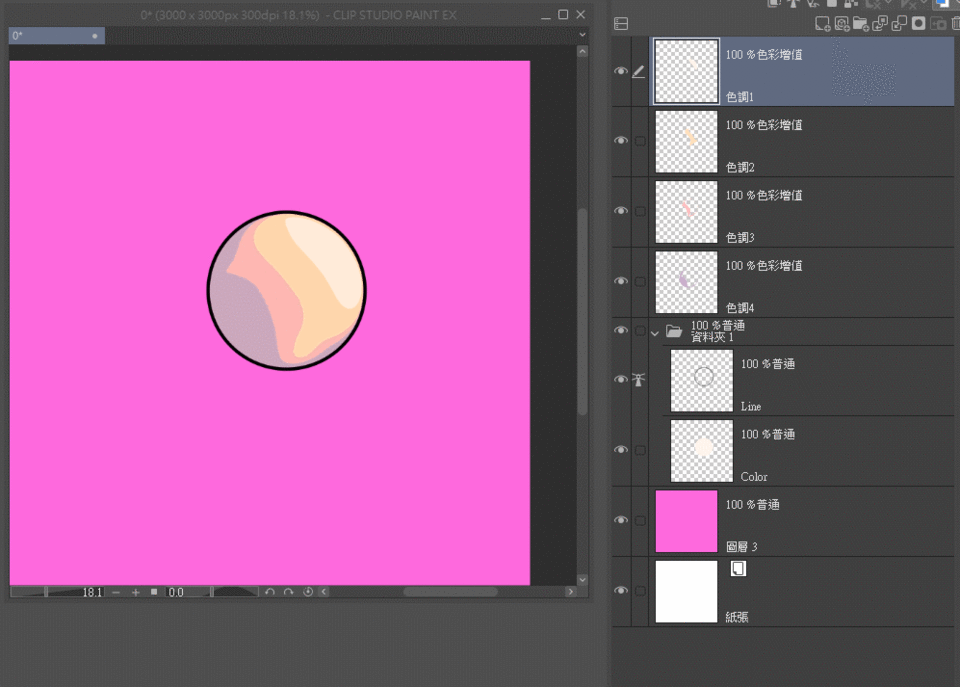
Because these four colors are divided into different layers, the block area does not overlap, so I think it is inconvenient to modify,
In the example at the beginning, when I need to use this function, I will only focus on calculating [one] the color block (layer) I need.
✨Set the reference layer as line art
(I remember that this default is [not ticked], you need to pay attention to it yourself)
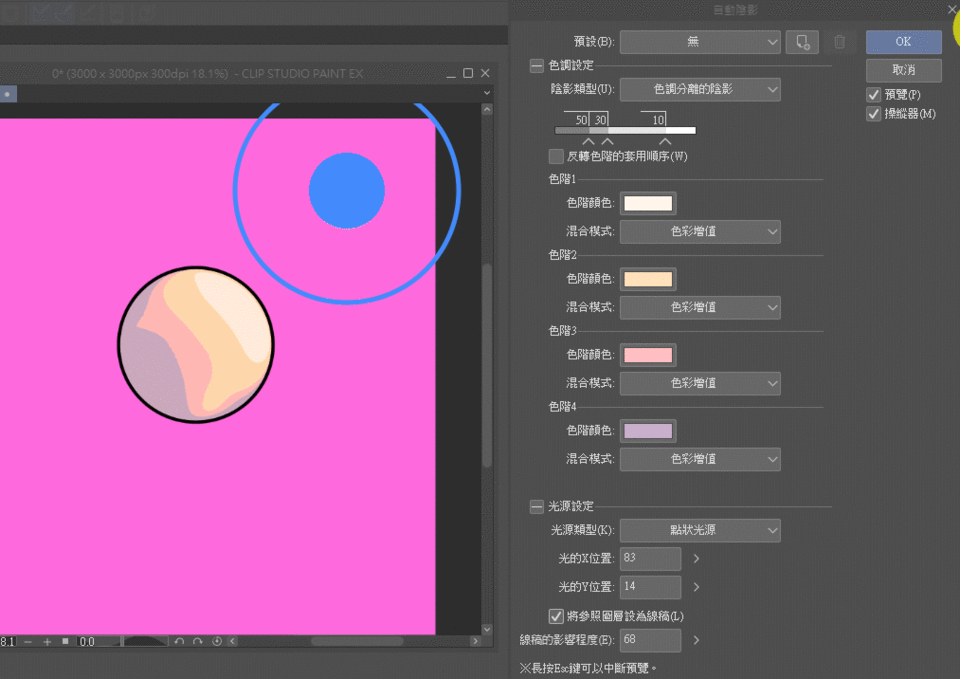
After roughly knowing these, you can start to use the automatic shadow (Shading Assist) function.
By the way, if the shadow type is selected as smooth shading,
Only two layers, Highlights and Shadows, will be generated.
Example one
Then use the example to understand the usage of the function.
On the right side, you can see the layer status of the current file.
I put the line draft and background color of the characters under the same folder.
【Set as reference layer】can specify a folder,
Therefore, multiple line art layers (Line) can be placed in one folder.
I don't want the line drawing of the eyes to be referenced, so I moved it out separately.
✨ An important point that has not been mentioned before,
Each block of the base color (Color) needs to maintain a single color, otherwise it will affect the automatic shadow (Shading Assist) function and the calculated effect.
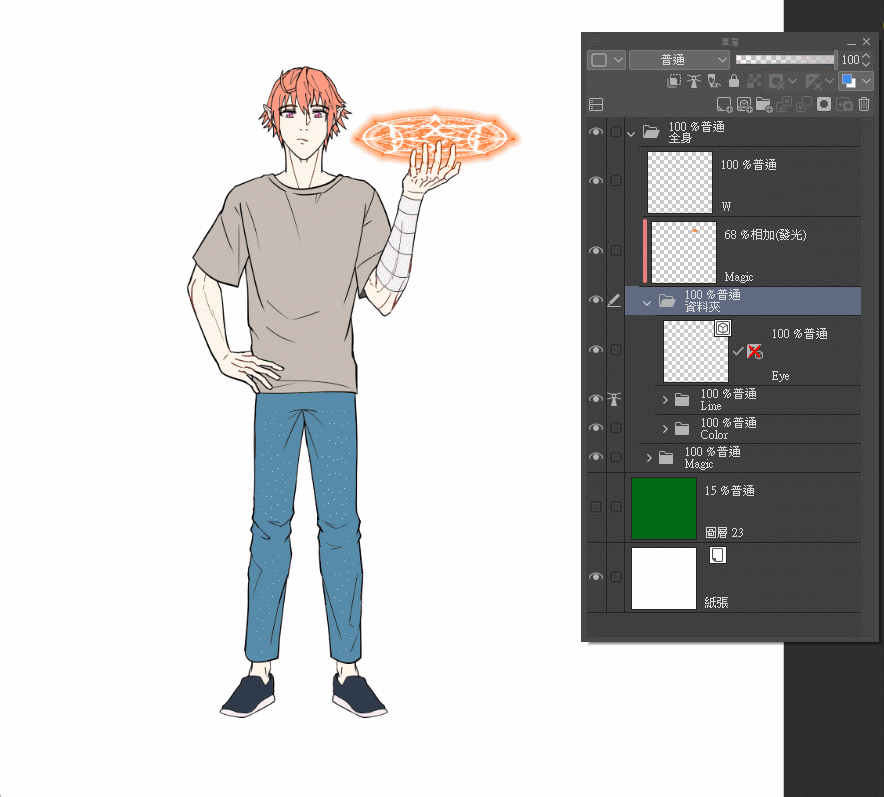
Turn on Shading Assist,
The data of the panel will stay at the data last used last time.
Because there is a magic circle in the example, I put the light source on the upper right.
For this preset (Preset), we choose Night.
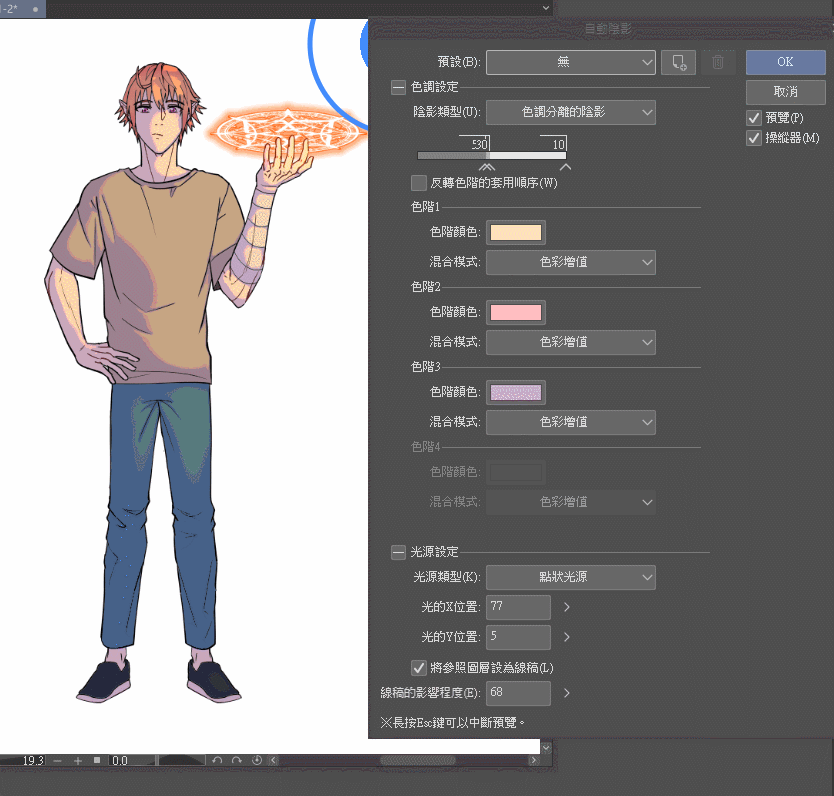
logically,
I want to get a light side and a dark side, two layers,
So when adjusting the strength and position of the light source, I focused on observing the range of bright and dark sides.
As for what color they are, it doesn't matter to me as I will change the color later.
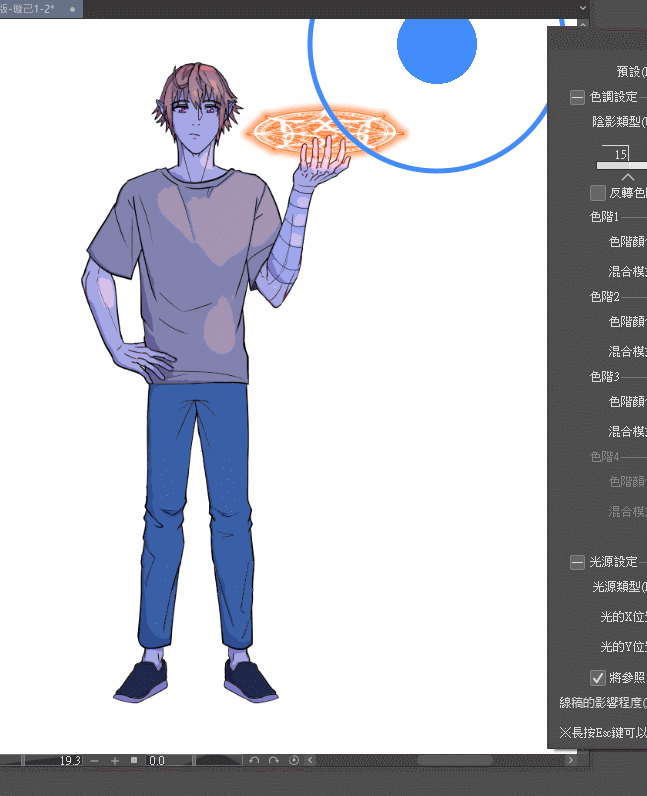
Press OK after adjusting to the desired effect,
We will get three newly created layers.
Light side, midtone, dark side.
Since the intermediate color layer is not needed, it can be deleted.
Then we recolored the light and dark sides, changed the opacity and layer blending mode.
Tips, want to change a layer to another single color,
You can [Lock transparent primitives] first, and use the shortcut key Alt + ←Backspace to change the color.
I fill the bright side with yellow, blending mode -- screen (Screen)
Dark side Fill purple, blending mode -- linear burn (linear burn)
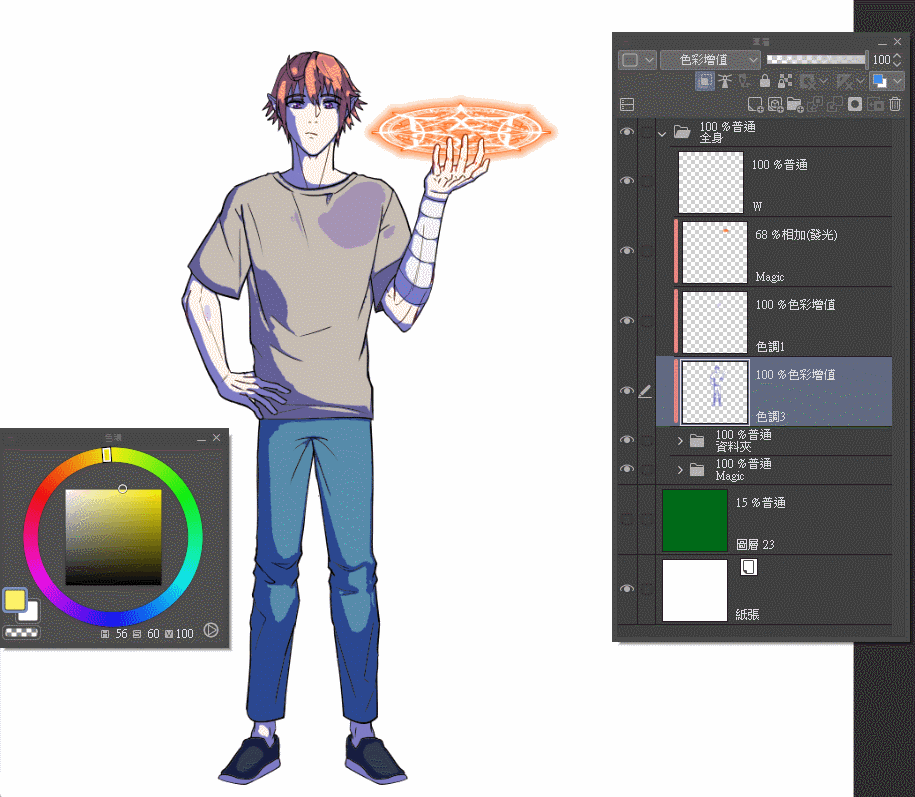
After that, the details are still slightly revised.
Finally, let's see if we need to add some details, and we are basically done.
Example two
When exposed to any new feature,
Faced with a bunch of data options that can be adjusted on the panel, it may be dizzying.
This part is mainly to give you a brief understanding of how I adjust the data options on the panel.
After the previous examples, readers should have a general understanding of my thinking on use.
I just need the function to create a bright or dark range for me, and I don't care about the color of the color block.
So sometimes, I end up needing only one layer too.
When using the Shading Assist function for the first time, you may encounter a problem.
[I want to make the dark side more, but my light source can no longer be adjusted down. 】
Now, to solve this problem.
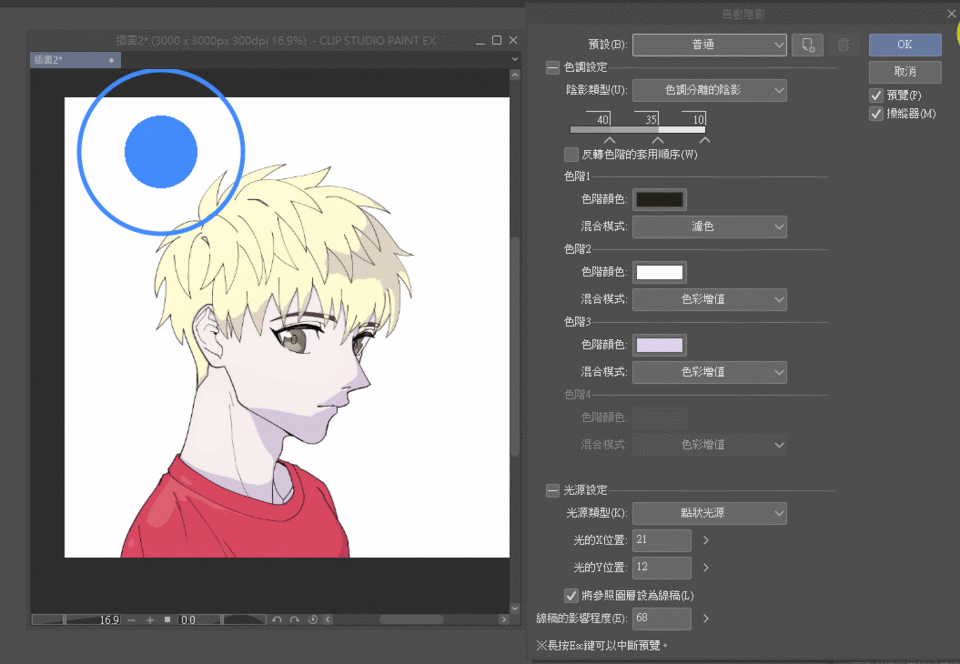
The range of the shadow cannot be increased, because the slider of the control item has been pushed to the end.
As long as there are more colors that can be controlled, the range that each color can be assigned is smaller, and the easier it is to be limited by the range.
Since I mostly only need to create a layer of shadow in my use, I can remove the unnecessary color range.
It will only produce two colors and two layers at most.
If you want to remove the extra color, you can choose anything by default.
Just remove the order of the colors, please start from the right, because we need to leave the darkest part.
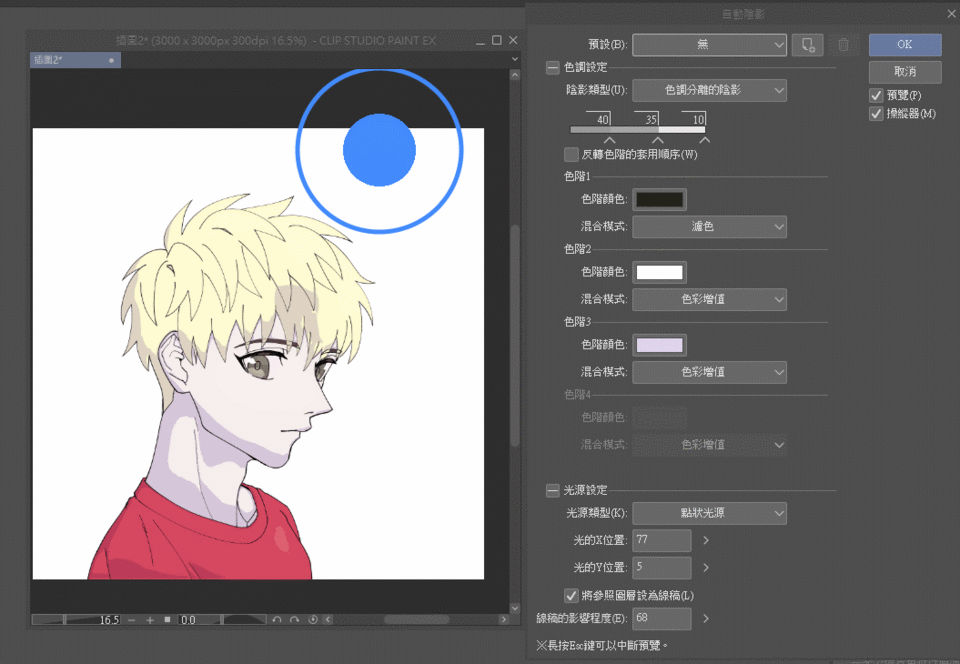
After making it, you can also save it as a new preset for next use.
actual use,
Sometimes the shadow does not need to be done in one step, you can combine the parts that you think look good.
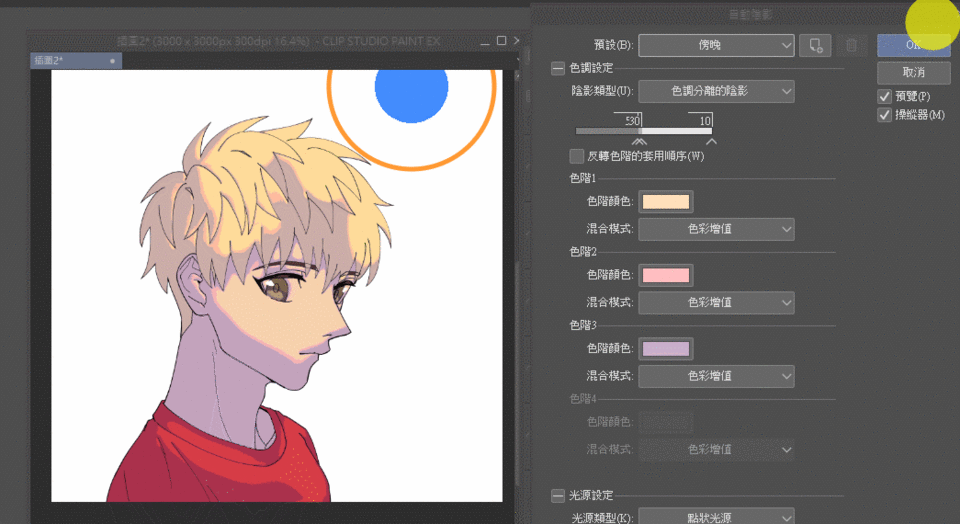
The next step is the same as the previous demonstration.
Modify the shadow range.
change shadow color
Add a little more detail as needed, and you're done.
other supplements
As I mentioned in the keynote, whether to consider using this feature depends on how fast the user can modify the shadow.
Because in some people's cognition, it is fast enough to draw such a large area of shadow by yourself.
Functions can make the creative process more convenient, so they need to be used.
So, below I will put a few other pictures of usage status for your reference.
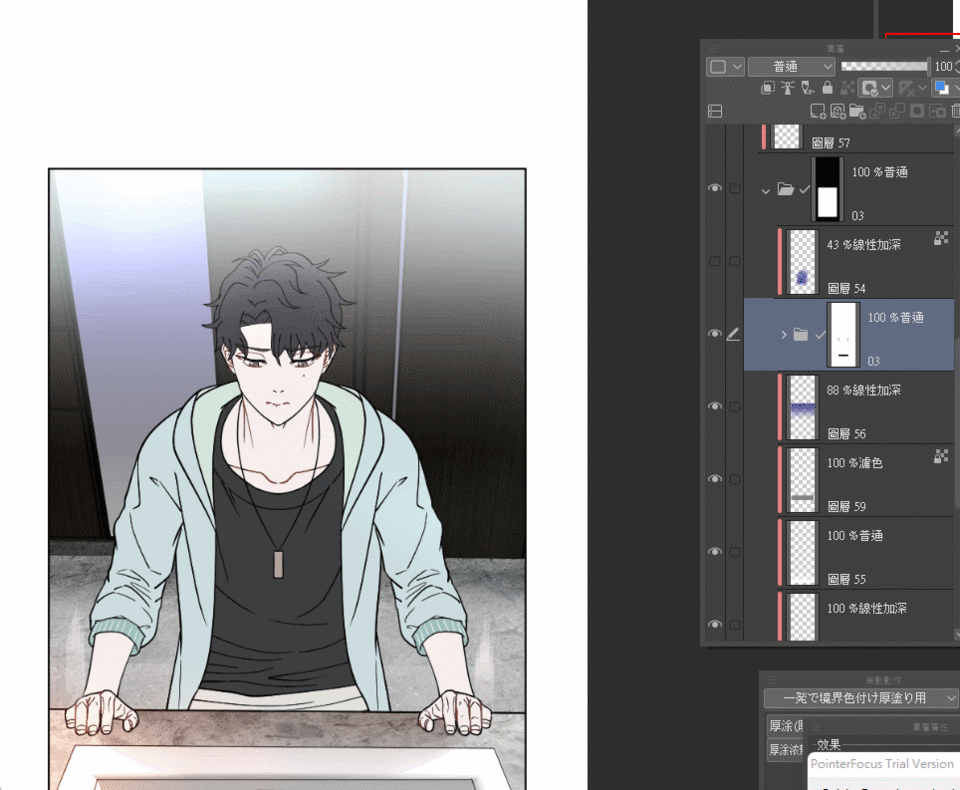
Comparison of light source types:
Point light source (Ball light)
Directional light
Comparison
Overall usage idea:
The point of manually modifying the shadow is to add a shadow to the joint between the head and the neck,
There is no need to force the software to calculate it for you.
as well as
The position of the light source can be tried in many ways to find the best effect for you.
After all, comics sometimes don't need to be particularly correct in light and shadow, but in the sense of atmosphere.
postscript
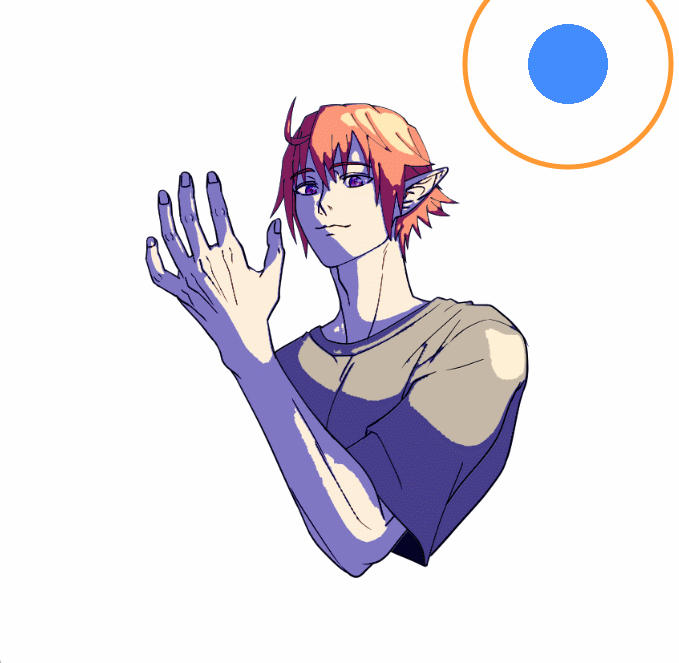
The example pictures are all modified from my old pictures, because I think that if the new function [Shading Assist] can be freely matched with my various previous creations, this function is worth recommending.
I also admit that I didn't make good use of this function (almost only one or two colors at a time).
In my opinion, this function is only a prototype of an innovative concept. I feel that the function will be updated and improved in the future, and there will be more adjustable control items. So I picked the parts I thought I could use first.
(I hope to update later, you can first make functions such as writing, reading, and appending like color plates and brushes)
Hope this article helps you,
My IG


Comment