
Your eyes are belong to us!! Any books, even online tutorials can show you "How to" ― this simple tutorial shows you how NOT to. Join Dr. Gles with her instructional guide you will ever need to check your manga eyes, realistic eyes, cute-puppy eyes, and even monster's eyes!
Despite the title, How NOT to Draw Manga Eyes actually teaches nothing about NOT drawing manga eyes. Instead, it highlights the most common features theoretically found in the most popular manga eyes creation but-because Dr. Gles is trying to promote originality-does not actually provide concrete examples of manga titles (forbid by CSP policy).
The facts presented rely entirely on the reader's own prior knowledge of manga to make the jokes work, but someone must be more limited than he or she was aware, as anyone could only think of one or two manga serials that fit the proposed stereotypes.
👀 - Where to Look?
"Sometimes people don't know where to look, even though it may seem obvious."
Unknown
The design of the whole body is subconscious information. Although there are many people who say they like the design of the eyes, or the hairstyle, there aren't for the sketch of the body (the physique). If the sketch of the body doesn't work though, this registers with people subconsciously and they end up thinking "I don't like him/her appearance," for an artist he or she might say "I dislike this piece of artwork..."
Information immediately jumps out to us from eyes, whether they are the eyes of a living human being or a manga or even animation characters, including not limited to creatures. This is what is called conscious information.
The eyes are probably your greatest concern when you are drawing the character design. Perhaps you have tried to draw lots of eyes but to your surprise the shape always looks slapdash.
Moving images above will show you in less than 30 seconds from our optometrist, Dr. Gles.
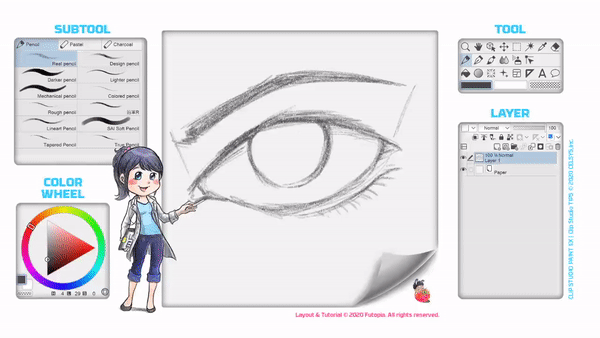
My tips for doing the experiment of drawing eyes will be occasionally or every-time start with [Pencil] tool → [Pencil] → [Design pencil]
▼ Click link below for more information about default pens & brushes from Clip Studio Paint.
You don't need to worry about doing a perfect circle, just practice using [Design Pencil] lightly until you get the new habit for doing circle shapes easily. After done with the circle, usually I will mark 4 spots using 'x' to determine the position of eye.
◈ 01. It's what we call eye lid. In order to do so, I use a rectangle as my personal preference guide to make the curves steady; not too small nor too big.
◈ 02. I create the pupils and the middle part of it supposed to be black and any other colors which I will explain for later.
◈ 03. The iris color will be there. Again, I'll explain much better for later.
◈ 04. The bottom lid. For anime eyes, there will be so much different to draw. So let's leave it like that for now. As for now, please refrain to do anime eyes. You need to understand everything in a correct order to get better at drawing an eye.
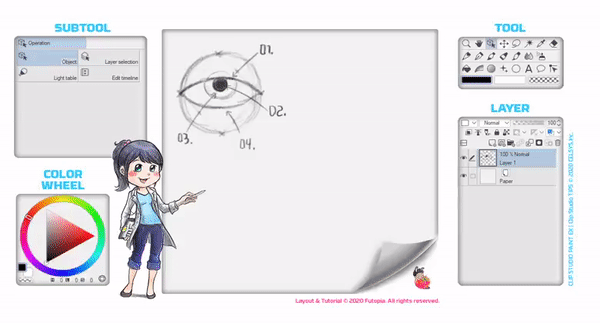
◈ 05. Eye lashes. Simply on the tip of 01 and 04.
◈ 06. Just don't forget a pupil comes with a slight highlights with white to make the eyes 'alive'.
Those are the guidelines for you to understand how to make an eye that not too much manga for the starting point (don't get us wrong, Dr. Gles will also explain in details for manga eyes later).
👀 - Changing Your Way to Look
"Change The Way You Look At Things And The Things You Look At Change."
Wayne Dyer
Here is some information on the eyes that are often used in animation, anime, and manga.
Don't argue which one is the best, it's a meaningless effort to even think about it.
The problem about eyes is that although you can draw them perfectly well face-on, you might not be able to draw the eyes you are best at drawing flat - when the direction of the face or body changes.
It is fun deciding things like the colors of the pupils, the number of eyelashes, and whether the highlights should be round or square. But these considerations take over and you tend to forget the overall shape.
The biggest pitfall you can fall in though is you can't draw the eyes when the angles of the face changes.
👀 - Start Simple
"Simplicity is, as simple as you make it."
Anthony Liccione
Here are some outlines for the eyes. Can you see that they are outlines of the eyes on the previous chapter? Before you draw the details of the eyes, think that the people looking at your drawing will register this information subconsciously.
◈ Just as with the sketches of the body for character drawing, the sketches of the eyes are also essential. With an awareness of their importance, think of it as a culmination of angles like the body. Look at the outlines above and work out how they are composed.
For example, look at the shapes, the diamonds, triangles, and even the curves. They are shapes made by joining the dots and the lines.
👀 - Keep Synchronize

Try sticking the outlines for the eyes onto part of the full-face that is considered a polygon (a square box). Decide the position for the eyes without being led astray by considerations such as the number of eyelashes or the shape of the highlights.
◈ First, I use [Symmetrical Ruler] to begin with. [Move] it into position that I wish, even [Transform] a bit before and after using [Design Pencil] for doodling.

◈ After done with the necessary doodles, I transform the image with (Ctrl + Shift + T) shortcut key to make a [Free Transformation] mode activated. By doing so, you'll have an ability to make the 'perspective' angle when distort the image then click OK.
Naturally when the angle changes, draw the outlines for the eyes as they were one side of a polygon. They are not that difficult to draw if you think of them in the same way as you would do to a box of perspective transformation as well as adding a sphere to give you 3 dimensional guide-lines like I used to do with other tutorials.
👀 - The Pupils
Once the angle has been decided and you have drawn the outline, you can start the job of drawing in the pupils. Actually this is where "think in polygons" evolves into "think in curves". Make sure you master drawing the pupils on a flat surface first.
◈ Picture above shows you how to do the eyes with its pupil distorted with perspective angle [Transform] tool with (Ctrl + Shift + T). The same technique when you try to synchronize the positioning of the face, it's one of many ways to make the pupil stays in the middle.
How to positioning the eyes size and distance simply by applying simple rules like image above with the head divided into 2 areas (inside the perspective box) which will be important for you to get the right idea and composition to place the eyes.
◈ See the red arrows; you'll notice that the size of the right eye is bigger than the left eye. Just as simple as that, draw a perspective box, divide it then make a sphere if necessary. Everything has its own simple method to achieve greater result.
Exercise:
◈ 01. It's the basic eye for manga. The shape is exaggerated a bit to fit the style. Feel free to try by yourself those example of pupil designs from "A" to "F".
◈ 02. Just remember to have the pupil in the center of the eyeball. Even if you decide to make it looks like a star like the "F".
◈ 03. This is an Iris, to give color to the eye. The most exciting part when coloring the eyes.
Now it's your turn to create your own pupil design!
👀 - Closing Eyes
It's a self-explanatory to make an eye close.
Below is the example of progression from an open eye into close one. You can also see from the side, there will be no trick: just as simple as follow the triangle or an arrow shape guide.
👀 - The Eyebrows
Eyebrows are extraordinarily important in creating expressions. They reinforce the emotion behind the eyes. You can achieve a great deal of expression by drawing the eyebrows as if they were a single line.
This adds a dynamic flow that is especially appealing in animated characters (including but not limited to anime and manga characters). By maintaining the single-line approach as an expression changes, you get a nice flow to the transition.
◈ Take a look at GIF above, Dr. Gles shows you how the red line changes the way of eye's characteristics drastically from average to somehow shocked.

Not all eyebrows are drawn as a single line, but it can be an effective tool as a starting point.
◈ The third drawn eyes with its eyebrows (at the bottom) were shown with a horrified or panic look, so the line needs to be divided as the eyebrows also divided.
With comical sweat-drops or even some wrinkles below the eye lids; those are a good addition to give more impactful situation or details just by looking at the character's face: specifically eyes.

Please practice using one line to determine the eyes' reaction to your characters.
◈ At least draw different type of eyebrows like GIF above so you will get better for drawing character with full range of personality.
In one document, I usually draw 5 different emotions of my character using only the combination of eyes with the direction its facing as well as the eyebrows to support the drama.
👀 - Cartoon Eyes
Here's some anatomy for the eye in a cartoon way! Yes, some of you might say it's an animation style or manga eyes. But not yet! We're trying to find a nice balance between too complicated approach from realism and shiny eyes from manga with simple one.
Moreover, the way you draw your cartoon eyes will be crucial to determine your style of drawing! And here's why...
🔰 Easier to be drawn.

◈ 01. Doing everything simple means start with a simple circle.
◈ 02. Draw eyelids, upper and lower with only simple lines and an oval in the middle to represent a pupil.
◈ 03. Last part for doing a simple eyes that look left (or right) will be the eyebrow location. As you can see, I give a green lines to let you see a right place to start your eyebrow drawing. It's a standard for everyday drawing, I know some animation characters do have longer and big eyebrows or even shorter-thinner!

◈ Now, with decreased Opacity to 10%, I begin to draw the eyes that rolls into us with another layer on top of it. By doing so, you practice to match the eye from the side with the eye that looking at us.

👀 - Animal Eyes
These are some of animal eyes selection to be drawn. The famous cat eye, reptile eye, as well as bird eye! Compared to drawing manga eyes, these three core eye drawings will be essential for you to learn. If you wish to be better at drawing manga; even fantasy creatures; you'd need this basic experience to 'evolve' your drawing skill using default brushes from Clip Studio Paint.
Cat's eye:
◈ Some sub tools needed:
[Design Pencil] for sketching (and texture for some parts).
[Real Pencil] to give texture while coloring.
[Rough Pencil] to block entire eyeball with a bit texture (can be done using Pen tool)
[Air Brush] → [Soft] and [Highlights] for giving the reflections.

Reptile's eye:
◈ Some sub tools needed:
[Design Pencil] for sketching (and texture for some parts).
[Real Pencil] to give texture while coloring.
[Rough Pencil] to block entire eyeball with a bit texture (can be done using Pen tool)
[Air Brush] → [Soft] and [Highlights] for giving the reflections.
Optional: [Air Brush] → [Running Color Spray] to add more scattered texture details.

Bird's eye:
◈ Some sub tools needed:
[Design Pencil] for sketching (and texture for some parts).
[Real Pencil] to give texture while coloring.
[Rough Pencil] to block entire eyeball with a bit texture (can be done using Pen tool)
[Air Brush] → [Soft] and [Highlights] for giving the reflections.
Optional: [Air Brush] → [Tone Scrapping] to add more scattered texture details.

If you'd like to see more of the animal drawings (including how to render feathers, furs, even scales for the snake in Clip Studio Paint, you can head on my other tutorial about 12 Japanese Zodiac Animals below:
👀 - Semi Realism Eyes
Since we're studying real eyes (or at least semi-realism) - I suggest you to go online and get yourself some eye reference. Dr. Gles will also tell you the same, not trying to be lazy but if she's posting reference here; CSP will ban her.
◈ Practice using the guide about simple eye creation: polygonal shape. I always prefer [Design Pencil] at first, but for this semi-realism style: I choose [Real Pencil] over [Design Pencil] to have a nice and smooth strokes which also captures a paper textures while sketching with bigger size of the brush.
◈ You can add values to your sketch with pressure onto your graphic tablet. It depends on the sensitivity and the type of your product: mine can detect the thickness of the strokes changes, according to the tilt of the pen, therefore it is possible to reproduce a style that applies value more uniformly on the canvas.

◈ In order to color the eye for this piece, I prefer to choose [Watercolor] → [Opaque Watercolor] and combination with [Watery] to show you my quick coloring method. I did the coloring with a new layer and place it below the sketch.
◈ For the details of the pupil and iris, I create a new layer on top of sketch layer to achieve better result of contrast colorization (especially by adding highlights with light blue over the iris.
👀 - Final Look
To wrap it up, remember the eyelid wraps around the eyeball. Make sure the whites are smooth and the eyelids and surrounding skin is textured when doing realistic eyes, as for manga; you could just let it very smooth like a porcelain.
Redness in the corner of the eyes helps give the eye life. Highlights should be subtle and well placed. Now we're at the end of this session with our Dr. Gles, because she'll be leaving to another job. It's your turn to check on your eyes and do some experiments on yourself.
Q: Wait a minute, what about the monster's eyes?
A: If you can do cat's eye or reptile's eye; you're good to go to create your own monstrosity creatures.
If you do have any question, feel free to give me your Private Message. I'll ask Dr. Gles to answer all your 'sight problems'.
Happy eyeballing!
この投稿を「いいね!」したユーザー


コメント