
If you were in the middle of World Fashion Week, we might talk a lot about fashion illustration like there's no tomorrow! It's so mesmerizing and breathtaking when you can imagine something from our mind and put the ideas into life not only into the paper, digital canvas, but also red carpet!
So let’s explore the basics of fashion sketching, brainstorming, and a few video tips that will help you get started with Fashion Illustration techniques with Clip Studio Paint.
Get inspired, grab your tablet and free your imagination to create some amazing outfits!
Introduction
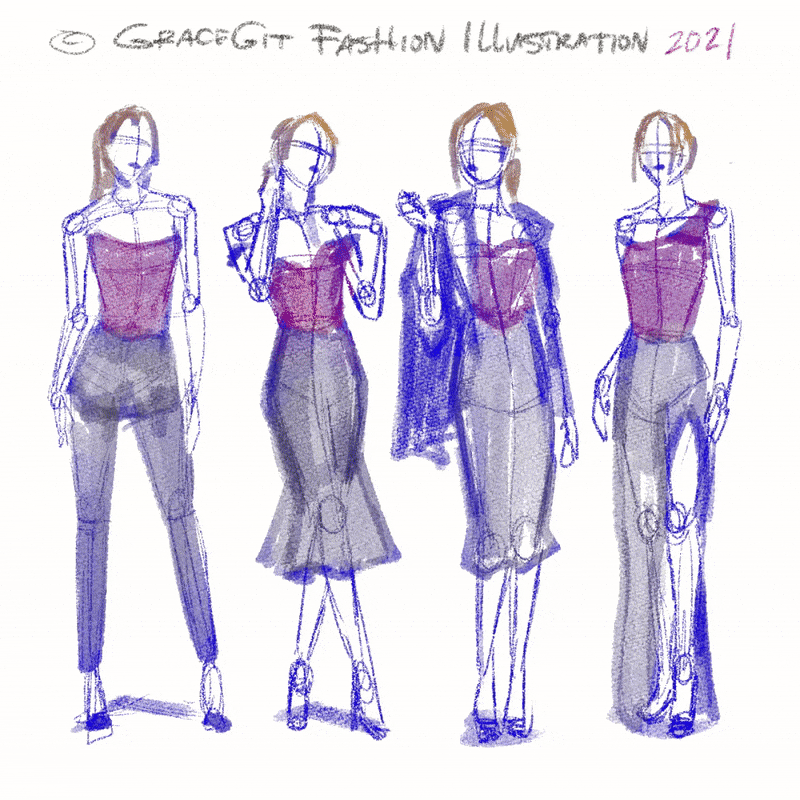
Hi there! My name is Grace, a.k.a GraceGit here on Clip Studio TIPS - and welcome to my Fashion Illustration & Design with Clip Studio Paint. We're going to go through the process of creating fashion illustration drawing style looks like image above with default brushes!
But before we get into the tutorial, here's 4 basic steps you should keep in mind to get started for doing Fashion Illustration in the first place:
1. Understand body proportions
2. Define your character poses
3. Place the clothes
4. Explore and find your style
Steps above is not an absolute or perfect guide, however if you think there will be something to add or correct, feel free to drop your comments here or through my YouTube channel. Thank you in advance, dear good people.
1. Understand Body Proportions
Yes, you need to understand body anatomy but never getting stress of it. At least having a good sense of proportions, natural movement and posture will help your sketch come to life and I'm going to show you how. Ok, here's my question for you:
Do you know your own body well? Have you ever think about your body shape?
If not, I think it is time to learn which body shape you have and apply to your character design and her fashion too! So, in this first step of tutorial, we are going to learn about body shapes; especially supermodel body shape! You can dress yourself beautifully or handsome but how about your character design?
By any means necessary, you should learn which body shape your characters gonna have with pre-installed 3D model to be modified on your own will - thanks to Clip Studio Paint!
Before we learn about the body shapes or modify 3D model, it's best for you to learn a little trick that I had:
Customize Shortcut Key!
First you need to open the shortcut settings by using these key combinations:
CTRL + SHIFT + ALT + K
Then scroll down until you find GRID
Double click to assign shortcut keys combination.
For me, personally to make it easier to remember; since Grid begins with letter G. And if you try CTRL + G, it's already assigned to [ Group Layers ] so I use [ Alt + G ] instead and it works well.
But as I stated above and on the video, the key combinations will be anything you want!
Soon after that, you can try it out by press the key combinations!
Now, onto the real deal...
After setting up shortcut keys above, I create those dots in order to prepare the guidelines for my body proportions drawing. Grids can be a 'game changer' for those who love to work in details when designing industrial artworks such as technical drawing for architects as well as maintaining balance of figure drawing for fashion illustrations.
I'm holding my shift button on my keyboard while click from one dot to other part of the grids. Now after you've 'unlocked' the ability of toggle on and off for the grid; it's so much easier to see lines whether it's straight or not or even if it's not aligning right.
Exaggerated body illustration is what I've been planning to show you through my video tips.
( Whoops, I misspelled the word to 'exagerrated' it on the video!)
Those 9 dots and lines going to be useful to make your figure drawing looks like fresh; straight coming out from professional fashion illustrator.
As you see from screenshots above. That's how I mange to draw the figure with or without the clothes. It's not a perfect guidelines, I guess... But it's also pretty useful for me to keep in mind for 9 dots and lines in order to create something balance for quick illustration.
2. Define Your Character Poses
Once you have the body proportions clear, practice sketching different poses. These will bring the clothes to light and give movement to them. You can work with curves and geometric shapes to place body elements.
But there's a GOOD NEWS for those who don't have enough time to create from scratch. Here's my tips:
You can use any internet browser to find materials easily.
Side note: my Clip Studio App interacts slowly, so I guess better for me to search materials with website instead.
But first, you need to have your account registered to Clip-Studio.com and here you can see my Clip Studio Profile.
I click on the arrow button and go to ASSETS:
Then it will bring you to the assets as shown on the screen.
I type 'FASHION' on the SEARCH box.
Now it pops up many materials, there are some FREE but others need to pay with GOLD or CP (Clippy Points).
Ok, so let me scroll back to top and to make it efficient to browse, I click on DETAIL and click on FREE for the Price.
Take your time to search other things but let me focus to Fashion topic.
Simply DOWNLOAD it with the RED BUTTON over there.
If you're using browser like me, just check Always Allow then click Open Link.
From my screen it seems nothing happened, but actually if you already log into website and your Clip Studio Paint, the items will be automatically downloaded.
So here I am browsing another pose. But also I give LIKE to those creators who already shared their creations to give my support!
Feel free to get things you want but don't forget to leave nice comment, like, or even favorite to any creators of Clip Studio Assets whether it's FREE or PAID ones.
Now, head into your Download folder, in order to access that; go to Window --> Material --> Download. I placed the material folder on my Clip Studio Paint workspace on the left side of canvas, so I can access them efficiently.
Just drag and drop those downloaded pose into your blank canvas and you're saving a lot of time already! Not to mention you can manipulate the positions, poses, anything that you can think of! The possibilities will be endless!
Yep, there you are with the 3D model. Plus it's already on the 'supermodel' pose as a plus! Actually, you can try to modify your 3D model by those icons above its head.
3 icons with a camera will be useful to modify positions of your model. Make it further away or rotate the model.
5 icons with a box icons will be useful to modify each portion of 3D model's body. But for this time, I will not bother to modify the model's pose as it's already good as it is.
Drag and drop other models in order to see how it looks. Also if you can actually see from the video, I click the icon on the bottom of my 3D model. It's the important additional settings to play with. You'll need to play around by clicking and trying by yourself.
You can always find any interesting things going on with 3D model! Should there be anything wrong you click, you can always delete them, drag and drop to have the default or always think it's like a 'quick reset' feature!
Now onto BODY SHAPE, you can try to MODIFY HEIGHT and it's really an important feature to create the '9 heads' figure like supermodel with 175 or anime ones around 150.
Actually it might be accurate but not perfect, the 3D model can be changed like this and it's super awesome feature!
Try to move the [ + ] slider in order to adjust the body shape appearance.
Adjusting the illumination control by clicking onto the 'ball' over there.
I love to create dynamic lighting somehow to 'give quick reference' where should I put the shadows on my character design. Since we're focusing more to pose, let's talk about that sometimes later.
Or you can easily uncheck the box with [ Apply Light Source ] to make your 3D model flat without any shadows or highlights reflected into it.
Now that you have the quick 3D model to play with the pose, it's time to put clothes into it!
3. Place the Clothes
If you scroll this far, that's a sign you're definitely creative persons who are interested in exploring more about fashion illustration – I can offer a trick, a tip or piece of advice to get started with fashion design & illustration:
1. Learn the basics. For example study a human’s anatomy and body proportions if you want to draw a runway model and get the hang of perspective drawing, which is super helpful if you want to add dimension to your illustration.
2. Start with a flat drawing of a model (there’re many body silhouettes’ templates available on the Internet) and then move to more complex poses (using Clip Studio 3D models) which will bring the clothes to the right place, lighting references, and give fluid or dynamic pose to them! Making an illustration more interesting.
3. Decide if you want to focus more on being expressive to create an illustration with very limited strokes or if you want to go into details and show your craft too. The most important thing is to find your own drawing style – but remember, it takes a lot of time and experimentation with different techniques, so be patient and draw a lot.
Now let's look into my quick illustrations steps:
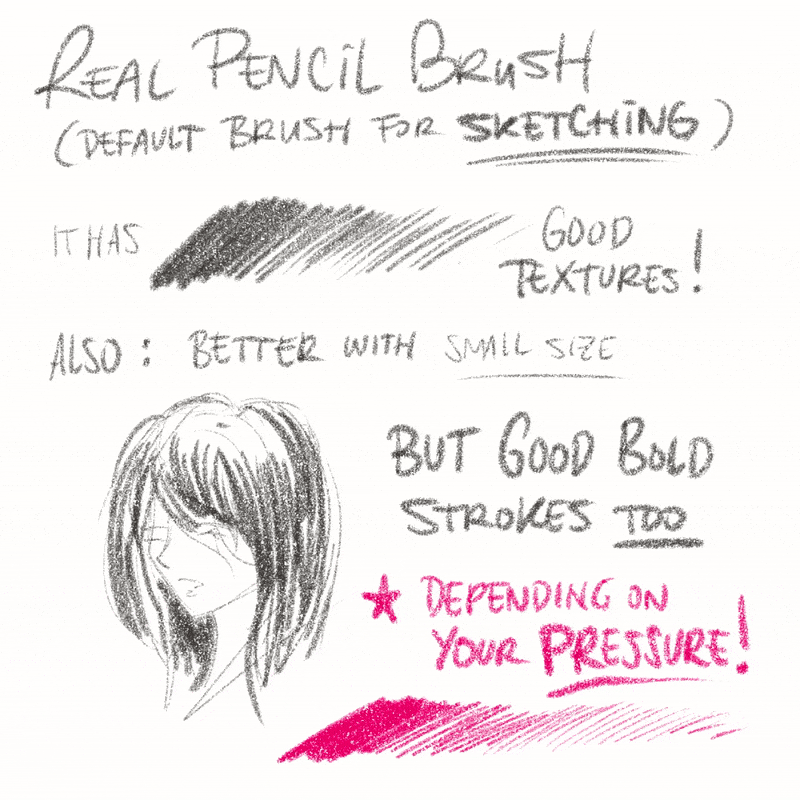
Real Pencil Brush will be a good choice to start doodling:
❤ Texture looks like 'real pencil' shading
❤ Better with light pressure strokes and small size
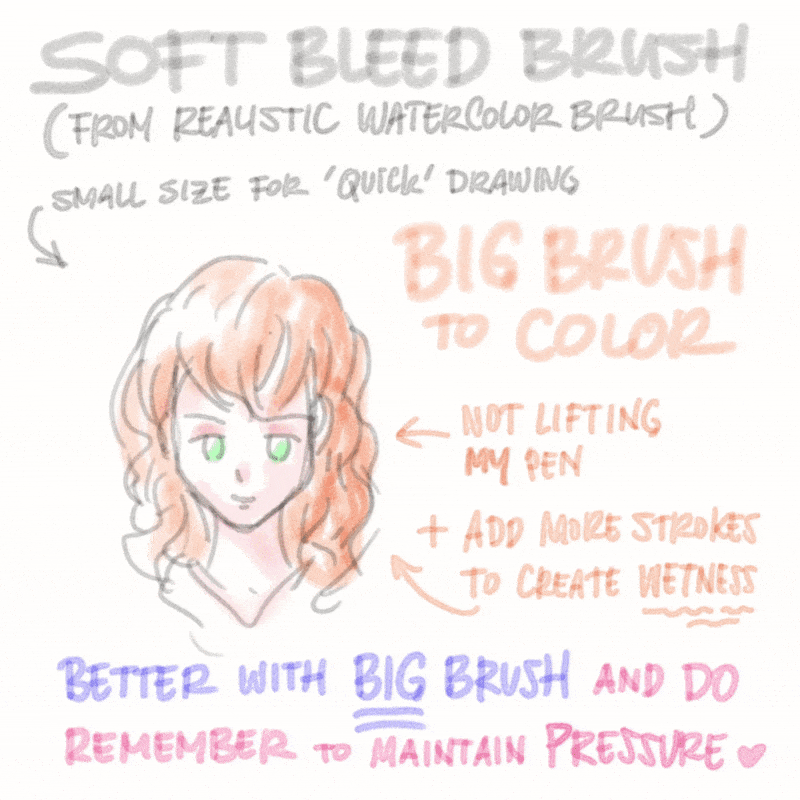
Soft Bleed from Realistic Watercolor is good for applying quick 'color base':
❤ You don't need to fill everything although it's said 'color base'
❤ Better adjust the pressure before giving strokes, best for big size
Kind of difficult to handle at first BUT this brush definitely THE BEST and probably my 'top secret brush' because of its 'UNIQUENESS' shape of flat watercolor markers:
❤ It's difficult but it's worth to try! You will be able to create unique textures out of it!
❤ Yes, CAREFULLY USE IT: please don't lift your graphic tablet pen too much because it has the tendency to 'multiply' each strokes

If you're NOT SO FOND of my flat brush, here's the least difficult ones to handle:
❤ Tapered Watercolor has softer rounded touch than boldness of flat watercolor brush
❤ Honestly when I don't feel like challenging myself: I always use this to finish my entire project in one go after sketching with Real Pencil brush

I'm using CLIP TO LAYER BELOW feature to colorize the outfit. As you can see, I'm using pink color with Soft Air Brush to fill:
❤ With this feature, you can create endless possibilities of using color combinations!
❤ Colors will go along with pixels below, so remember to add 'base color' first
You can try to combine the colors and see it turns out pretty subtly and well designed:
❤ Either use soft pastel colors or any vibrant colors will be a good combination
❤ Feel free to experiment on it BUT never ever forget to CLIP to LAYER BELOW!
Creating personalized style #1:
❤ I prefer sketch it out without 3D model, since I have more flexibility to explore
❤ Tips: don't go overkill your design with details!
Now, it's time for you to try it out with those brushes I mentioned above!
I don't use custom brushes way too often. Instead sometimes; I jump to [ Pen ] tool for creating those white highlights on the hair (can be seen on image below) or using just downloaded brush from asset to create scattered brush:
4. Explore and Find Your Style
Practice trying out different styles and techniques to refine your style and find your personal touch. It takes training and testing out different sub-tools and outfits to discover what you like and what reflects your vision. Up to you now!
You’re now ready to experiment, feel free to show me your fashion illustrations!
Another try, if you're wondering if fashion illustration & design can be made with 'solid brushes' as usual like digital painting, here's my steps:
Always start with initial sketch whether using real pencil brush or other type of pencil.
My illustration sketch above will be different in terms of style. You can explore or even see it throughout my quick video tips on my YouTube.
Inking outline will be my next step (as usual for digital painting), using such as Real G-Pen or any pointy and shard Pen brush will be useful.
Quick TIPS:
1. Never leave a gap, so you can easily select and fill the base color inside
2. Or another option just follow my next step if you're too lazy for detailed ink
Color blocking is the third step and CRUCIAL one.
Continuing my TIPS number 2, you need to create a new layer on top of your ink layer, start re-outlining the ink then blocking out the color you want.
This is my usual method to apply quick shading and highlight NOT directly on the color base.
By creating new layer and using VALUES from standard color set provided by Clip Studio Paint. You can see mine on the bottom left of image above.
Create a new layer on top of the color blocking layer then use CLIP TO LAYER BELOW. So you won't be worry about colors getting out of places.
From screenshot above, you'll notice that I am using gray colors for the hair, however it's because of [ Blending Mode ] that shows [ Normal ].
You definitely need to switch to [ Multiply ] instead for creating difference in values from gray color set. It's pretty simple and basic if you want to change the hair colors or anything; the 'shadow' will always remain in the same place.
Now there you go, after switch with [ Multiply ] then you have the shadows of hair, cloth, and everything else in one place without disrupting the color base.
Adding another layer of highlight will be important since I will be using different Blending Mode, for this example; I'll normally use [ Overlay ] for highlight parts.
If you're aiming to have a good blending but solid color, feel free to use other brushes but mine will always be [ Paint and Apply ] from Watercolor brush set.
Yes, it will be different in terms of solid or opaque brushing result. This set of brushes can also create opaque but not too subtle or tricky like [ Real Watercolor Brush ] set.
Try to experiment using different color other than gray values. At this point, I'm using a bit of pink or even blue to add color shade differently than its 'dark pink' from gray.
Anyway, you can always use any techniques to blend the values or colors that you put over there. But using [ Blend ] tool will be efficient for 'blender'.
Another tips that you might've already know from other tutorials, using [ Lock Transparent ] is a good way in order to change the color (pixel) without adding more strokes.
Lock transparent function actually locking pixels that you've been adding onto the layer hence the name 'transparent'. At first, it's kind of misleading interpretation for me.
After locking the pixels, it's time for you to experiment different brushes, use them interchangeably to produce different result for the folding of the outfit.
Now the FUN part begins. After you play around with those shadow and highlight layers, it's time to get back to the color base layer. Then using [ Auto Select ] tool, you can select which part of the design you need to change its color.
For example, I choose the inner outfit:
Now using [ Ctrl + U ] for Windows user or [ Cmd + U ] for Mac user.
It brings you to [ Hue/Saturation/Luminosity ] option box with its sliders so you can modify its color base ranging from its color (hue), contrast (saturation) and brightness (luminosity)!
Last but not least, you can use [ Watercolor Brush ] in order to have a bit of textures or strokes for your outfit. This can be good for any digital illustration not only fashion.
Happy trying, guys!
Here's my conclusion, whether you'd like to have a quick or solid illustration style, it's always fun to try out different things with different tools in Clip Studio Paint.
Having unlimited layers, unlimited color for the paints (that can't be depleted also) will always be a HUGE advantage for us nowadays.
Two illustrations below was inspired by someone I know from social media, I got the inspiration from her fashion OOTD (outfit of the day) so I decided to create these illustrations inside Clip Studio Paint and also present how did I make it with my YouTube video - feel free to check it out and please leave some comments if you wish.
Outro
You’re now MORE THAN READY to experiment, don’t forget to show me your test sketches!
I put the same YouTube video over here on outro in case you scroll through my writing up from above and kind of lazy to scroll back again to top. Haha! This is the end of my tutorial, I'm Grace, hope you enjoy and get things or two from my amateur Fashion & Illustration Design guide.
この投稿を「いいね!」したユーザー


コメント