Speed Up Your Workflow with Fill Tool in Clip Studio Paint
Introduction
Fill tool in Clip Studio Paint always amazes me how easy and friendly to use. and how important they are in my workflow lately, since they help me finish my work faster by a lot!
Hi! I'm steele. In this tutorial, I'm gonna go over and help you understand how Fill tool in Clip Studio Paint work differently from each other one by one! and how to tweak with the tool setting in great detail, and most importantly, how to use them in your workflow effectively
also at the end of this tutorial, I will share a few tricks that help you speed up your workflow from using Clip studio paint in the long run
So let's get started!
Fill with Refer multiple
In clips studio paint we will have 4 different tool in [Fill] sub tool you can press [G] shortcut to open the fill sub tool. 4 of them work similarly in terms of property setting. once you learn how to use those property settings, you basically can play with all of the fill tool in clip studio paint. but each fill tool still has setting that is unique to each other.
and in this section, we gonna do with the most basic one first.
you can see we have [Refer only to editing layer] and [Refer other layers] and we will start with these two first. but even though clip studio paint separates them into different sub tool but actually they are the same. because one has ''Refer Multiple'' is one and the other is not, we gonna talk about how ['Refer Multiple] tool property work later in this section.
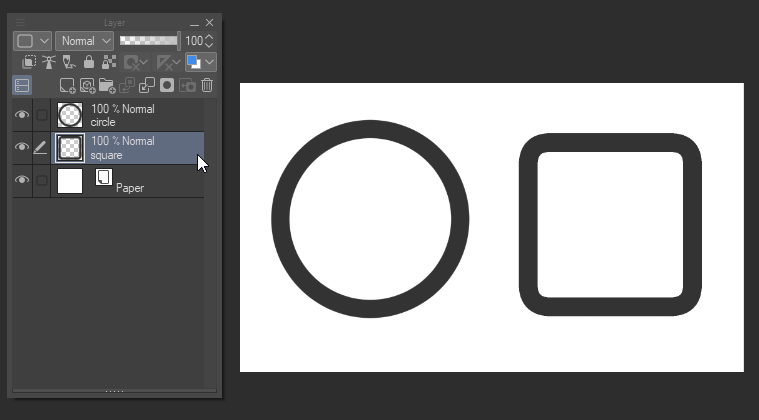
[Refer only to editing layer] fill tool will be only referred to the editing layer, this is pretty straightforward. but honestly, we will don't use this tool that much, because it will limit how we use them in our workflow.
instead of clicking one by one of each area you want to fill, actually, you can just hold left-click and drag it to the next area you want to fill. this will be useful when there are a lot of gaps you want to be fill.
then we gonna talk about [Refer multiple] to see how this property will help our workflow a lot since we gonna turn [Refer multiple] on all the time. from now on I gonna help you understand how each [Refer multiple] options works differently.
■1. [All layers] option will be our first layer refer option that we start with.
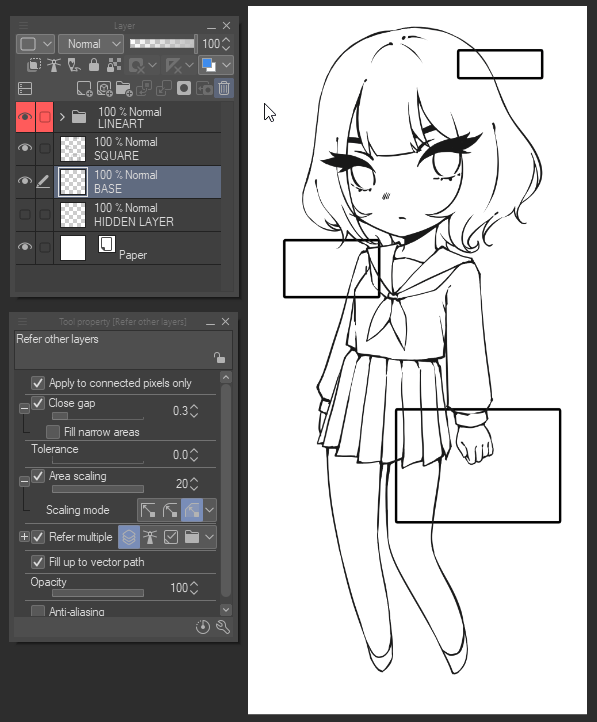
All layer basically the fill tool will take all layer in into account when filling. you can see I separated layer into 3 layers, one is line art, one is square I place around my art and the color that I'm currently editing right now. but you can see, the fill tool only takes All visible images that they can see into referenced, they will not fill the hidden layer.
■2. [Reference layer] this layer preference is my favorite one since I use this a lot in my workflow when my work becomes more complicated and have a lot of layers to work with.
In order to get [Reference layer] function to work. First, we need to set our layer to [Reference layer] first in the [Layer] property. simply click on the lighthouse icon on the top left of the layer panel. or right-click at the selected layer and choose [Set as reference layer]
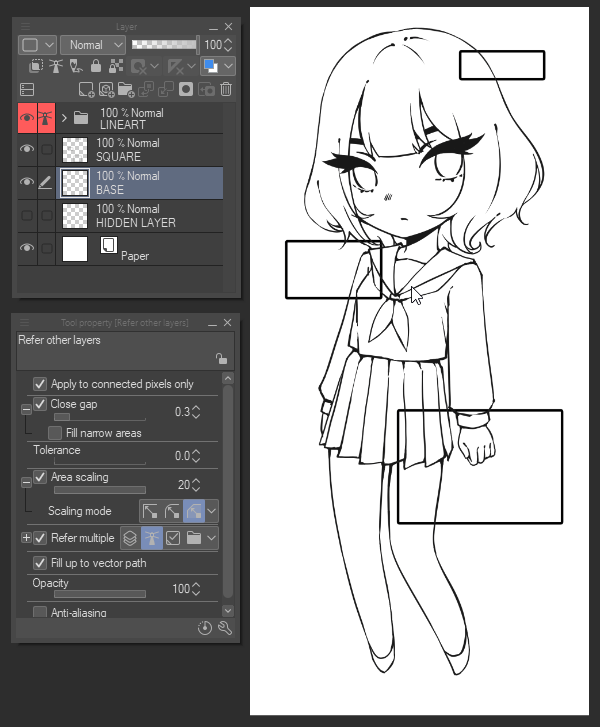
after I set my line art folder layer to the reference layer. I start filling the color in it to see if it's actually working properly. you can see those colors that I'm filling are now ignoring the square around my line art since the square layer is not a reference.
this function is very useful when you want that specific layer to the main layer for the fill reference.
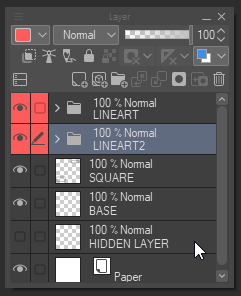
you can also set [Reference layer] more than layer too! all you need to do is select at layer and hold [Shift] key and selected all the layers that you want to be reference, then click at [Set as reference layer] to see all those layer to the reference layer.
■3. [Seletecd layer] only selected status in the layer property would be referred to and filled in.
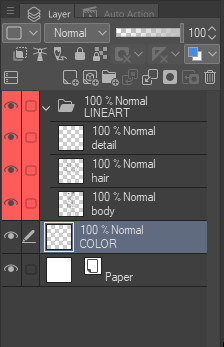
I don't want to over-explain because this setting is pretty straightforward.
note that make sure to select the layer that you want to fill first, there will be a pen icon displayed in the front of the layer, then you can select whatever layer you want.
■4. [Layer in folder]
this function will be refer and fill only layers in the folder. all layer you want to be referenced need to be in the same folder as the editing layer.
I think that's all for [Refer multiple] properties. there 4 of them and actually this setting is not hard to understand at all right? but there are many other functions that are left to be explained, like exclude layer, but I think it's good for now. so, let's head to the next section, shall we?
Close Gap
The second important option is [Close Gap] option as the name suggests, this option helps you close the gaps in between your line art preventing the color to bleed out, and filling the entire canvas or unwanted area. The higher the number value, the more it will close the lines. but higher doesn't it will close gaps better, this setting still have some flaw, which I'm about to show in a moment.
you can find [Close gap] on top of the tool property. original [Close gap] will come with an indicator bar, I don't like that so I change to a slide bar instead, much more convenient!
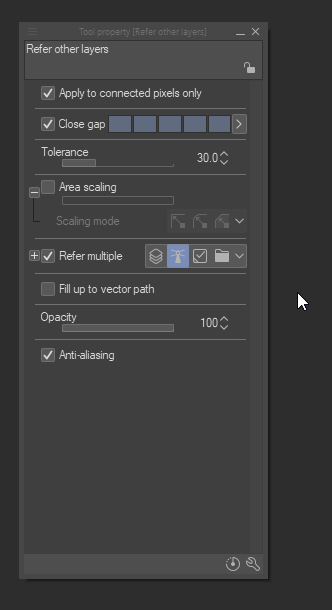
you simply right-click at [Close gap] option and select [Show slider] instead of indicator.
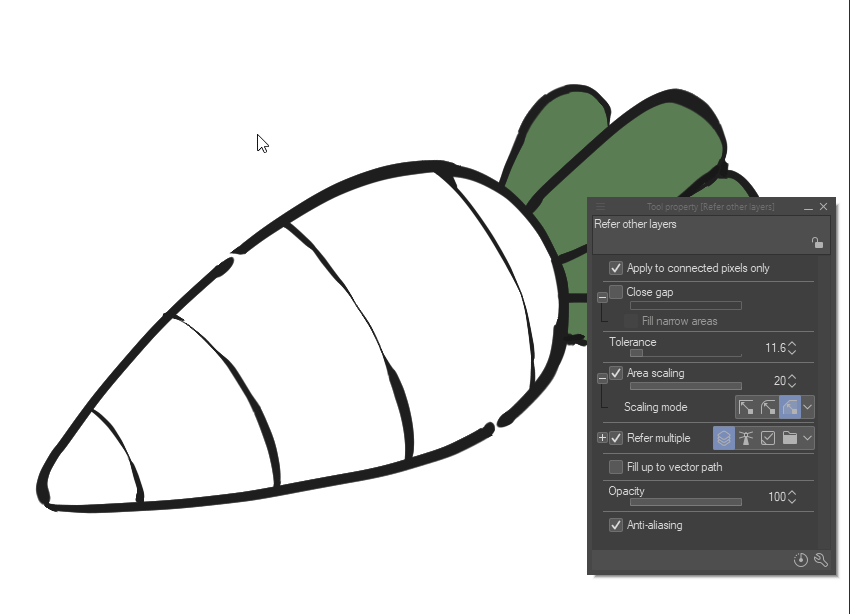
with this option enabled, areas within the line can be filled in even if there are small gaps between the lines. but that gap is not close perfectly, you can see the color slightly overflow from the gap.
this will be more noticeable when [Close gap] value setting is very high or the gap is too large to close. create some unwanted overflow color. In inorder the make them perfect close you need to lower the close gap value or need to close the gap manually.
Another downside of [Close gap] function, when using the fill tool with a higher value of close gap option. Sometimes when filling a specific area, the tool will recognize the narrow area as a gap. leaving behind some unfilled areas. This can resolve by enabling hidden function in sub tool detail.
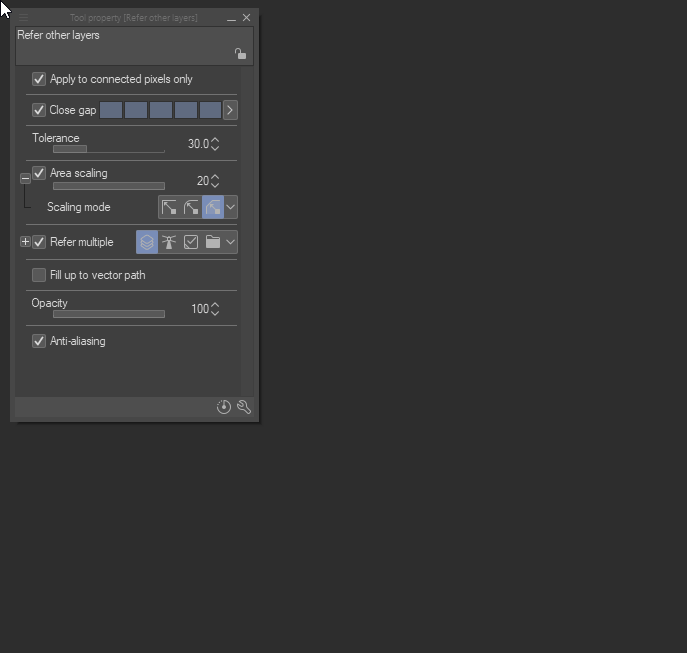
1. In order to open that function, you need to click on the wrench icon at the bottom of the Tool property.
2. Sub tool detail panel will appear. click at the box to unhide [Fill narrow areas] Function.
3. Enable it. Done!
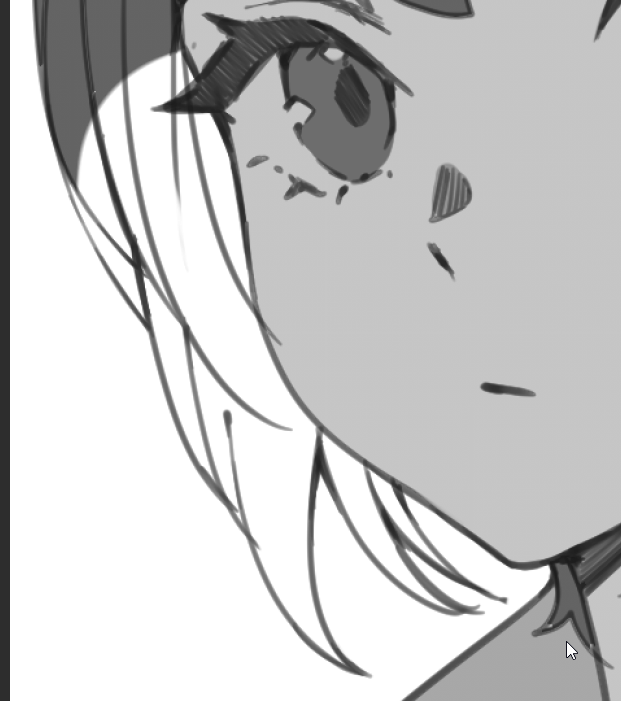
with [Fill narrow areas] Function on, this will fill areas better than before! though not perfect, maybe it's the brush that I use or not but it's still useful fucntion nonetheless.
Tolerance
■[Tolerance]
is also known as color margin. this property will determine how close the color portion needs to fill and be regarded as the same color.
you can find Tolerance on the bottom of Close gap function, andI'll show the example [Tolerance] property works in picture down below.
I will fill at the left side of the color value which is white color, and I set tolerance value at around 20% you can see that the color only covers the small. then, I set the value higher to 50% the color that I've filled covers half of the color bar. you kinda get the idea now right?
The larger the value, the larger is the tolerance to include different colors than that of the clicked point in the selection area.
High tolerance values also help to fill the gap between line as well. high tolerance will help you eliminate white pixels along your line.
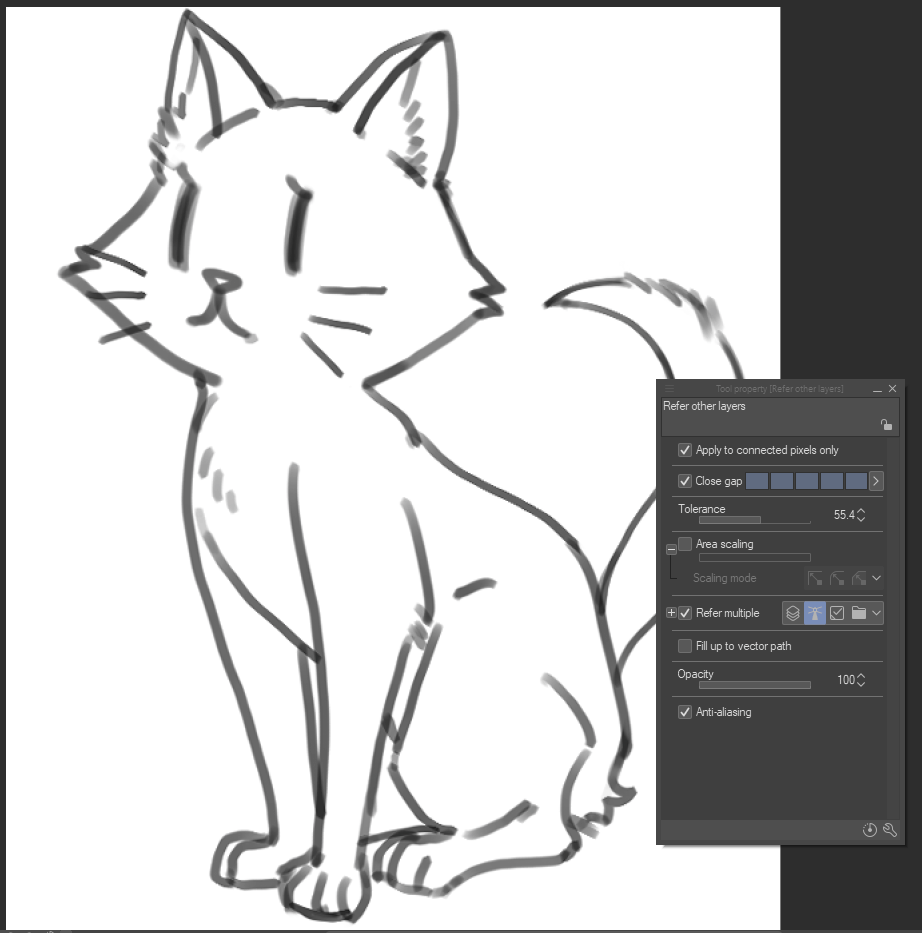
but If you set tolerance too high, sometimes the tool thinks that consider everything as the same color. result in a color overflow. the problem becomes more noticeable when I use a brush that doesn't have 100% opacity.
Area scaling
■[Area scaling]
now we have [Area scaling] this property help scaled area or expanded the pixel further in the filled area when we use the fill tool. useful when want to close the gap between the line, eliminate white pixel area, or want to color to expand beneath the line art when not using solid and crisp brush.
[Area scaling] also have [Scaling mode] which you can select between three, but I will recommend you to stick with [to darkest pixel] because it's more convenient in the actual workflow.
this is the example when using area scaling with different values. with the maximum 20 value, the color area is almost scaled and fills the entire line art, but this still depends on the resolution of your canvas too. I encourage you to test it yourself to see which setting suits your workflow the best. but for me, I will always keep my area scaling value between 5-10 at all times.
this is the example with I use scaling in my line art, with this function my line art is filled completely, and no white is left out to be seen! very useful when you use solid brush for line art.
I'm also a fan of using a lower opacity brush, I love the see the color overflow into my line art and change to the color of each area depending on the color beneath the line. although I use solid line in the example image so I lower the opacity for the compensation instead.
another example is when using a fill tool with line art that has opacity pressure turn on. you can really see the problem right away and on the right side when area scaling is turn off. That's why area scaling is really helpful when you use this kind of brush .
Apply to connected pixels only
After we go through every important property. there are still a few useful functions that can help in some scenarios and is worth talking about. these properties are also not complicated compared to other option I've been talking about.
So, let's take a look at the first one!
■Apply to connected pixels only
usually, the property will always turn on by default all the time. when disable colors of the selected position when click on would be regarded as the range, so the entire canvas that has the same color would be filled in.
I'll you how it works in the GIF down below, cause the explanation kinda hard.
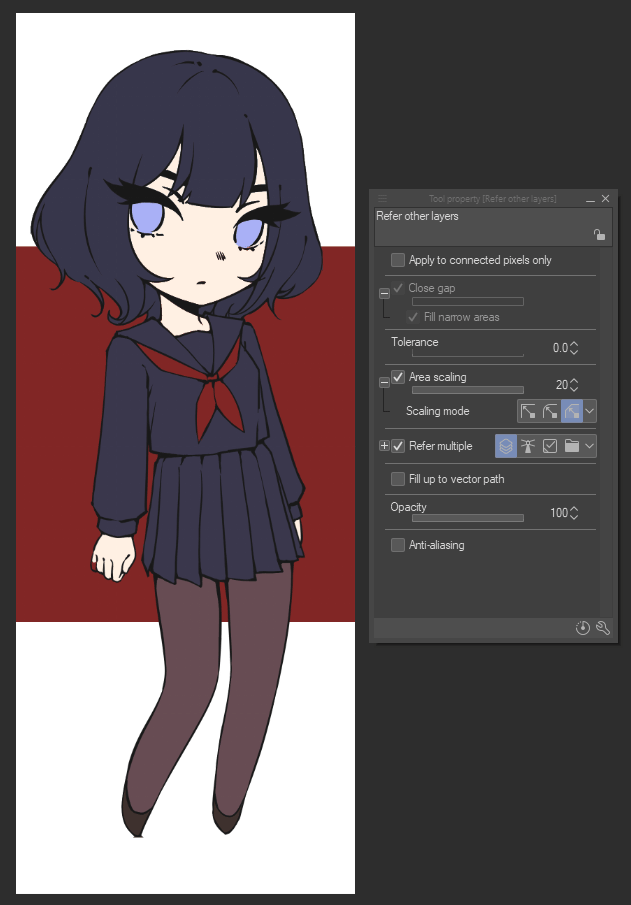
you can see each area that has the same color will be filled, even though their pixel is not connected to each other. this function can also use with [Tolerance] to fill colors that have similar range.
Anti-aliasing
■Anti-aliasing
if this is turn on this property will help the color that you filled softer look, kinda like blur smoothing function. depend on personal preference but for me, I turn it off all the time.
Fill up to vector path
■Fill up to vector path
this useful tool If you use vector layer as your standard layer for line art, since vector line is really good for line art, allows you to change shape, thickness, etc.
to unhide this function, go to the wrench icon and click it to open the Sub tool detail panel. > go to reference category > click to unhide [Fill up to vector path]
all of the vectors will have center lines that are called a path, this only exists on a vector layer only. with this function turn on, this tool will filling the areas up the center of the vector line.
the color will reach the center of the line, create 0 gap and white pixel unlike raster layer. a very good function for those who like to use Vector layer for the line.
Close and fill
■[Closed area fill]
this is my favorite fill tool that I've ever used! ability to fill in all the enclosed areas very fast is very useful and can help your workflow be more productive. let's go ahead and see how this sub tool works differently from the normal fill tool.
the rest of this tutorial we gonna talk about [Close and fill] sub tool first and then we goona talk about [Paint unfilled area]. but don't worry, the setting of these sub tool is the same as the fill tool that we use except that they work differently.
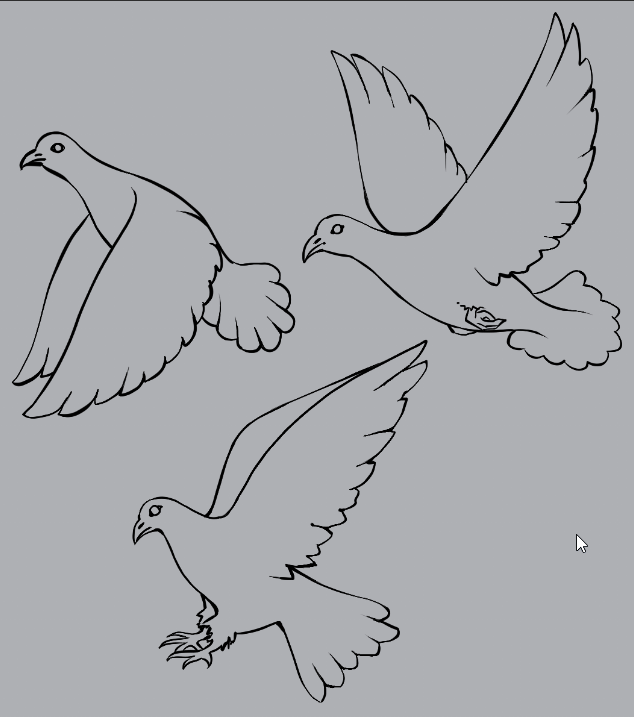
These areas that are surrounded by lines or colors are referred to as closed area, close and fill will fill whatever area that is enclosed when drawing a selection.
That's why [Close and fill] is so effective when it comes to this kinda thing. compare to normal fill that needs to click to fill each part of the area to fill. but close and fill can just draw selection and boom! Everything inside is now filled with color! that's why I think close and fill it's much faster and better compare to the rest of the fill tool.
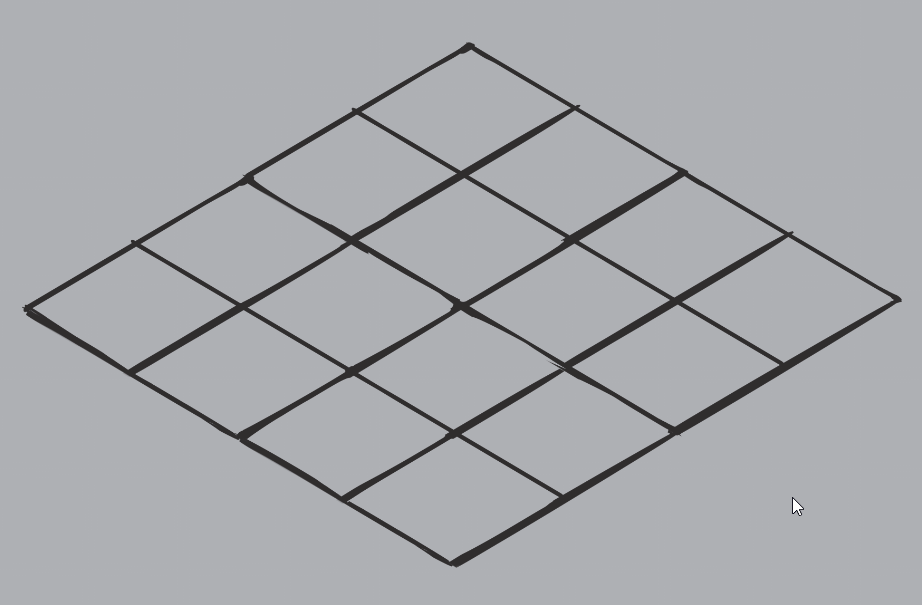
also If you don't want close and fill to fill specific areas. all you just don't enclose and circle them around them partially. so sometimes you don't need to avoid that closed area completely.
but the demonstration is kinda slow if you compare it to the original fill tool, sure it is very slow. but [Close and Fill] will come in handy when you have to deal with work that has complicated line art.
Let me show you
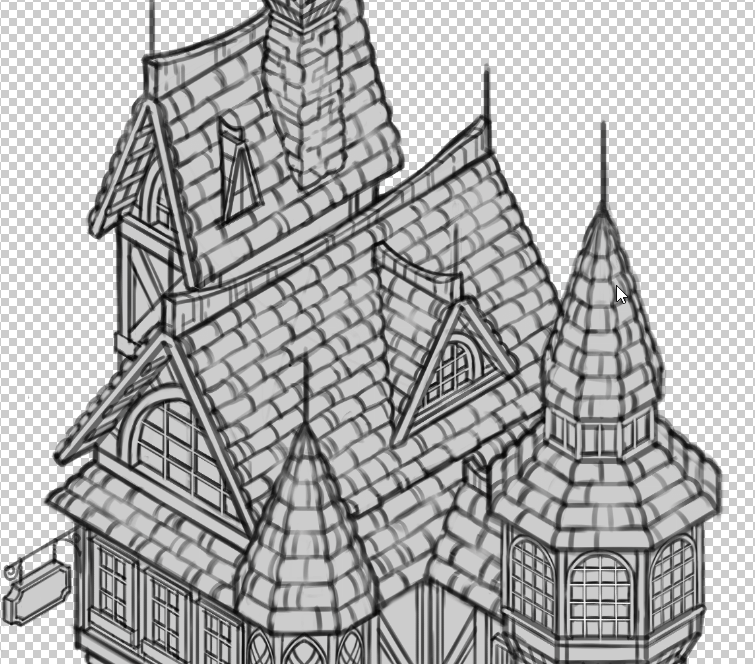
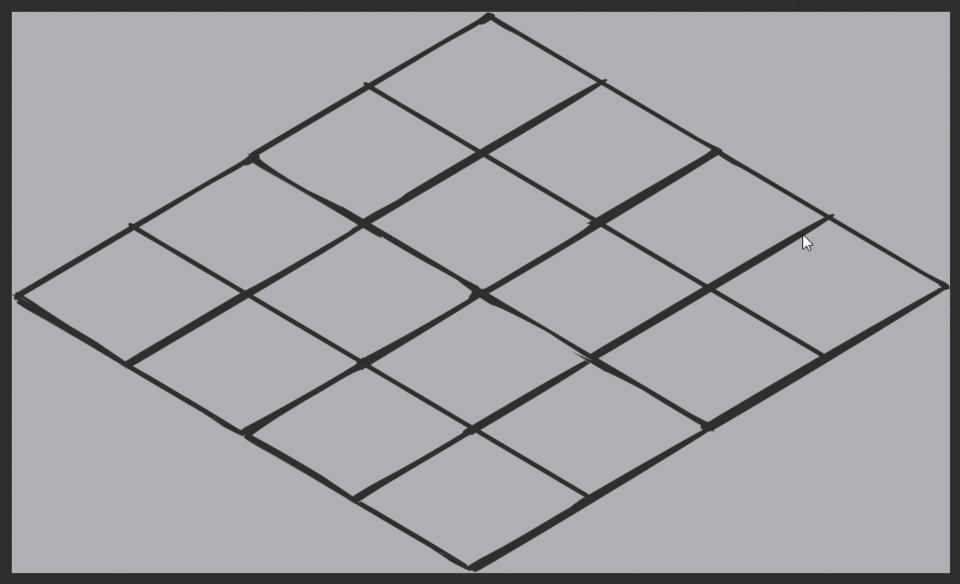
This is the Isometric art that I've drawn a long time ago. by the look at it, there is no doubt that this has a lot of detail in it. and most importantly I'm NOT using crisp and solid lines in this work! that is why it is hard for the fill tool to fill every part of this line art and also need to fill color beneath the line art too. that's why I think it's impossible for the Fill tool to do these kinds of work, and this is where [Close and fill] shine them most.
as you can see in the GIF image I fill those close area with little effort, even though I kinda rushing to fill those parts, but you still get the idea of how fast and effective this sub tool is. most importantly every line in that close area is filled completely with no gap no white pixel left to be seen! thanks to the [Target color] function!
[Target color] will be refer too which color or setting to be targeting in your selection depending on your setting, it also can be used for changing specific colors not only in transparent area but also black and white area.
tbh, this is the most complicated setting of them for me personally because are a lot of options that you can choose and play with. I recommend you to play with the setting to know what each option does effect in your selection
But we gonna look at only 3 settings, which I think It's the most practical setting that you can use in your work.
I'm also gonna leave the link that explains everything [Target color] setting down below.
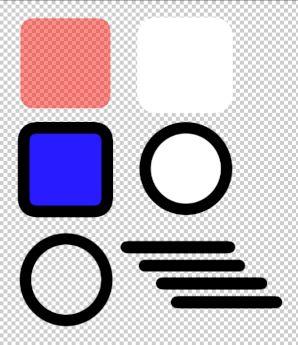
■1. Only white and transparent
with this option, [Close and fill] will only fill within the enclosed area, that are white and transparent. this option is very useful when you want to add new color to your line art. but since the tool can only fill white and transparent, they can't replace and fill other colors more than white and transparent.
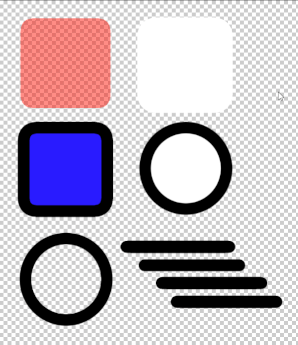
■2. Area surrounded by black
with [Area surrounded by black], the closed areas that are surrounded by black will be filled. I think setting will work best when use to crisp and solid lines.
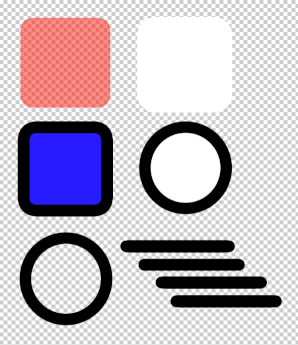
■3. All enclosed areas including transparency
this is the setting that I find myself using very often, when I'm using [Close and fill], this will fill within the enclosed area, and even the part in the partial areas of the selection will be filled as well, not just the enclosed area. basically, it will fill everything in the selection. I really like this setting, because I myself like to use texture and see-through brush so fill tool and can fill everything the line beneath is very convenient for me!
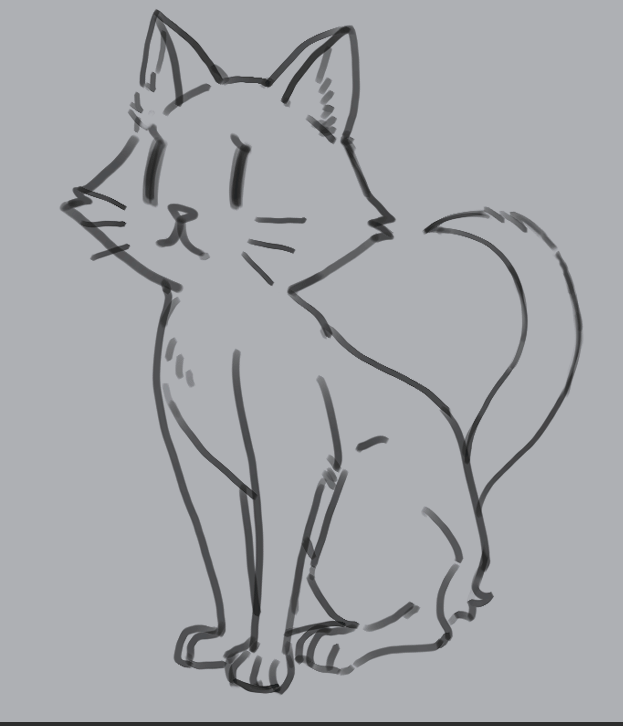
the reason that I really [All enclosed areas including transparency] is, when I use [Close and fill] on my work, especially with sketch brush that I use all time. it fills perfectly with no gap no white pixel at all. and the color beneath the line is fill evenly.
If you still think the setting is too complex for you, I will recommend these [Close and fill] that I really like to use in my workflow. I gonna just drop the link here.
Paint unfilled area
■[Paint unfilled area]
this tool has the same setting as [Close and fill], the only difference between them is [Paint unfilled area] use a brush to select the enclosed area that you want to fill, instead of circling around to enclosed area to fill it like a lasso tool.
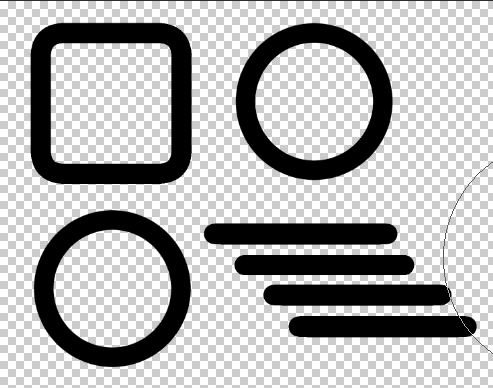
When you paint the area, that area is shown in green. and only enclosed areas that stay beneath within will be filled and areas that is not enclosed within the green selection would not be filled which is similar to [Close and fill]
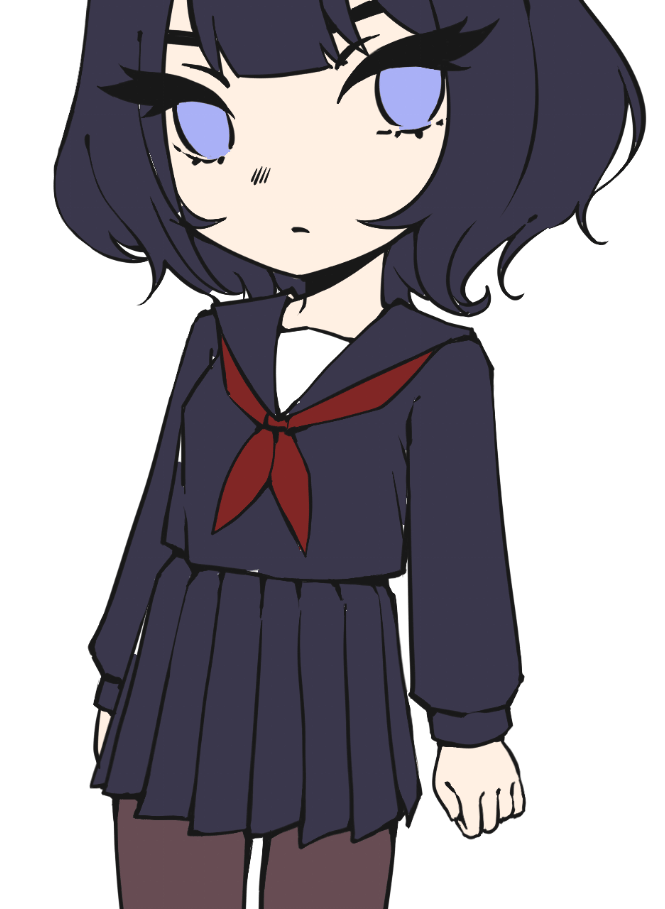
I usually use [Paint unfilled area] to fill the white gap that is left unfill by the fill tool.
and since this sub tool behaves like pen tool, you can actually setting and modify them just like a normal pen tool!
[BONUS] Mask your art with just one click with Auto Action
Finally! after we take a look at all the fill sub tool that clip studio paint provides us, now we come to the last part of this tutorial. In this section, I'm gonna will share with you a technique to be able to mask your work with just one click, with the help of Advanced Fill and Auto Action.
It may look complicated at first glaze, but trust me! It's actually pretty easy to understand. If anyone of you guys doesn't know what Auto Action can do and how much it can help you speed up your workflow
Enough talking! Let's get started!
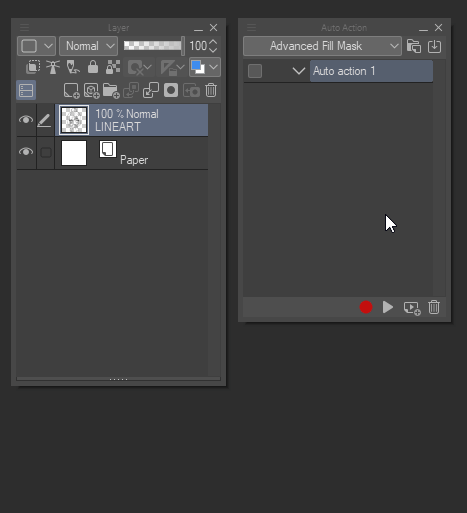
First thing first, we need to find Auto Action and open it up. for those who can't find Auto Action palettes or the palettes it's hidden somewhere. you can go to [Window] > scroll down until you see [Auto Action] > Click on it and Auto Action palettes will show up somewhere on your screen.
And here it is, Auto action is here! don't panic! I know it's intimidating, I also have the same feeling when looking at it without knowing how they actually work. now, we gonna take a look at how each button and command work in the next picture.
I think the first thing we have to do first is to create a new Auto Action set first
(1) go to the top right panel, and you can see the folder icon. Click on it to create a new set.
(2) after clicking on it. the small window will pop up to let you name the set that you are about to create.
after you create the set. the set will automatically create one auto action for you, It works like a folder that contains every action that you record in the folder. But that auto action is still empty right now, so I gonna do a little demonstration of how recording work in auto action.
(1) you can see the Red circle icon button on the bottom of the palettes, click [Start to record auto action] on it here to start to record the auto action.
(2) everything you do after that, changing layer order, creating a new layer, changing name everything all the operations will be recorded in the auto action.
(3) Click [Stop to record auto action] on the red circle that now appears to be a red square now. this also tells you whether auto action is recording or not. Click on that to stop the record auto action
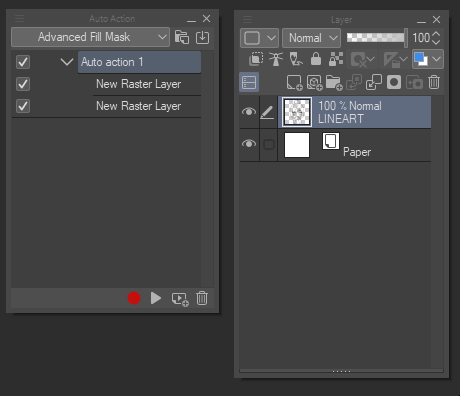
after we finish the record, now we go auto action ready to play! even though it's just creating 2 new raster layers. but the point is to help you understand how auto action work!
Now, click on the Play button on the bottom to start the auto action and look at how it actually works in our layer property!
after clicking to play the auto action operation, we will have 2 new raster layers created in the instant!
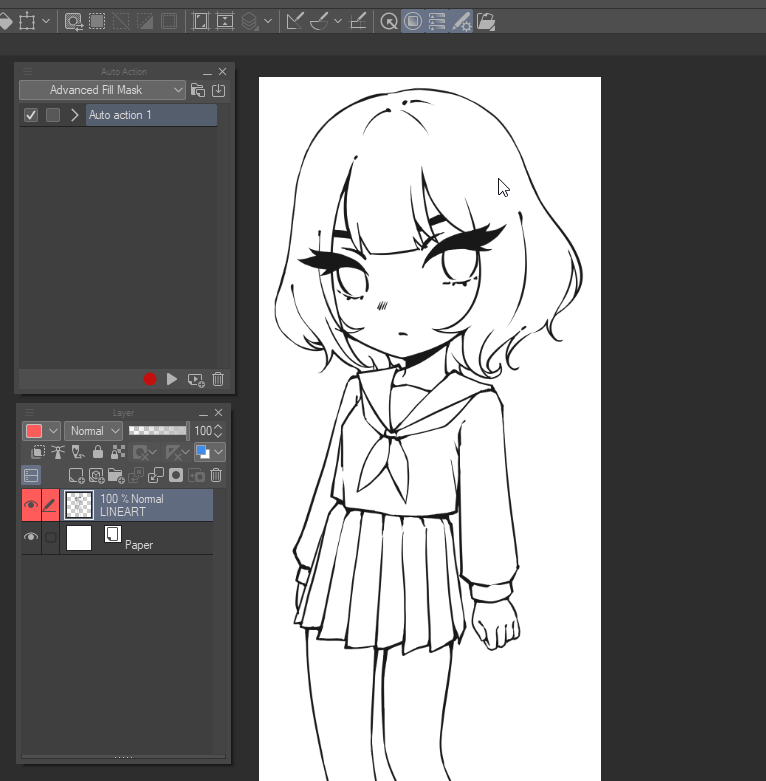
I think it's about time to get to the real thing huh? you can see I already prepared my art for the next step I gonna do. I place the auto action panels and layer property beside each other to let you progress throughout this tutorial on how to mask your art with just one button!
1. In the First step, I click on the button to start the record. Then, I click on this line art layer that I want to be fill. right-click on the selected layer and choose [Duplicate Layer] to create another line art layer above the original one.
2. after we have the Duplicate layer now, I'm gonna move to the next step. go to [Edit] > and click on [Advanced Fill]
3. Advanced Fill Dialog Box will appear on your screen. you can see the setting is identical to the normal fill tool. If your line art is crisp and solid like mine you may like to copy the setting and use it in your advanced fill setting! but this setting really depends on the brush you use as well. So, I encourage you to play with it and see which setting suits your workflow the most. after satisfied with the setting, I click okay to confirm it.
after I fill the layer completely, you can see that the color layer is actually placed above the line art layer. in the step, we gonna move it down below the line art layer
also don't forget to always keep track of the auto-action record. to see if we actually record unwanted operations without knowing or not. since auto action will record almost everything we do in the clip studio paint right now. so, be careful!
4. In this step we have to move down the color layer, you need to go to [Layer] > [Layer Order] > choose [Down] in order to move the layer below the line art layer. by the way, you can't just drag the color to the bottom of the line art layer, since auto action will not record that action. that's why we need to use this method instead.
now my line art is masked! you can just click to stop record and now you will have auto action that will mask your line art with just one click! but I will not stop here, I will adjust my auto action a little the suit my workflow change the layer name, create folder and insert the layer, create a new layer and clip it to the base color layer, etc. to show you what auto action can do.
5. I know that I'm gonna use this auto action a lot in the future, so I decide to change the layer name. you can see the auto action recording that action as well.
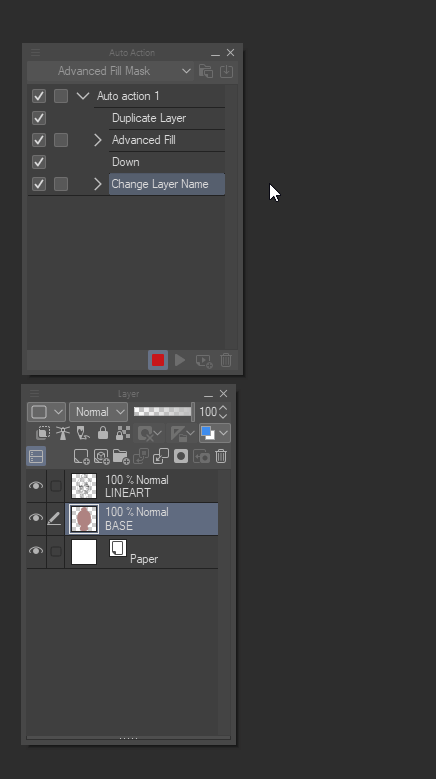
6. After I change the layer name. I click on the Base color layer that I just changed the name recently I right-click on the layer, and choose [Create folder and insert layer] to put my color layer in the folder.
7. I also create a new raster layer and choose [Clip to layer below] to prepare for the next step when I want to add color to each part of the line art like hair, face, skin. I think this auto action is good enough for me now. so, I check auto action order to see is something wrong or not. then, I decide to stop recording.
and now you have mask auto action ready to use in your art!
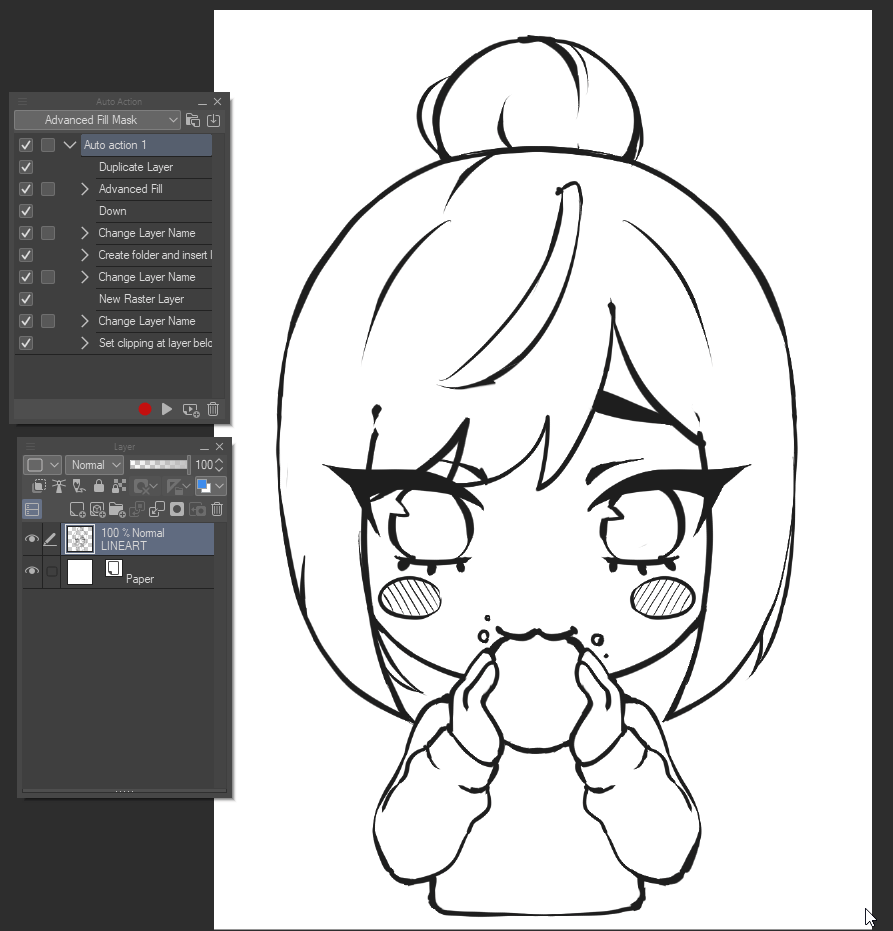
after I have everything all set, I delete all the layers that use to record auto action, left with only line art layer. so, after everything is back to normal, I go ahead and try how auto action work on my art!
but the mask is not perfect though, that's why I need to use selection tool to select the unwanted and them with this tool.
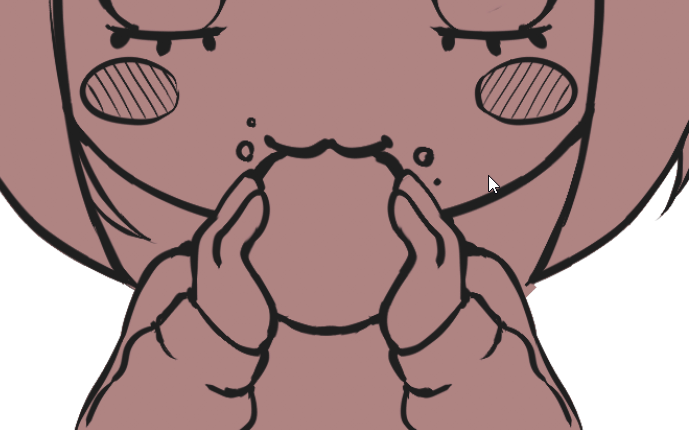
while I use [Auto select] tool, I hold Shift and left-click at each unwanted part. then click on [Delete] in the launcher or just simply press [Del] button to erase those unwanted parts.
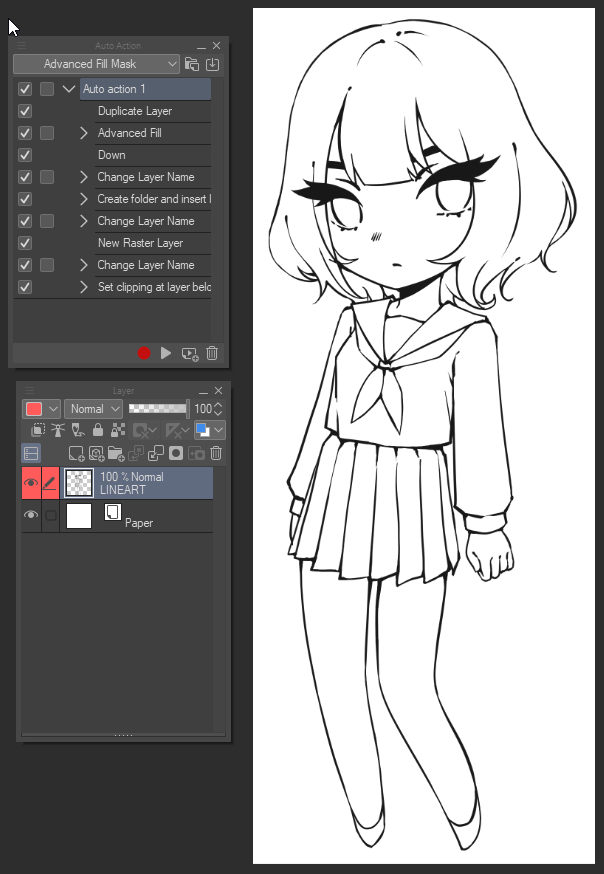
After, see that auto action work perfectly fine. then, I will use different art to see how it look.
and seems like everything is doing fine!
Also is good to mention that auto action can also be use with shortcut keys and that can make everything more effective. In order to assign the shortcut key to auto action you need to go to [File] > click at [Shortcut Settings]
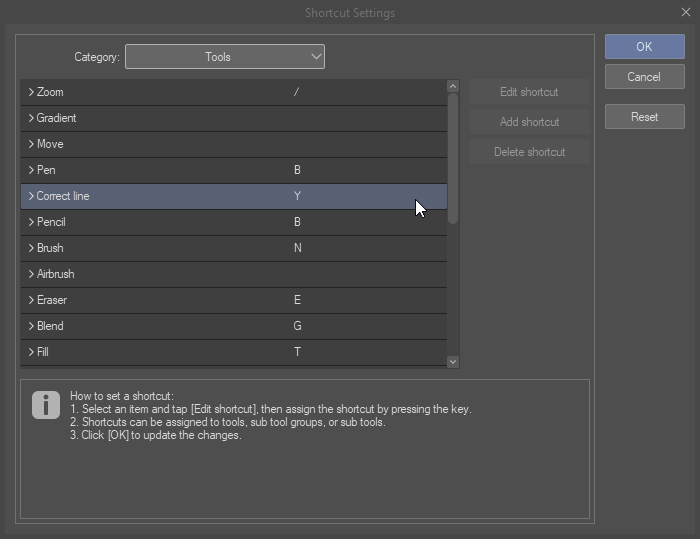
[Shortcut Settings] will show up > click at [Category] on the top of the box and select [Auto action] > click at the set and expanded it > select auto action that you want to assign to the shortcut key > after selecting the auto action click at [Edit shortcut] and use the button that you want to assign. my short cut gonna be [Ctrl+Alt+F] but everything depends on your preference.
and now you can fill your line art with just one shortcut key! very cool isn't it?
you also can add your Auto action to the command bar, a very good alternative if you don't want to use it with a shortcut key, and you can add multiple auto actions to the command bar too!
in order to add auto action into the command bar. simply right-click on the tab > [Command Bar setting] > then Command Bar setting dialog box will appear > similar to shortcut key setting, choose [Auto action] and select on auto action that you want to add> click add to confirm. Done!
and that's all I want to tell you in this section! I'm sure that this technique will help in some way and make your workflow more productive for certain!
Author's word
That's all for the tutorial! Thank you so much for reading this far. actually, I feel grateful that I can share some tips and tricks with you guys since while I writing this tutorial I also learn a lot of new techniques throughout this tutorial too! so let's say it's a win-win scenario yeah?
I hope you found it helpful from what I taught you in this tutorial and I hope these techniques will help you work in the future
If you have a question or have a problem understanding some parts of the tutorial, please don't hesitate to leave a comment down below, I will reply as much as I can to help you! and about what I use in this tutorial I leave the link below here.
See you guys in the next tutorial!


댓글