
Intro
I used to be a portrait artist before but that didn't teach me how to exactly draw a face, because what I usually do is just carbon copy the photo side by side.
However, as I draw every detail of the face, I began to notice some minor details.
Of course, that wouldn't be enough to teach me but it would be more if we became knowledgeable of anything going on on a human face.
Chapter 1: Pre-study by Tracing
For now, let's try to pre-study a face by tracing.
If you have experience in portrait before, you don't have to do this and skip to Chapter 2.
As you can see in the photo, I trace every part of the faces, thanks to my friends who allowed me to use their photos for this study.
My goal here is to find visible muscles as much as possible
and don't get bothered if it would turn out to be ugly when done in hard lines because our main purpose is to study
Maybe do some, 10 or more photos and make sure the faces you've trace has obvious features such jaw, cheek bone, etc.
Chapter 2: Face Feature Placement and Proportion
If we want to know how to draw a face, we might also need to know the placement and proportion of each facial feature.
Let's start with a cross, and add an oval to it.
In the middle of the vertical length is where you place the eyes.
The Spacing Between the Eyes has the same length as a single eye.
Of course, this also depends on the feature of the person. Just use this as a standard measurement.
If you divide the length of the space between the eyes and the bottom of the chin into 3 parts (blue line), you'll get the placement of the tip of the nose, and the lower part of the lips.
The width of the nose is aligned with the teardock of the eyes, and this also depends on the people feature or race.
And the end point of the mouth's width is aligned somewhere in the iris, but whenever a person smiles, the width extends a little which will align the middle of the pupil.
Chapter 3: Head
Now, if we want to know how to draw a face, we should at least know how to draw the head.
Because this will help us guide where the face should be... facing.
One of the common ways to draw a head is using the Loomis method.
Let's start a drawing with the side view, and the front view.
Do this drawing in order, Left to Right.
1. Draw a Square
2. Draw a Circle that fits exactly inside the square.
3. Draw a circle Outside of the square that exactly fits the square.
4. Draw a cross in the square that divides the square into 4.
5. Draw a rectangle with the size of exactly half of the square, and move it below the square.
This output can actually be useful from both angles.
Now, let's figure out where the parts should go.
The left will be the side view, and the right will be the Front View.
In the front view, you should cut the circle that exceeds the side of the square.
On the side view, the Ear should be placed below the horizontal line of the cross, do the same on the front view.
On the side view, draw a vertical straight line starting the edge of the circle on the left, and ends until it aligns with the bottom of the rectangle.
Then estimate and draw a short horizontal line from there and then extend the drawing until it connects to the center bottom of the bigger circle, then extend the drawing again until it connects to the ear.
Now do the similar action to front view and just estimate the width of the chin.
Since we're done with the placement and proportion of the eyes, nose, and mouth. The next step will be easier to follow.
The horizontal line of the cross is actually where the eyebrows should be placed.
After that, it should be easy to locate the placement of the facial parts.
Though we didn't know the exact placement of the facial parts on the side view, because we haven't talked about the shape of the head just yet, that includes some depth.
This one is a little harder to explain so maybe follow along. Green Arrows serves as a guide.
Start with the side view.
Just remember the shape of the lightning.
After that, draw a curve line towards the middle of the ears, a little below eye level.
Remember this part because we can use this later.
On the front view, the shape is a little different but try not to be meticulous about it.
Adding the rest of the parts would be easier now and you'll notice that everything magically aligns by itself.
Though, the face wasn't drawn perfectly and requires minor tweaks and some freedom to adjust, and that part is for your, after all, a human face isn't always symmetrical and perfect.
Now drawing this in different angle can still be hard so I have some tips for you when doing it.
First is, the two circles are shaped similar to a single bead from a bracelet.
Second, just to make sure you know, the Lightning Line I mentioned earlier means that there's a depth in that area so the eye placement should be going inward the face.
and also the cross within the inner circle can help you guide where your character should be facing.
Third, if it's hard to do it in perspective, you can use boxes and straight lines to make it easier to figure out the direction of vanishing point.
and neck is a cylinder whenever you want to connected the head.
Fourth, Keep in mind that the face is slightly curved when viewing from the top or bottom.
Fifth, if you'll be creative enough, as simple as a whistle can be a reference for the head angles. though some adjustments should be done but the main shape is present to start with.
Now, it's time to proceed to the next topic which is how to draw each facial part.
I've tried to restudy and figure out the face and tried to turn everything into simple planes and geometry in my own way and here's what I've achieved.
Now it seems some of here are understandable but still, I'll gonna explain each of them because there are some minor details that should be pointed out.
You also have to consider the other parts of the human face such as muscles and the skull.
I have traced one of the photos I got from a friend to show the details of the muscles, skull and bone.
Though, don't be intimidated by it right away since we'll be only needing a few of those.
Chapter 4A: Eyes
First, keep in mind that eyes have skin and thickness, therefore, they could catch a light at a certain angle.
Then, a single straight line can help you create a direction of the eye and shape differentiates on how big it can open.
The skin that makes the eye close is the eyelids (red highlight), that based on the eye's spherical shape.
While there's also a skin above the eyelids that could also affect the eye's shape (green highlight).
Most of the time, the skin above the eye overlaps the skin below it.
and the skin above is a little more forward than the below so it's a little tilted angle on side view.
Keep in mind that the eyeball is spherical so when viewed on top or bottom, it will bend accordingly.
and the eye pupil and iris are going inward, so the shadow is cast differently from the other areas of the eyeball.
Now, when converting the eyes into simple geometry, it would be easier to understand and the plane that is near the nose creates a shadow.
You might notice that some people have double-line eyebags. That is actually formed by the bone structure, since a sleepless night weakens the muscle around that area then causes it to form.
Now, of course, if people wanted this to turn into anime, these information can still be applicable.
Basically, anime styles came from simplification and exaggeration of reality. Since anime should be animated, the lesser detail, the faster to finish the animation to make.
Chapter 4B: Nose
To draw the nose more simpler, you can always draw a triangular prism just like what I draw in the first row.
But to make it more defined, you can reshape it a little to closer to the real nose just like what i did on the second row.
to add more detail, you can start with a circle in the middle and extend a bridge on both sides.
you can also do this with geometry.
When you are now at least capable of drawing the nose, remember that in front view, the bottom part can be visible.
and on this area of muscle could create a soft shadow, implying depth to make it look less flat.
You should remember that this area in the middle should create a shadow to imply that it has depth. If not, it would create an illusion that this area is just straight.
Though of course, there are noses has that type of nose bridge so technically, it isn't a mistake.
The tip of the nose has muscles on it so if you try to touch that area, you'll notice some little slice in the middle. It's one thing you can exaggerate when doing a stylized cartoony drawing.
and that bump on the nose bridge causes by no other than the bone structure.
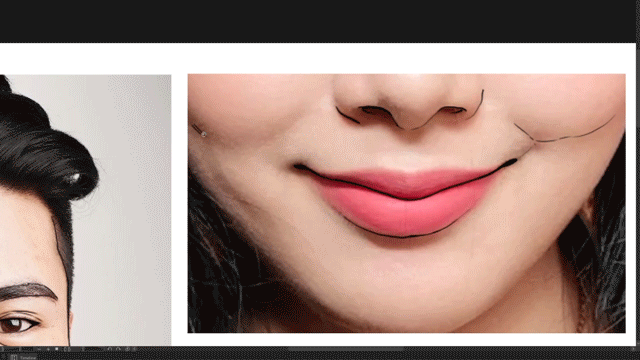
Chapter 4C: Mouth to Cheek
Before we start, remember that the face is slightly curved, that also accommodates to the mouth.
So drawing and imagining it being attached to a cylinder means will be very helpful.
Remember that there's a muscle in this area that could appear when smiling.
This is also the area where the dimples could appear between the spaces of the muscles.
Sometimes, making it look like a mask in the start makes it easier for us to imagine the placement and shading of the mouth.
Drawing a side view of the lips would be easy, but things get complicated when drawn from a different angle so just imagine that lips are supposed to be going outward.
So on the lower angle, you'll only see a glimpse of the lower lip while the upper lip is shown more.
While the angle from above is showing the opposite.
These areas (blue) are prone to highlights. It's actually a subtle detail that can improve your drawing to realism when painting.
When smiling, the lips stretch to the side and it could make the lips appear thinner.
and the muscles stretch as well trying to hold back the expansion of the lips receiving pressure from the push.
This highlight on the cheek from anime actually cause by a cheekbone.
Most of the time, this area will be the common part for the highlight to appear since this always been the sharpest edge of the bone and somehow, the thinnest skin on the entire face.
Outro
This might be like much-bombarded information of an individual but I don't expect you or advice you to memorize it, that would be stressful.
Even pros use a reference from time to time, sketch from time to time, and review from time to time.
The best way to memorize it is keep referencing it, and the more you do it, the less you'll need it in the future.
이 게시물에 '좋아요!'를 누른 사용자


댓글