
1◾Introduction
Hi everyone, welcome to another chapter of my tutorial marathon, am Daniel by name, commonly known as Dannyyoung22, and I will be showing how to create knight and sorcerer scene using props on clip studio paint (CSP) app.
***
I will be using my smartphone to do today tutorial, and I will be show useful and handy tip to creating dynamic and magic scene with some CSP shortcut tools to make create a fantasy knight and sorcerer scene. I will be taking the tutorial one step at a time for beginners better understanding.
What do we understand as props?
A prop, formally known as (theatrical) property, is an object used on stage or screen by actors during a performance or screen production. In practical terms, a prop is considered to be anything movable or portable on a stage or a set, distinct from the actors, scenery, costumes, and electrical equipment.
A prop can as well be anything that a cartoon character uses to perform an action, like a magic book, a staff, a shield or a sword.
***
Unlike accessories, props are generally objects that the character holds rather than wears. The use of props helps further define your character as well as communicate the action being performed.
Let take for instance, if your character is performing a magical spell and the spell been chant is affecting other objects like a book for example, we might need to add a character with either a wand or magic staff in his or her hand with variety of books floating about.
***
Note: the prop item notice are the character (subject), the staff and the floating books.
Now if you are a beginners or you are new to propping item, this question will come to mind,
i)• What are the format which props save?
If you have come across image format or have heard of it before, you will know that images are save in various formats and some of the format are [JPEG,PNG, Photoshop format], this few listed format have their own way of expression when an image is save, but we will just be looking at just two formats JPEG and PNG.
And for a jpeg image when save, comes with the objects or subject and it background,
While that of PNG image when save or stored, save only the objects or subject with no background/transparent background.
***
But prop items are commonly save as PNG format so that they can be use later on and they will not reflect background when add onto a scene.
With the the above said, we can now move to the next related aspect.
ii)• CSP handy tools to the creation of props.
At this point, I will like to point out use tools and setting which Clip studio paint [CSP] has made available for creator to easily access the tool and images, and what we will be looking first as above is
• The way to which we can save props on CSP.
The first method I will like to mention is saving props into ones [Library storage] in a PNG format,
[Library storage] saving process,
After creating an object which we want to use as a prop, which for me is a pumpkin head on a Canva size [height 1000px × 1000px with resolution 72] which we will be using throughout the tutorial,
***
Open the [Layer setting] located below on the [palette bar]. In the mini dashboard displayed we will see the layer which we have save our (pumpkin) image and below it is a layer called [blank paper], click on the icon inform of a eye by the left hand side on the [blank paper] axis to turn the layer invisible.
***
Notice now behind the pumpkin head image, can see some dots in form of a puzzle that show the image is now without background.
With that done, we can now save the image into our library storage by clicking [export to photo library] shortcut which is on the [command bar],
***
And that finalize it with our image now save in our library storage in a PNG format,
***
Also the [export to photo library] can be access by clicking on the three bar which open the menu page.
***
Click on file setting,
***
A new dashboard page will displayed, we can now see [export to photo library], select it.
***
On that same page we can also see a selection called [export (single layer)].
Click on it, a new dashboard page will display here we can see the various formats to export the image like JPEG, PNG and more, but we just need to select that of PNG and some other dashboard will display, we can just continue clicking ok till it's finish.
***
And those are the ways to export image.
• [Item bank] tool saving process,
This process first require us to bring the shortcut setting called item bank, to do so we need to long press the palette bar, a dashboard will display with two settings [layout and palette setting], click on the [palette setting] a new settings will display, we can now select the item bank, move it to where ever position we want it on the bar and it will then be save on the [palette bar].
***
Now, after we have create our prop objects or subjects, we can then use another of CSP setting that is very useful which is,
• Folder tool [📁📂]
This [folder] tool is so useful that I often use it to help compile my work for easy understanding as shown below, and if you are new to using CSP, I do advise you try it out.
With the objects or subjects image properly compile in a folder, we can now repeat what we did above by making the [blank paper] layer transparent or invisible.
***
Open the [menu]>[Layer]>[File object]>select [convert layer to file object]
***
A new dashboard page will display, click on [keep original layer] if you want the software to keep your folder been deleted, also above it we will see a setting [copy paper layer] but we will just disable this cause we want our image to be stored or bank as it is called in a PNG format, not a JPEG format.
And lastly, their is a bar called [Area] which shows how the image can be save and it has two selection options [1][canvas size] and [2][drawing area], but we will be using [canvas size], then click on [ok].
***
[Save file object] dashboard page will display, we can new select [save] and our image is save.
***
For we to be about to reach or access it, we just need to first be in the canvas which we want to import onto, then click on [item bank icon] which is the icon in a box with a circle on top of it,
***
a new dashboard will be display, by the bottom left corner there is a paper shape icon with a plus sign below, click on it and it will take us to the [open] dashboard where we can now import the save image onto the [item bank] tool.
***
Now, import the image from the [item bank] tool by dragging the image from the [item bank] dashboard onto the canvas as shown below.
***
The image is now save as a new layer but we can not do any adjustments until we create a new layer and merge it to the import [image layer].
***
With that done we can do any adjustments we want.
***
Moving on, we will be looking at,
• The various handy selection and fill tool I use.
CSP [studio mode] is the most complex mode than the CSP latest mode the [simple mode] cause of it's many setting and tool options, but I just love it, I don't know if it is because it was the first mode I use but I tend to have come across so many useful tricks which are handy and I would like to show some of the as I will be using them in this tutorial.The first two tool we will be looking at is the,
• [Lasso and shrink selection] tools, they are handy tools which when one want to select an object or some area of that object and we don't want to select the entire thing, this select tool is solve that with easy.
***
• While [shrink selection] tool similar to the lasso tool it can also select object but as the name implies this tool react to selecting the borders of an enclosed object when we use it to draw around the object.
***
Next is,
• Quick access [Shortcut setting]
This setting I found mostly useful cause it gives CSP user quick access to tools and setting.
[Quick access] can be access on the left side of the [palette bar], click on the icon looking like a letter Q(a circle with an arrow pointing inward)> a mini dashboard will display with some default tools.
We can also add setting to it by going the needed setting and by the right side we will see the icon shape like letter Q with a plus sign on top of it, click on that will take the setting to the current open. Page on the [Quick access].
***
In this same [Quick access] setting, we will see another set of tool that are already set default as shown below.
And they tool is,
• The Transformation tools,
[Transformation] tools are different types but the ones I love mostly use are of three type which are the [scale/rotate] [free transform] and [mesh Transformation], the all a hand in their on way like for example,
***
• When I want to just increase the size of my object or rotate it, I just make use of [scale/rotate].
• while if I want to tilt my object to either the left or the right or I just want to stretch either the top or bottom or the left size or the right, I can just make use of [free transform].
• Hence for that of the [mesh Transformation], we can adjusted it from different twelve points to any side.
***
2◾ Thoughts and Decision that is to be made before making props.
• Decide on what kind props are required? To the creating a properly composition in the scenes, like for this tutorial we are too to create a knight and sorcerer scene, so we need to create item the belong to both the knight and sorcerer.
• Interpret plans made from rough sketches to detailed designs.
• Decide on the kind of perspectives you want to make use of before starting a design.
• Carry out historical or cultural research to make the items look authentic.
• Experiment with different materials and methods to create good props such as using of shapes and CSP 3D model.
3◾ props for the knight and sorcerer scene.
To create a props for our ideal kind of scene, we just need to layer out the moveable things which can be use to identify our fantasy scene that can either below to the characters or that are on the background.
1• Sorcerer prop items,
So if we are to draw Sorcerer props, we need to identify the various items which belongs the sorcerers. This now bring our to the now creating of,
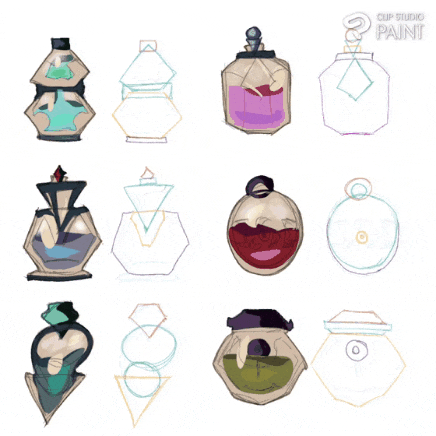
1) potions set (i),
Potions are we know are liquid substances which varies on colour appearance and functions such as love potions, elixir of youth potions, and much more.
So now we by using what we know to create what we know or don't know as it better easy and makes the work more fast. REGULAR SHAPES [such as triangle, square, circle, love shape and more] are artist “cheap code” for it is very useful when we want to draw shape of an object for example.
With that taking to account, we just started the drawing of the various potions with the above regular shapes indicated with the the [primary colours], cause potions are contained in either bottles or plastic rubbers, we draw some if the container face forward or side ways and add some base colour.
***
Note: that our base colour are place as shown above in the LAYER setting [1] ate the bottom of the Folder indicated [2].
We now create a new layer in the [Folder] tool, add some colours to the potion containers to show the viewers the liquid substances shape and also the appearance of the container.
***
We move on to next create two layers, set the up one blending mode to OPACITY and then add some soft colour to the potion to give it that glowing effect, while for the layer below we add so flat colours and shadow to the covers of the potion containers.
***
We finish it up by saving the art piece in a PNG format.

potions set (ii)
Same as the above set of potions, we will be using REGULAR SHAPES mixing the various shapes together to create this set of potions and their containers starting from the top as shown with the primary colours.
So start of by we create another layer below the various layer and add the base colours for the different potions containers.
***
Create another layer indicated [2] above the base colour layer located on the [Layer] setting indicated [1], add dark colours to some area and a white highlights to the container,
Next, we can move on to add colour inform of a liquid substances into the different containers, also adding some dark colours to show the shaded area which are all done on another new layer above the form layer indicated [2].
***
Then we can save it a PNG format as explained above.
***
The next item on this sorcerer list is,
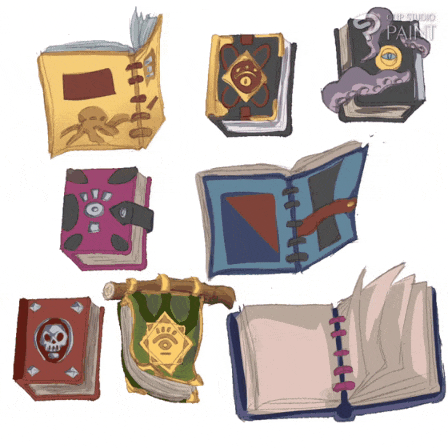
2) Books
Spell books are widely use by sorcerer to help them study the forms of spell practice by form sorcerers, also this item can also be use by knight for they also read and study to be knowledgeable on the different history and combat skills.
To draw this, we start by drawing the rough sketch, add the base colour and highlights all on a different layer as shown in LAYER setting indicated [1]> dashboard indicated [2].
***
And always remember to save as PNG as above said.
***
Moving to the next is the,
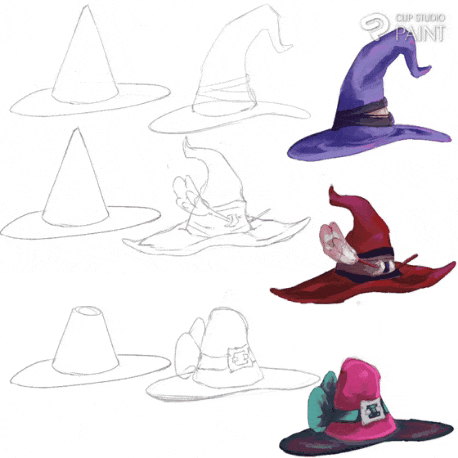
3) Sorcerer hats
Sorcerers are said to mostly have hat to either conceal their appearance or use the them for magical practices, So to better indicated that our character is a sorcerer, we need to create a hat. As you may have notice this about me is that I always love implemented shape to my work as it is vary helpful,
And to draw this sorcerer hat we will use a conical and round shape to construct or create the hat props on a Layer, Then on another layer set to MULTIPLY and use the drawn conical and round shape as guidelines to draw the line art of the hats which are in three different forms one in a Ziggy, curvy and short around the top.
Following that, can then create another layer below and add the detailed painting of the hat props which are the base colour, shading, halftone and highlights.
***
Here's is the finish piece Which is to be save on a PNG format by the way.
This will now take us to the next item on the sorcerer list.
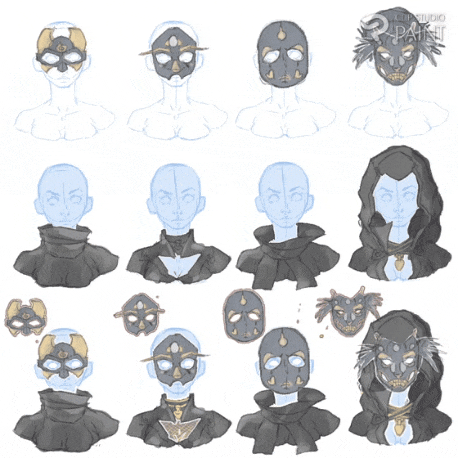
4) Sorcerer Mask 🎭 and clothes
Base on what was said above item about sorcerers most at time liking to hide their appearance will now bring us to the creating of this part of the item called the SORCERER MASK which sorcerers use to hide their face from been seen.
While that of the SORCERER CLOTHES are the appreal wears which sorcerer put on and this can be use to distinguish them from regular people.
To achieve this for the masks, we need to first have a character figure, the draw the mask in different shapes having different expression around the eyes and some can even have furs coming from the side like in that of the last on the right.
For the appreal wears, we draw a straight down garment with ribbon at the neck and waist or another will a belt at the waist and the ribbon on the neck.
***
On the the third row figures, we can put the sorcerer mask and appreal on the four figures to give each of them their unique look.
***
And this brings us to the end of the sorcerer's Prop items and it takes us to the next.
2• Knight prop items,
Knight prop items are the various items which a knight poses tat he or her a knight like for one a,
1) shield 🛡️
Shields are the objects mostly use for self defense with some of them holding the Crest of the kingdom like for the first shield a SUN CITY crest, the second a OMEGA crest and the third a AMAZON crest.
To a frontwards view shield let's use circle, square and upside down triangle rough sketch, do the line art and lastly add the detailed colours composition to the shield.
***
And with that we are done with the Various shield, save them in a PNG format.
***

Next up, we will be looking at the knight attacking arsenal which is the,
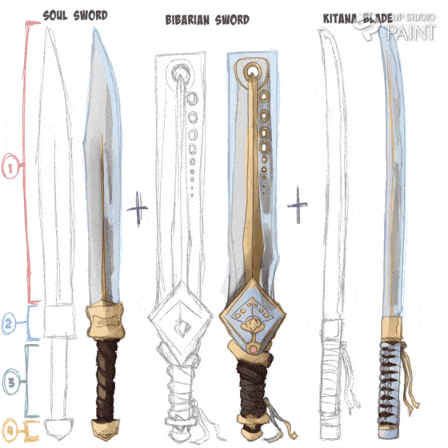
2) Weaponry set 1: swords ⚔️
SWORDS are pointy metals with either one or two sharp sides, so to get such an object, we start by draw the sharp end metal indicated [1], follow by the other part of the sword [2][3] and [4] in the order of the PRIMARY COLOURS. Using that formation, we can now draw three sets of swords soul sword, Bibarian sword (bar) and lastly kitana blade.
***
With our rough sketch on one hand, we duplicate them and use them to create a line art for the various sword, add some details colours to the sword as displayed in layer setting indicated above [1], in the folder indicated [2].
With the various work now done, we can just save it in PNG format as well.
***
With the various work now done, we can just save it in PNG format as well.
***
3) Weaponry set 2: dagger, arrow and bow 🏹
Here we can on set (ii), we draw all the rest weaponry which we will be using in the tutorial such as sword, dagger, bow and arrow.
Starting with drawing the line art for the various various weapon prop items, add some details colours to the items as displayed in layer setting indicated above [1], in the folder indicated [2] an [3] indicating the Layer dashboard.
***
That's concludes the creation of the weapon prop items as shown below.
***
The next item that we will be talking about is the,
4) helmets and armour wears
The helmet and armour both service are protection equipment for the head and body.
HELMETS are made with metal and the come in different form and shapes and they are of deferent colours like grayish and yellowish as shown below.
While ARMOURS are wears comprising of material and metal and the wears can be of different design as shown below.
***
Here is the the finish piece done separately on different Layer and save in a PNG format.
***
And with this part we have finish creating prop items which we will use in the scenes.
3• Room design,
This aspect we can be ignore do it's props and last during the background scene design add them to it when creating.
But for the so purpose of this tutorial arm which is to help beginners know how to create props, I will make the room object into props separately to later place them onto the scene.
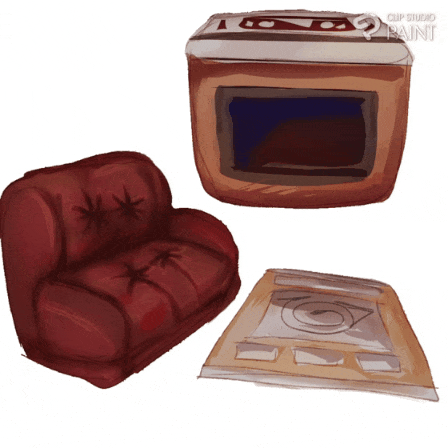
1• Chair, mat and table
We start by drawing the line art of the objects,add detail colour as displayed in layer setting indicated above [1], in the folder indicated [2] an [3] indicating the Layer dashboard.
***
Below is the finish work of the chair, table and mat prop.
***
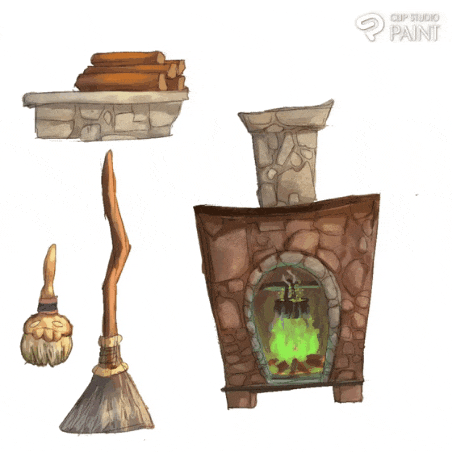
2) rock layer chimney, broom and wood holder
2• Rock layer chimney, broomstick and brush
Now some object in this this part are not moveable object like the chimney and wood holder for one but props are not entirely fix on moveable objects along.
We start by drawing the line art of the objects,add detail colour as displayed in layer setting indicated above [1], in the folder indicated [2] an [3] indicating the Layer dashboard.
***
With the we are through an it is save in a PNG format.
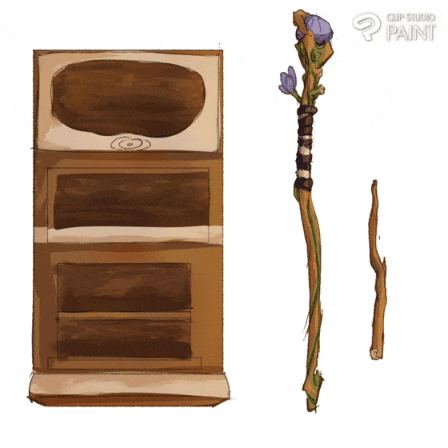
3• Cupboard, sorcerer staff and wand
Using almost the same process as the above said we can create a cupboard which are use for holding items like potions and books, sorcerer staff and wand which are use for magnifying the spells.
***
LAYER setting indicated above as [1], in the folder indicated [2] an [3] indicating the Layer dashboard.
Finish piece in PNG format.
***
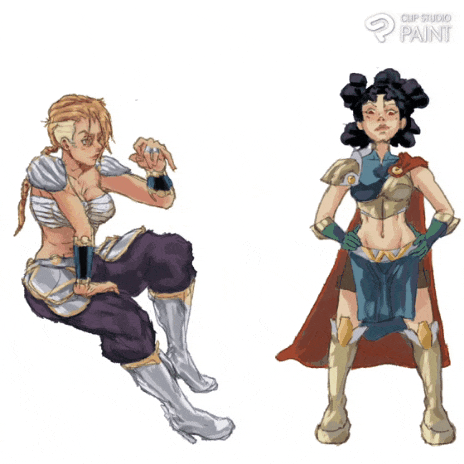
4• Character designs
Here what we need to do now is draw the different characters or subjects which will take part in the scene. And firstly we will be looking at drawing.
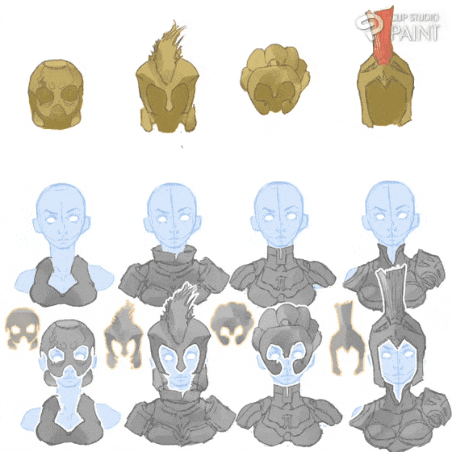
i) sorcerer character design
Sorcerer is a person who performs magic by using the spiritual power attempts to influence the surrounding world. Taking to account those prospect, we will start by drawing some rough sketch of the sorcerers and a little sorcerer because I want the sorcerer to have her own person apprentice in IMAGE 1, followed up by creating a new layer and using the rough sketch as a guideline to draw the line art of the subjects in IMAGE 2.
***
Note: that the different IMAGES indicated they different number of layer use.
Afterwards, we draw the both subject clothes[apparels] on a Separate layer indicated in the IMAGE 3. In the IMAGE 4, we draw the hairs of the both subjects.
***
In IMAGE 5, we can now add some base colour and shaded colours to the sorceress and her apprentice skin, hairs and bottom wears(clothes), while in IMAGE 6, we add some details to the top wears(cloth) of both characters.
***
After with that we are done with the [sorceress and her apprentice] characters.
***
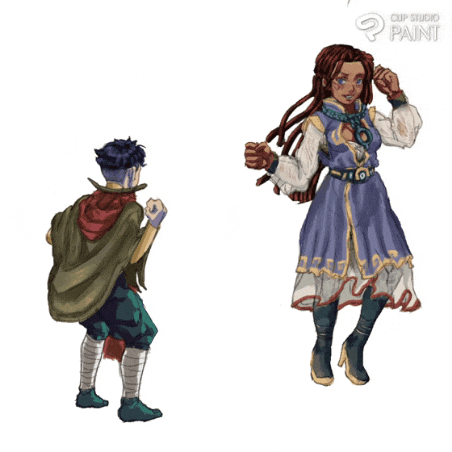
ii) knight character design
A knight is a man or woman of noble birth, who served his king or lord in battle is the king's faithful knight. If someone is knighted, they are given a knighthood, and sometime knight characters are musculine in appearance but I enjoy just normal looking character so well just draw today's knight and her apprentice to be normal.
And we start by rough sketching the knight and her apprentice in the IMAGE 1. On IMAGE 2, we just clean the work by further detailing the rough sketch and add some main features of the both subject.
***
Then in IMAGE 3, we just clean the work by using the rough sketch layer as guidelines to draw the line art of the both subject. While on the Then in IMAGE 4, we add some base colours and shade some area of the skin.
***
In IMAGE 5, we add some detail colours to the material part of the clothes while that of the IMAGE 6, we details with the base color, halftone and highlights composition to make it look like a metal which are known as armour that knight put on.
***
And that finish this piece of the knight and her apprentice characters.
***
4◾ Use CSP handy tools for placing of the knight & sorcerer.
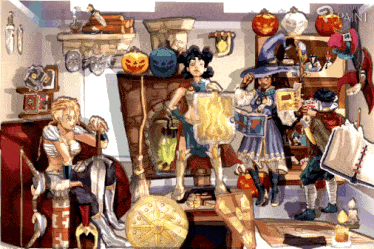
With our props now created, we can now put them together to get our desirer kind of look and in this case, we want to create a room with a sorcerer and knight with their apprentice [two kids].
And we start by creating a new canvas [height 1000px × 1500px] bring in our prop which are our cupboard and placing the various created potions props on the opening area of the cupboard, for it to look like the potions are in the cupboard, also we erase the bottom part of the bottle for it to be more realistic. Then we place the cupboard by the right,
***
Note: that we make sure to create a [Folder] for the the props which indicated [2], and all of this props when imported onto the canvas were all adjusted with the various CSP tool such as the Transformation tools, erase, folder, layer effect property and more.
Next, we add some more props such as [the chimney, broomstick, pumpkin and wood pile] and also keeping in mind to better balance the scene [3] with its own created [Folder] which we can for now called [object 2] indicated [2] as shown below.
***
Afterwards, we move one to add the sorceress and her apprentice with prop some other sorcerer items like her hats, mask and wand from the [item bank] onto a created [folder] name [sorcerer] which is indicated [2] below.
***
Note: That in the IMAGE above, the SORCERER FOLDER indicated [2] above contains [the sorceress and her Apprentice] characters along with some of the magic items such as [her mask place on the wall, staff which the sorceress hold with the left hand, the hat place on her head, The wand place in the hand of the apprentice and some candle light props], hence were all adjusted with the [Transformation tools] onto position that I feel suit this scene.
After that, we can also create a new [folder] named [Books] indicated [2], placing some of the book on the created shelves on the left side and some of the books floating around the sorcerer as she is casting a spell from the books as shown in [3].
***
We can the move to dragging the chair, table, mat and candles which was designed for the tutorial from the [item bank] onto another created folder named [object 3],
***
Following that, we add our knights character with the various items onto the scenes from the item bank or smartphone storage unit Onto it only folder as well.
***
Note: That in the IMAGE above, the KNIGHT FOLDER indicated [2] above contains [the knight and her Apprentice] characters prop along with some of the weaponry items as well such as [her sword which she is relaxing upon, the shields, which the apprentice is holding one, bow, arrow, helmet, and daggers] props], hence were all adjusted with the [Transformation tools] onto their different position in the scene.
Now that we are through bring in all our created props on to the scenes, we can now edit this piece using another creative CSP setting called BLENDING MODE.
We start by creating a new folder named ALL PROPS, and we put all the props which we imported of the scene, then we use the [convert layer to file object] to convert the entire props into one IMAGE which we can then merge with a NEW RASTER LAYER to now have a duplicate image on a singular.
***
Next we use the FILL LASSO TOOL to fill the new duplicate image with a darker colour and set the blending mode of that layer to MULTIPLY.
***
In order to give my character a GLOW effect I just duplicated the converted layer and set it blending mode to COLOUR DODGE.
***
For the background, we can create one or just go online CSP assets site and download one which I did. Then add it on the background of my image scene by placing the downloaded background folder indicated [2] at the bottom of the other folder[all props] in the Layer setting indicated [1].
***
And with our props place and background place, we are done with the knight and sorcerer scene.
***
5◾ Bonus course
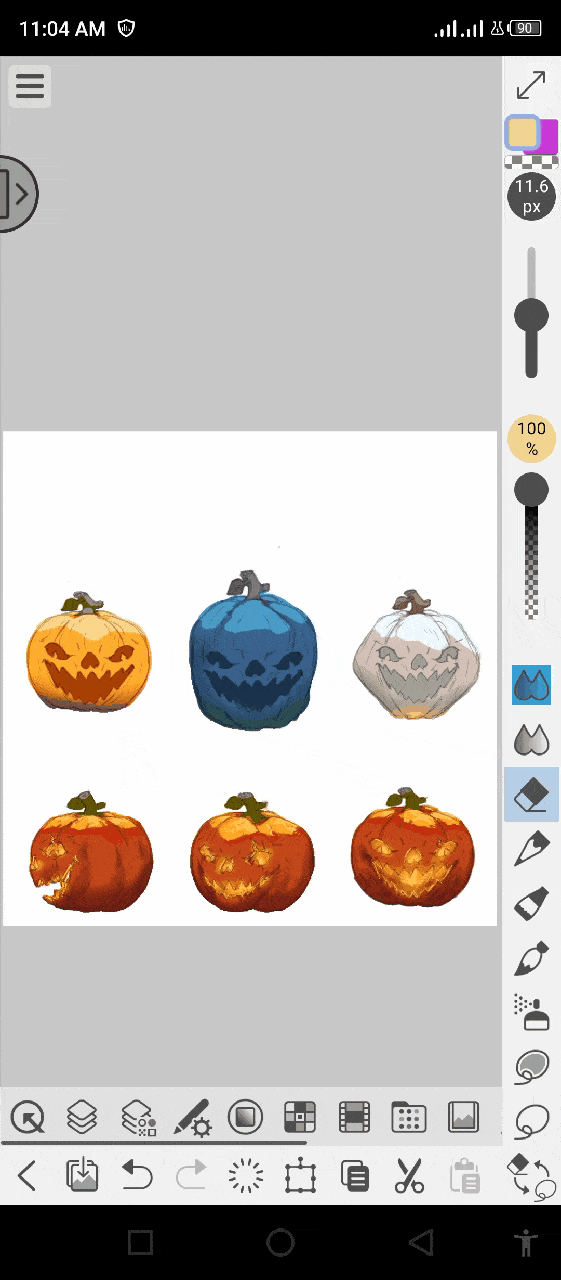
The wonderful things about props items is that subjects images created in such format can be use for different scene or background as shown below.
***
Conclusion,
Thanks everyone, for sticking till the end. if you found the tips helpful and have any questions or issues on any of the above, do say hi in the comments section and I will answer, also I will advise those who feel intrigued should further study others tips on it to better his or her and also frequently practice to better his or her skills. So for now, I will be signing off, bye bye...
Users who liked this post


Comment