
About this lesson
Skin tones can be hard to paint and even harder to find the right tones for your chosen skin colour. This lesson explains my process and how I paint semi-realistic skin by using layer modes and building on shadows and highlights.
Painting skin tones
To begin I create a sketch, I like to keep my sketches loose and rough as I prefer to add in details as I paint and make it up as I go depending on what I feel the piece needs at whatever point. Once I’m happy with my sketch, I save the file so I have a backup of my sketch and set the layer to multiply and lower the opacity. To sketch I like to use a dark red shade so that when it comes to painting the multiplied sketch will blend into the skin and add further depth.
Choosing your base skin tone
Creating a new layer under my sketch layer and roughly paint in the areas where any skin would be showing and I choose a mid-tone tan colour. To choose my skin tones I generally stay within the red box to choose my base skin tones from and then move the toggle on the colour wheel if I want a different undertone.
Brushes
Below I will explain what brushes I use to paint when painting and where you can find them to test them out yourselves. I mostly use the “Soft Gouache” brush to paint and the “Soft Airbrush” and “dv_skin_splotches” occasionally throughout the painting to add depth and realism.
Soft Gouache
I use the Soft Gouache brush to lay my flat colours, add shadows, highlights and anything else. I like to use a brush that I can achieve hard edges with (helpful when refining details) and have soft edges when I use less pen pressure (helpful when blending). This brush can be found in a free pack that you can download by clicking the link below.
Soft Airbrush
The second brush that I use while painting is the Soft Airbrush that you can find in the Airbrush section on Clip Studio Paint which I use to add soft shadows and to create a sense of realistic form.
dv_skin_splotches
To add some realism and texture while painting skin I use the”dv_skin_splotches” brush from a free pack that can be found linked below, the pack includes a variety of brushes that can be used while painting skin such as pore, wrinkle and vein brushes.
Adding depth and detail
After laying down the base skin tone previously shown, I use the base skin tone colour and create a new layer and clip it down to the base skin tone layer so that I can’t colour outside of that shape and set it to multiply (1) which can be found in the layer mode drop down menu next to the opacity settings. After doing this I use the Soft Gouache brush to paint in rough shadows varying my pen pressure, pressing harder where the darkest shadows are (eye sockets, under the nose and bottom lip and then around the armpit) and pressing lighter to softly paint in where the lighter shadows are to start building the idea of form.
After painting in the shadows the next step is to paint in the highlights and now that we’ve blocked in the shadows, we can use them to work out where to place the highlights. To do this I create a new layer and pick up the base colour using the eyedropper tool and then go to the colour wheel, I stay within the green box shown earlier in this tutorial and select a slightly lighter tone.
Staying with the Soft Gouache brush I use the lighter shade that I just chose to paint the more prominent highlights, pressing harder to paint in the tear duct, forehead, tip of the nose and the top of her shoulder. Slightly using less pen pressure I paint her cheekbone, brow bone, cupids bow and shoulder blade.
Now that the base shadows and highlights are in place, I create a new layer in between my base shadows layer and my highlights layer and set the new layer to multiply. Using the eyedropper tool to pick up the base skin tone colour again I go in again with the Soft Gouache brush and further add in more shadows to areas such as her shoulder blade, eyelids, nose bridge, cheekbone, forehead and tip of the nose.
Next I paint in any other base colours such as lipstick, hair colour, eyebrows and eyeliner and throughout painting I’ll repeat the same process of base colour > rough shadows using base colour on a multiply layer > highlights > add in darker shadows for each feature.
Then I create a new layer, set it to multiply and then select the Soft Airbrush and a peachy/coral tone on the colour wheel to softly paint around the edges of the face and the body to add warmth and depth.
Once I’m happy with how the painting is progressing I merge all of the layers to create one flat layer and then I begin refining details using the Soft Gouache brush. To keep the painting cohesive I try to colour pick from areas of the painting that I have already painted instead of choosing new colours every time.
Now that I’ve got to the stage of painting where I’m adding in more details and refining the piece I create a new layer and choose the dv_skin_splotches brush, using the eyedropper tool to select a shade slightly darker and less saturated than the base skin tone and then picking a bright highlight colour and switch between the two shades to lightly paint to give the illusion of pores and highlights.
After refining the face more and changing a few things such as eye colour and adding in flowers I select the Soft Airbrush and choose a peachy-coral shade, create a new layer to multiply and paint some darker blush on the nose bridge. After that I create a new layer and switch back to the Soft Gouache brush and then use the eyedropper tool to select the lightest skin shade to paint next to a few dark shadows such as her chin or forehead to create a few harsher shadows.
To create freckles I chose a dark brown shade by using the eyedropper tool to select the darkest tone in her eyeliner and paint a few freckles with the Soft Gouache brush by randomly stippling a few dots on her face making sure to vary the pressure I’m putting on the pen so that we achieve different shades and sizes of freckles. After this you can play with the opacity of the layer to achieve the prominence of the freckles that you would like, for this piece I kept the layer at full opacity.
Here's a close up screenshot where you can see more accurately where I painted in a few bright spots using the lightest tone found on the skin and a few pores using a soft shadow tone.
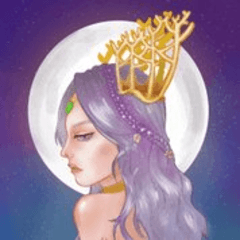
Now that I have worked on the illustration for a bit longer and have established the lighting, I like to add a last few highlights to add interest to the piece such as rim lights and dewy highlights to the skin. For the red lighting that you can see on her shoulder, left side of her face, nose and upper lip I chose a pale red to contrast against her eyes and used the Soft Gouache brush to trace along the edges using light pen pressure on a new layer. For the dewy highlights on her brow bone and cheekbone I switched to the dv_skin_splotches brush and selected the lightest highlight shade using the eyedropper tool and created a new layer, setting it to screen and pressed lightly on the areas of the face I wanted to highlight until I was happy with the brightness.
After I’ve finished working on the skin, I paint in her hair and add any additional details such as the lily, earring and background using the Soft Gouache brush to continue to refine the illustration.
この投稿を「いいね!」したユーザー


コメント