
What we have learned so far
In the first part of this series we learned how it’s possible to create, edit and export sprites from Clip Studio Paint.
Now it’s time to use the software to create some animated sprites.
Right now in the industry, animation for 2D games are usually made with 2D Bones and Mesh Deformation systems - the pieces of a sprite are imported in a specific program that creates a polygonal mesh around it. Bones are associated with different areas of this mesh, offering a method to ‘deform’ the sprite like it was a 3D object. The result is a super smooth animation that only needs a single image for the whole animation of the sprite.
While 2D Bone Animation systems are the current trend, the cut-out animation system still can be used to create sprites for games. It’s a time-saving technique that you can use on your first games, prototypes or even in a full game that may have a compatible art-style.
This is also a very approachable method to create animations for videos, GIFs for social media or graphics for your stream channel.
⎯⎯⎯⎯⎯⎯⎯⎯⎯⎯⎯⎯⎯⎯⎯⎯⎯⎯⎯⎯⎯⎯⎯⎯⎯⎯⎯⎯⎯⎯⎯⎯⎯⎯⎯⎯⎯⎯⎯⎯⎯⎯⎯⎯⎯⎯⎯⎯⎯⎯⎯⎯⎯⎯⎯⎯⎯⎯⎯⎯⎯⎯⎯⎯⎯⎯⎯⎯⎯⎯⎯⎯⎯⎯⎯⎯
Cut-Out Animation in Clip Studio Paint
Since version 1.84, it’s now possible to animate the content of a Layer using interpolation. This is a HUGE addition for the Animation toolset.
Let’s learn this new feature by doing a fun bouncing ball animation:
1. Create a new File and draw a ball to bounce.
2. Make sure your Timeline panel is visible and click on this NEW TIMELINE button; just hit OK in the confirmation dialog.
3. Click on this little ‘running paper’ button to ENABLE KEYFRAME ON THIS LAYER; Note the little icon added to the current Layer.
4. Change your Sub Tool to OPERATION - OBJECT and you’ll notice the properties that can be animated while interpolation is active.
5. Back to the Timeline, let’s set a keyframe for this first pose.
You can just move the Ball graphic a tiny bit so the program registers it as a keyframe. You’ll notice that a Blue diamond icon is now on the Timeline AND in the Properties of the object.
6. Move the Timeline to the half portion of the time (frame 10 in my example) and move the Ball up from the ground. Remember, first move the Timeline to frame 10 then the object. You can hold SHIFT to constraint the movement of the ball on the Y axis.
7. Now Move your Timeline to frame 20 and place the ball back in the ground;
Hit Play and the little Red Ball is alive.
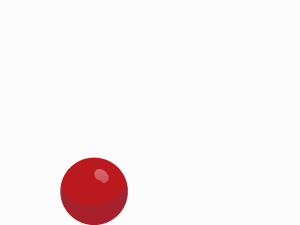
8. To make the bounce of the ball more interesting you can adjust the timing (the duration/exposure of each keyframe) to add the feeling of “weight” to the object.
Back to the Timeline, CLICK AND DRAG the middle keyframe closer to the end keyframe - the ball will spend more time on the upward movement AND will fall faster…
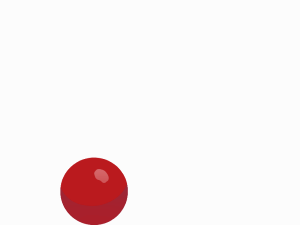
9. Now let’s make it a bit more cartoony by adding Squash and Stretch to this animation.
Back to the Timeline, in the middle of the upward movement of the ball (frame 7 on my example), adjust its shape using the SCALE - stretch the ball in the Y-axis only.
Remember to turn off FIXED ASPECT to enable the non-uniform scaling. Keep the volume of the shape; if you stretch in X, compress in Y and vice-versa.
10. To finish this example I added two more Squash and Stretch frames before the last one; on frame 18 I made the ball longer in Y (stretch) and in frame 19 I made it wider in X (squash), this makes the ball react to the gravity and the impact on the ground.
Here’s the poses evenly spaced and without the interpolation so you can see the deformation on each frame.

And here’s (below) the final animation with interpolation and some adjustments on the timing (the whole movement is made faster by shortening the Timeline and adding an extra frame, holding the ball in the sky before the fall).

⎯⎯⎯⎯⎯⎯⎯⎯⎯⎯⎯⎯⎯⎯⎯⎯⎯⎯⎯⎯⎯⎯⎯⎯⎯⎯⎯⎯⎯⎯⎯⎯⎯⎯⎯⎯⎯⎯⎯⎯⎯⎯⎯⎯⎯⎯⎯⎯⎯⎯⎯⎯⎯⎯⎯⎯⎯⎯⎯⎯⎯⎯⎯⎯⎯⎯⎯⎯⎯⎯⎯⎯⎯⎯⎯⎯
Before animating the Character, something about FILE OBJECTS
While animating the Bouncing Ball you probably notice something: when using the TRANSFORM tool (to rotate, scale and move) it uses the whole canvas area for the deformation and not just the shape of the object.
This can be a problem if we plan to animate more complex objects. In these situations, it’s better to animate FILE OBJECTS instead of common Layers.
//About this Image: LEFT: the red ball is on a Layer and the Transform Tool will use the whole document area as a reference to transform the object.
RIGHT: the green ball is a File Object, and the transformation is now based on the object’s size.
A FILE OBJECT is a container with contents of an external .CLIP file. This (the File Object) can be placed on any document. Any change on the source file, will reflect on the document where the File Object is being used.
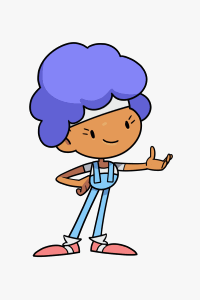
As an example, let’s start creating our main character using FILE OBJECTS this process is equivalent to rigging a character in 3D software and/or any Skeletal Animation tool.
Rigging your Game Sprite using File Objects
Let’s start by creating a NEW DOCUMENT and pasting a complete image of your sprite, so we can use as a template to create the rig. Adjust the Canvas Size so you have room for the animation you are planning to make.
To import the pieces of the sprite, use the FILE - IMPORT - CREATE FILE OBJECT option. Import the transparent PNGs or .CLIP files that you created in the first part of this tutorial.
You can also CLICK AND DRAG the files from your Folder to the ITEM BANK palette.
Place all the sprites in the Canvas and use the OPERATION - OBJECT sub tool to arrange the parts.
If you need to adjust the Z-Ordering of the parts (what object is in front/behind of other) just move the corresponding layer up or down in the Layers stack. To quick select Layers you can hold CTRL+SHIFT and click on the canvas.
//About this Image: LEFT: wrong Layer ordering, RIGHT: correct overlap of the parts.
⎯⎯⎯⎯⎯⎯⎯⎯⎯⎯⎯⎯⎯⎯⎯⎯⎯⎯⎯⎯⎯⎯⎯⎯⎯⎯⎯⎯⎯⎯⎯⎯⎯⎯⎯⎯⎯⎯⎯⎯⎯⎯⎯⎯⎯⎯⎯⎯⎯⎯⎯⎯⎯⎯⎯⎯⎯⎯⎯⎯⎯⎯⎯⎯⎯⎯⎯⎯⎯⎯⎯⎯⎯⎯⎯⎯
Now let’s prepare the animation workflow. I strongly recommend that you move your Timeline palette to one of the sides of your canvas - it’s just easier to understand what’s being animated.
Click on the NEW TIMELINE and set some properties of your animation, eg.: the name of animation sequence (Idle, Run, Walk); the Frame Rate of your animation (12 or 15 fps are good for this cut-out style) and the Amount of Frames you are going to use (I’ll start with 20).
You can make the Timeline even easier to manage by changing the THUMBNAIL SIZE option to NONE; this option just displays the Name of each part, similar to other animation packages (Flash, Animate, Blender, eg…)
To be able to animate with Interpolation in Clip Studio Paint you will have to enable it on the Timeline. Select ALL the Layers and click on ENABLE KEYFRAME ON THIS LAYER. You’ll notice the Layer icon change.
Now something you have to do in ALL Layers of your sprite, PREFERABLY in the first frame of your animation.
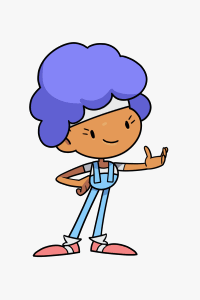
Use the OPERATION - OBJECT sub tool and move the transformation pivot(center of rotation) of the piece to the correct position (in this example, I moved this pivot from the center to the bottom of the head, where the neck is)
The Arms of the character also needs the pivot to be where the shoulder is. Adjust the pivot of each part before move to the next step...
While you set your pivot points, do some tests on the Rig - rotate the joints of the character until you find the best way to animate it.
In the Example, the hand is not working due to an incorrectly placed pivot...
Tweaking the pivot position, I can rotate the joint of the hand, creating the illusion that her whole arm is made from a single image.
At any moment, you can reset the ROTATION of a Layer by setting the ROTATION ANGLE option to 0. The same goes for SCALE, where you can reset to 100.
Here’s a diagram of how I adjust the pivot points of each joint.
Notice in the Timeline how each part already has a keyframe set.
If some of your Layers don’t have a keyframe, please create one by moving the piece a bit on the canvas or manually with the ADD KEYFRAME button.
Done. The character right is ready to be animated.
⎯⎯⎯⎯⎯⎯⎯⎯⎯⎯⎯⎯⎯⎯⎯⎯⎯⎯⎯⎯⎯⎯⎯⎯⎯⎯⎯⎯⎯⎯⎯⎯⎯⎯⎯⎯⎯⎯⎯⎯⎯⎯⎯⎯⎯⎯⎯⎯⎯⎯⎯⎯⎯⎯⎯⎯⎯⎯⎯⎯⎯⎯⎯⎯⎯⎯⎯⎯⎯⎯⎯⎯⎯⎯⎯⎯
Animating an ‘Idle’ type of animation
Once your character rig is set (pivot joints in place and all parts keyframed), it’s time to duplicate this first pose to the last frame of the animation.
The easiest way to duplicate multiple frames is by selecting every keyframe in the Timeline, hold the ALT key, and CLICK and DRAG to the desired position.
Now, move your Timeline selection to the middle portion of your animation, select all parts of the character (except her legs) and move it down a bit (we’re creating the up/down of a breathing).
Remember you can use CTRL+LEFT MOUSE click to quickly switch and select through the Layers. You can also move the parts using the Keyboard arrows.
This is the result. Very simple, but it’s a start.
A “simple” method to break the rigidity of an animation is changing the Timing of the moving parts: in the example below I delayed (moved to the left) the keyframe of her body (Girl+Body Layer) so the movement starts a fraction of the time faster than the other parts. I also delayed both of her Arms and Hand proportionally.
Lastly, I delayed the keyframes of the Head and Hair, so it looks like those parts are being “dragged” by the body.
The whole idea is to simulate a movement that starts on the chest and drags the other parts in sequence like a railroad car.
When it comes to timing, you have to train your eyes to notice those subtle changes. Try to see what part starts to moves first than others.

Until this point, we just dealt with the Translation (Up and Down) of the pieces, now let’s add some Rotation.
Starting with the Head part, select the middle keyframe on the Timeline (click over it so it became red) and rotate it counter-clockwise - just a tiny movement.
You will also have to fix the rotation of her hair accordingly.
See how such small tweak added weight to her head and hair. Things start to get more interesting.

I did the same for her Arms and Hand - just rotating the in between frame of each part.
The Scale property can also be animated.
I selected both of her Legs (GIRL_LEGL & GIRL_LEGR) and used the OPERATION - OBJECT tool to ‘squash’ the legs so it reacts to her weight.
Like we did in the Bouncing Ball exercise, remember to turn OFF the FIXED ASPECT property so you can keep the volume of the object (squash in Y, stretch in X and vice-versa).

Squash and Stretch is something you can use in various parts of your animation so it looks more cartoonish: notice in the example below how I used the Scale to squash/stretch the in between frames of her Body and Hair. They now look less rigid.

A “rule” when making (and previewing) animation loops for Games is to always have the same pose in the beginning and end of your animation cycle. (hold ALT, drag and drop the frames to duplicate it).
Here’s a tip: while you’re testing the animation, make sure to playback your animation from 0 to 19 (in case you have a 20 frames animation) - in Clip Studio Paint you can move the Blue Handles in the Timeline to limit the playback.
This will preview the Loop better since you won't expose the same frame (1 and 20) twice.
See the comparison between the first stage of the animation and the latest.
Remember we just used 3 (actually 2) different poses to create this very appealing animation loop.
This process is a great starting point for a variety of movements you can use to give life to your sprites.
Animating complex objects, like a character, can be confusing, so keep it simple until you start to develop a better sense of timing. It’s just too overwhelming to try to apply all those 12 classical principles of animation at the same time.


That’s it. I hope you like it and let’s continue to the third and last part of this series, where I’ll show you some tips and tricks to speed up the creation of animated graphics AND, of course, how to make these artworks ready for a game.
Please download the Source file of this Exercise in the link below.
Download Material
この投稿を「いいね!」したユーザー


コメント