Looping Animation Tutorial
Introduction
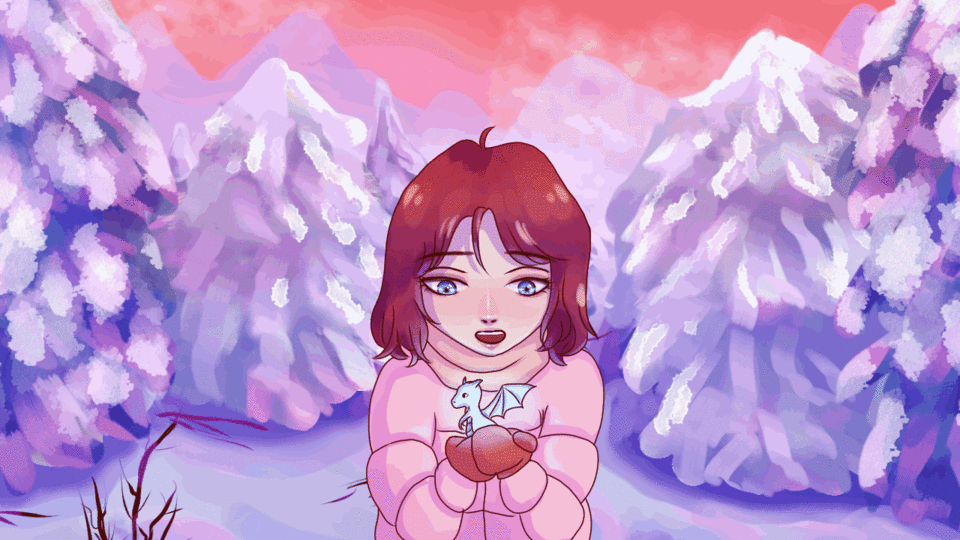
Hello, all! In this tutorial, I'll be walking you through the basics of looping animation, which is when an animation repeats continuously. Basically, this means that the first and last frames of the animation are the same. Here is what my animation looks like, and hopefully what yours will look like too, by the end of this tutorial!
So let's get started! First, create a new animation file in Clip Studio Paint. Click the icon to the very right to select animation and give your file a name. In this case, I used a canvas size of 1280 x720 and a resolution of 300. Also, the number of frames is 24, with the frame rate of 24. (Later on, the frame rate was changed to 15 because an animated GIF can only export at 15 fps.)
Now, once you've created the file, you'll see something like this: I've labeled the image to make things clearer.
The tool palette is where you'll find your normal drawing tools, like brushes, erasers, blending tools, selection tools, etc.
The canvas is where you'll be drawing your animation frames.
The timeline shows where you are in your animation. The two blue lines mark the start and end of your animation, while the red cursor shows where exactly you are. (In this case, I am at frame 1.)
Finally, the layers section is where you'll find all of your animation folders and layers.
But before you start drawing anything, you first need to think of a story. In a looping animation with only 24 frames, it has to be something quick and easy. I decided to go with the following story: "A girl in a snowy landscape finds a baby dragon." Now that you've decided what you want to draw, let's begin drawing!
First Sketch Layer
You already have one animation folder with one layer in it (found in the layers section, at the right side of your screen.) I renamed the folder "sketch" by double-clicking it.
Then, I drew my first frame. Your first sketch can be very messy, like mine. Its main purpose is to block out movement and flow, since we'll be going over it with a second sketch later.
Now, you'll want to draw a second "key frame." Keyframes are the most important frames of an animation: for example, in jumping animation, the two keyframes are when the jumper is in the air and when the jumper lands on the ground. My two key frames are the girl holding the dragon to her chest, and then holding the dragon to her face.
However, every time you want to create a new frame, you'll have to make a new animation "cel." This button can be found in your timeline. Move your red cursor to the 12 frame mark in timeline, and then click the new cel button.
Now, a blank canvas should be shown on your screen. Don't worry--your sketch didn't disappear, it's just at a previous point in the timeline. In order to draw the second key frame, I turned on something called "onion skin." This allows you to see the previous frame and the following frame.
Then, I drew my second keyframe (still very messy). As you can see, the purple outline in the image is your first layer.
Now that I have two key frames, I can go back in the timeline to create new cels called "in-betweens." In-betweens are just frames to make your animation flow better.
If you were to play your animation right now, with only two frames, it would look extremely choppy--not at all like an animation. So at about every two frames, I would draw an in-between, as shown below. (The purple outline is the previous frame and the green outline is the following frame. It's hard to see, I know.)
Another helpful tip is the "Specify cels" button, which can be found on your timeline as shown below:
This allows you to select cels that you already have, and copy them into another place on your timeline. You'll notice that if you try selecting a cel and then pressing Ctrl-C Ctrl-V, it doesn't work. But when you click the "Specify cels" button, you'll get a pop-up like this (probably with different layer names):
Then, you can select whichever layer you want, and it'll appear in your timeline! Let's say I selected the layer called "1." Now, there will be two places on my timeline with the cel called "1." This means that if I edit the first layer "1", the other layer "1" will also change.
But what if you don't want the other layer 1 to change? Don't worry, it's easy. First, in your layers tab, drag the layer you want to the "new layer" button.
A new layer should appear in your layers tab, titled "[insert layer name] Copy" or "[insert layer name] a." Note that this layer does NOT appear on your timeline.
To place the layer on the timeline, use the specify cels button again and select the copied layer. Now, you can freely edit the second layer without changing the first layer. I often use this shortcut to save time when sketching.
In the end, my sketch timeline looked like this (an average of 2 frames per second):
And here is what the animated sketch layer looks like:

Second Sketch Layer
As you can see, the first sketch layer is very unrefined and messy. Now, we have to make a second sketch layer to clean up the details. To do this, we have to create a new "animation folder" by clicking the button below:
Now, set the first sketch folder's opacity to 15%. In the second sketch folder, create new animation cels to redraw the sketch, this time with details. Don't forget to use the specify cels button for a shortcut!
There isn't really much to say about this part, because everyone draws the second sketch layer differently, depending on their art style. In the end, this was what my animation looked like:

Lineart
Now, it's time for lineart! Again, create a new animation folder. Inside the folder, create new cels and start tracing your sketch. I used the mapping pen at 4 px for my lineart.
When doing lineart, it's important that you follow the proportions of the sketch. If you have a good sketch, your lineart will turn out just fine. Just be careful and precise!
Here's the lineart animation:
(As you can see, I decided to ditch the waving scarf I drew in the sketch because I thought it looked weird ::P)

Coloring
Now it's time for coloring--the fun part! I created new animation folders for the skin, hair, clothing, and the dragon (all of these folders must be behind the lineart folder). To color in the animation, I used the paint bucket tool. Here's the color palette I used:
Then, I went in and added general details using the dense watercolor brush. For the skin, I added a reddish tone around the eyes, nose, and cheeks.
For the hair, I also went in with darker red shades to bring some depth to it.
I only flat-colored everything else (the clothing and the dragon) for now.
For the dragon, I also decided I wanted it to glow. This was done by creating a new animation folder, creating new cels, and then using the airbrush in a light color around the dragon.
Here is my colored animation:

If you want, you can stop the tutorial here. This is the end of what I consider to be the "basics" of a looping animation. The lineart is complete, and the coloring is done too. Good job if you completed my tutorial up to this point, and I hope it's been helpful!
Everything else from this point on is just more shading and detail. If you want to plunge into the nitty-gritty part of animation, then read on!
Shading
The next step is shading. I created a new folder directly above the skin layer, and set it to "multiply." I also clicked the clipping tool (found in the layers tab), which means that I can only draw on whatever's been drawn on the layer below. This is helpful because I don't have to worry about drawing outside the lines.
I used a light purple color to shade the skin, mainly at the top of the face and the sides, and also underneath the nose.
After doing this for all the skin frames, I moved on to the clothing. I created a new animation folder directly above the clothing, set it to multiply and clipped it, and then used the same light purple color to shade.
As you can see in the image below, I mostly shaded where the clothing wrinkles were.
You're done with shading! I didn't bother shading the hair because I thought it already looked fine, and I also didn't shade the dragon because it was so small.
We're so close to the end! I decided to add some highlights to make the animation pretty. I created a new folder on top of all the others, then added yellow-ish white-ish highlights on the hair, eyes, nose, and lips. The tiny details really do make the image so much prettier!
Here's the animation so far:

Finishing Touches
Now, the final step would be to add a background, to make the animation look complete. I had already painted a winter landscape, so I just went to File --> Import --> Image to import the background. I then dragged it behind all the other animation layers.
As a finishing touch, I created a new layer on top of everything else, set it to "overlay" at 50% opacity, and filled the screen with this purple color:
Holy cow, we're finally done! Here is the final animation:

Isn't it cute? Thank you so much for sticking with me through this tutorial--I hope your animation came out great! Feel free to comment below to tell me what I need to make clearer in the future. Have a fantastic day!
You can follow me on instagram at @melonpahn for more. ^ _ ^







![[Rown]](https://s3-ap-northeast-1.amazonaws.com/celclipcommonprod/accounts/profile-image/c6/130fa83901ffc444a46342807a43ce29ac098d1192f6ab8f8e13c3b7fe203185.png)





コメント