
Hey guys in this video I’m gonna talk about some of the final touches that you can give your drawing using the blending mode that will instantly enchane the artwork. Remember that all the tips are to uplift your drawing in the final stages so make sure your drawing is complete and use these tips as some final polish to your artwork.
SHADOWS AND LIGHT:
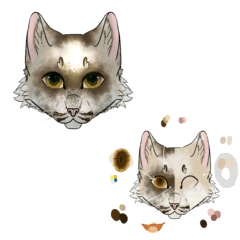
When you have completed your artwork but you feel like it's not interesting enough like my
drawing here. This is what I do in the finishing stages of my art to make it more striking, I add shadows and light. It's a very easy way to make your art look better. Shadows and light basically add more depth and will increase the overall aesthetic of your artwork. You can even use this to convey the mood of the illustration or even reflect a character’s personality. So this is something I do as a final step in my artwork but it changes the whole aesthetic and enhances the drawing.
For that make sure you’re done with your artwork,and since we're doing shadow and light choose from which direction you want the light to hit the object, I'm choosing this direction for this artwork.
then put the whole coloring layer into a file. Then create a new layer on top of the file and then clip it to the file layer below.
Now change the layer’s blending mode to multiply.
The color drawn on the multiply layer will be multiplied by the color on the layer below to give a darker color which is ideal for shadow.
As for the color, I chose a dark red color and filled it in the whole layer. We’re going to erase the areas where the lights are going to hit.
Then create a new layer above and clip it. Change its blending mode to “ add glow“ to draw the lighting. Use the blur brush on the edges to make the lighting more dramatic.
After adding a bit more details we get a result like this.
-----
One of the other ways to a good finishing touch to your artwork with shadows and light is the dreamy effect. You can use this method to show a character who is considered an angel or a hero who shines.
To create this, add a new layer and then clip it to the color folder and change its blending mode to multiply. choose any color and fill it in the whole layer. lower its opacity up to 45%-30%.
Now create a new layer above and clip it. SET ITS BLENDING MODE TO ADD GLOW take an airbrush and choose a brighter color like yellow and paint it on the edges of the character. and we’re done.
----
There’s one more way you can use shadows and light in the final stages of your art to make it better. For example: If you have a character that is below a tree, here’s what we can do. Create a new layer, clip it to the layer below, then set its blending mode to “ add glow, paint the whole character with a bright color, and lower its opacity.
Then create another layer on top and set its mode to multiply. Now select a custom brush that has the tree branches and leaves, I'm using this one. Select a dark green color and just paint it on the character
Now lastly add a new layer and set its mode to overlay and take a warm-toned color and airbrush on top of the shadows.
There are many more easy things you can do with shadows and light to enhance your art.
HIGHLIGHT :
Yes, highlight one of the most used tricks in the final stage of the art. Highlights basically uplifts a lifeless flat illustration by giving it the pop effect which grabs the viewer's attention. You don't necessarily need a light source to draw the highlights. Most commonly highlights are drawn at the highest point of the subject for example in a character highlights are added in their eyes, tip the nose, and lips. Highlights don't necessarily always have to be done in white color, try to pick colors that are lighter than the base color you drawing on, this will make the overall art pop.
To draw highlight Create a new layer on top of all the layers and set its blending mode to add [glow]. For highlighting the eye, nose, and lip, I usually choose a color that is brighter than the skin color.
Now create a new layer on top and set its blending mode to add glow again. In this layer, we will draw highlights are the hair. [ I created a new layer just for the hair highlights because I will change its opacity meanwhile I didn’t adjust the opacity of the highlights on the face]
Again I will choose a color lighter than the base hair color and apply the highlights.
And that is how I highlight my artwork.
Remember that highlights can be done to any object like food, flower not just to a character.
TEXTURE
Adding texture is one of the best ways to add finishing touches to your art. Texture instantly enhances your art piece and creates a sense of depth. You can usually see people adding texture to a 3d illustration to give it more of a traditional look or use texture when you’re drawing a flat or 2d illustration because these illustrations usually lack depth which can be added by texture or just to make the overall artwork look more interesting.
For example, I have a drawing here to which I am gonna add texture. Since I'm gonna add texture to the entire drawing I will make sure I'm on top of all the layers.
You can find the textures either on the internet or CSP has a bunch of textures ready to use. For that go to the material menu > monochromatic pattern under which you will find a lot of textures. select, drag and drop the texture that you want to apply, onto the canvas . adjust it to your according.
Now if you look at your layer palette, a new layer with a textured pattern has been added. We're gonna change its blending mode to “ overlay “ OR ‘ soft light “ and lower its opacity.
And that is how we can add texture to our art pieces.
Not only to the overall piece but you can texture certain parts like clothing to make it look more well done and polished.
Clip Studio has different texture patterns just for clothing like this kimono pattern. Just drag and drop it on the canvas and then change its blending mode to “overlay” or “soft light”. You will get something like this.
MAGIC GLOW
When you’re a magical fantasy illustration with a character who has magical powers but the drawing doesn’t look anywhere near magical because it lacks the glow. Here’s how you can turn your magical elements from this to this.
Make sure the character, background, the magic element are in 3 different layers.
Step 1: Now create a new layer on top of the character layer and clip it. Convert the blending mode to “multiply” and choose a dark color to fill in the whole layer.
Step 2: Now convert the element layer to add[glow]. Then copy and paste the element layer.
then go to Filter >blur> Gaussian blur and adjust the strength. ( Blurring will increase its glow )
Step 3: Create a new layer on top of the character layer and change its blending mode to add[glow] and using a soft paintbrush and airbrush draw the reflective lights.
Step 4: Create a new layer on top of the background and convert the blending mode to add[glow] and draw the reflective lights.
With that, we’re done.
OVERLAY DUPLICATE
This is a trick I do when I'm done with my drawing, especially with character designs. There's always an empty background. Instead of filling it in with different colors and patterns and making it look worse Using this trick You can fill in that empty space in a better way.
For that make sure you have your character in one layer. Now copy and paste the character layer. We're gonna create a new layer in between these two layers and clip it to the layer below and fill it in with a dark color.
Create a new layer below all the character layers and fill the whole layer with any color.
Then we’re gonna once again copy the character layer and paste it below the character layers. Now we’re gonna scale it and make it bigger. Once satisfied then convert the
Once satisfied then convert the blending mode of the current layer to overlay.
And that’s it.
HARD LIGHT
I feel like hard light blending mode is one of the most underrated blending since I personally use it a lot on my artwork and this blending mode can create some interesting looks.
This is a trick I do in the final stages of my art to make it look more interesting. When you’re bored with your regular art look try this out to create bold color looks.
For example, I have a drawing here pretty boring but using hard light I can create some interesting looks even in the final stages of drawing
Make sure you have your character and background in different layers. Now create a new layer on top and clip it to the character layer. Choose a bit of a saturated color I’m gonna use a blue color and apply it all over the layer.
then change the blending mode of the layer to hard light. It look something like this.
Now I'm gonna select a saturated red color and select a custom brush and draw the splashes . Using a soft paintbrush smudge out certain areas to create a smooth look. And that is all.
This is a perect final touch to give your at when you feel like doing something differen,
Try playing around with this hard light blending you can create a lot of interesting looks.
BOKEH
I have talked about bokeh effects so many times because this is the best final touch that you can give to your artwork because it not only intensifies the overall artwork but all also makes your character pop and gives an overall aesthetic look. And its very very easy to do. It’s basically out-of-focus lights that you can draw in a plain background or fit it in a concept like city lights and many more. It will also enhance your character especially if the lights are drawn around the character.
For that make sure you have your character and background in different layers and create a new layer below the character layer. Convert the layer blending mode to add glow.
Now using a round brush draw some circles on random places where you want the bokeh effect to be.
Then go to Filter[Menu]> blur > Gaussian blur and adjust the strength, click on ok.Now add more circles and we’re done.
この投稿を「いいね!」したユーザー


コメント