
Introduction
This is an explanation of the 3D materials for the classroom that will be exhibited on ASSETS.
It is currently pending publication, so the URL will be added once it has been published.
I apologize for the incomplete state until it is published.
It will also be sold on CLIPPY for a limited time, so please try it out if you like.
There is a lot of customization possible, but all the details would not fit into the material description, so I will summarize it here.
I will write up these TIPS little by little with the aim of completing them by the end of this month.
Sorry it's taking so long.
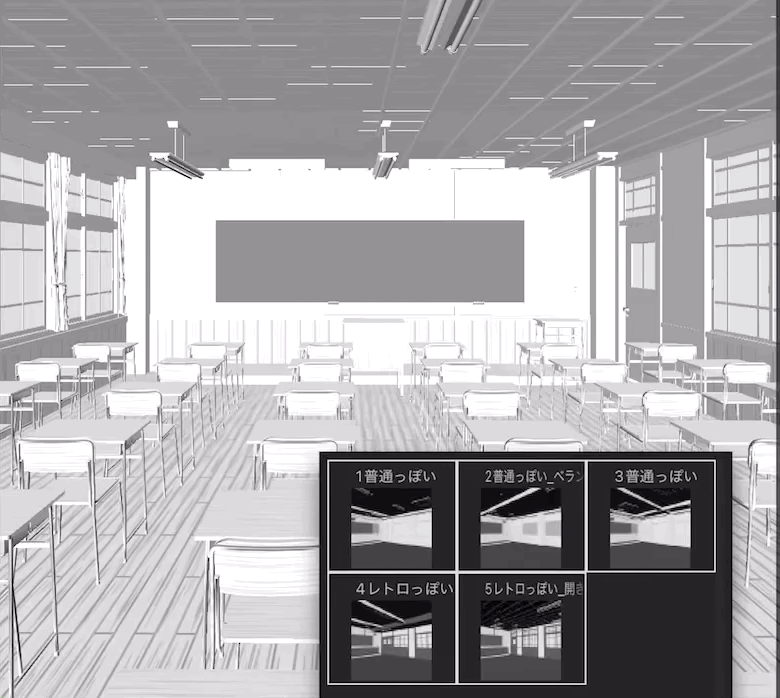
You can use them without this explanation by selecting the classroom design from the layout.
If you are currently drawing a classroom and want to use 3D materials, but can't find anything that matches the design of the classroom you've already drawn and can't switch... I think customizing them will make it easier to match.
However, the object list is in a lot of complicated ways and can be tedious, so unless you have reason to make detailed changes to the design as above, I think choosing from the layout will be sufficient.
Object Description
It is broadly divided as shown in the figure below.
I'll explain each one below.
Switches and operation panels
This is the control panel for the light switches and air conditioning.
It is independent so that it can be easily moved to any wall.
Three types of switches are provided.
Feel free to change them to suit the era.
The switches can be moved, so they can also be used for drawing close-up frames of characters turning lights on and off.
Depending on the era, it may be better to hide the air conditioning control panel.
Please choose according to your preference.
Wall_Locker side
Trash Can 2
The trash can is number 2, but number 1 is in front of the blackboard.
The trash can has a lid, so there is no need to add anything inside.
The flap also moves.
locker
There are two types of lockers: vertical and horizontal.
If you hide the doors, you can change the size as you like using the object scale.
However, it can be quite a hassle to hide the locker doors from the object list...
The origin of the locker door has been adjusted, so it can be opened by rotating it with the manipulator.
There is not much detail on the inside.
It's fine for a distant view, but if you want to show the inside of the locker properly, we have installed something that resembles an internal lock, so please use this as a guide to make any necessary edits.
The same goes for the cleaning locker.
Hook
In addition to the lockers, there are also hooks for hanging luggage.
I think it would be a good idea to hide the hooks and just display the boards as decoration.
Upper decoration
It's the protruding part on top.
Lower decoration
The wood grain adds more detail.
I think it's easy to create a retro classroom feel.
Bulletin Board
You can add variety by adjusting the object scale to change its size, or by expanding it to cover the entire wall.
Pillar
It's two pieces of wood.
I think this will also create a retro classroom look.
I think it would be good to display this when the walls are white and seem dull.
That's all for now.
I'll add more later.


Comment