
Caution ⚠️This material seems to be difficult for beginners to use.
We do not recommend downloading for beginners.
We receive aggressive messages such as being called unusable materials (after listening to what was said, it was not working properly because the operation was not performed as explained), and being ignored without a reply even after answering questions (including questions about basic operations unrelated to the material) many times, as if the problem was solved and they were satisfied... so we do not recommend downloading for those who do not think they can use it after reading the explanation...
I am not a chat GPT or anything, so I take the time to respond when I receive a message, and I have feelings...
If you contact us because you do not know how to use it, we would like to respond as sincerely as possible so that you can improve the situation where you cannot use the material...
Please check the explanation again before contacting us with abuse...
I wonder why I am shouldering the trouble of learning the basic operations of Clip Studio Paint, and on top of that, it is quite depressing when you are ignored at the end.
This material often leaves people disappointed, so I don't recommend downloading it...
I'm happy to receive any questions about the materials on sale, so please feel free to contact me.
If you have any comments about the 3D Eye material, such as the explanation here being difficult to understand, please let me know...
↓On October 30, 2024, the new "Simple version: 3D Eyes that you can add your own pictures to" was released.
The structure is simple, so I think it's less difficult to use.
If you're unfamiliar with 3D materials, I recommend you use this first.
I think these TIPS will be generally useful except for things related to the object list.
For the simple version, when moving the eyes, such as adjusting their position or rotating them, just select "Simple Eyes (select when scaling, moving position, or rotating)".
For example, if you only select "Eyes (for applying texture)" and align the eye, the eye will not rotate properly.
Please be careful about that.
Introduction
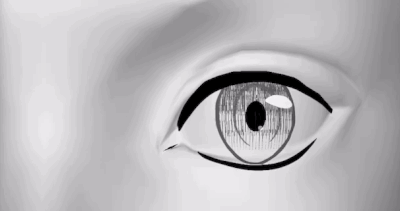
When drawing at a difficult angle, have you ever wondered what shape the eyes are going to be when you take into account factors such as the line of sight and how closed the eyelids are?
This is an explanation of how to use 3D materials to assist in drawing eyes.
Use in combination with Head 3D.
Note: Eye 3D is a paid material and cannot be used in ver. 1 of Clip Studio Paint.

↑Once set up, it will move like this.
Due to character limit, we couldn't fit all the details into the material description ↑, so we will also include supplementary information that will make it easier to use.
You can paste in your own eye textures, so you can create 3D eyes with your own design.
I think it's convenient because you can test it with your own design.
For those who think pasting textures seems like a hassle, there is also this↓.
Part of the explanation is the image of this material above.
Also, although the material was updated on August 3, 2024, the parts that do not seem to interfere with the explanation remain the old version of the image.
I can only speak Japanese.
Those who speak other languages may find the explanations here difficult to understand and dissatisfied.
I apologize for the inconvenience caused by my lack of ability, but I do not recommend downloading the materials for those who speak other languages.
If you download them, please be aware of the inconvenience before doing so.
If the material name is in Japanese, it may be even more difficult to operate.
I apologize for the trouble, but I think it would be easier to use if you could translate the name.
I think it would be easier to use if you translated at least the red frame in the image below.
↓Old version (updated 240518)
↓The latest version (updated 240803) has added eyeliner and looks like this.
Double-clicking the name of an object in the object list will make it possible to edit the name.
You can change the name by copying the original object name, translating it using a translation site, and pasting the translated text.
Similarly, we recommend translating and changing the names of auto actions and layer templates.
Please only download the materials if you are willing to go through the trouble of this when it is in Japanese.
At the moment, it is difficult for me to make it comfortable for people in all languages.
I apologize for the inconvenience.
Also, since these are 3D materials, you may want to avoid downloading them if you do not understand the basic operations of 3D functions.
This explanation does not cover basic operations.
If you are not sure what the object tools are, it is a good idea to first read the user guide.
Questions about materials are welcome, but it will be difficult to respond to inquiries requesting explanations of basic operations such as what the object tool is and where it is located.
When I searched the Internet, I found people who offer one-on-one lessons on how to use Clip Studio Paint, so I think you should take advantage of those services.
At the moment, it is difficult to find the time to respond, and when I answered your questions, you replied to me that you didn't understand what I was saying, which was a roundabout way of saying that you are bad at explaining things... so I think I am not up to the task.
I think it would be better for you to get guidance from someone who is skilled at teaching...
Combine with 3D head and drawing doll for more convenience

In Clip Studio Paint version 2.2 and later, you can do a very convenient thing called parent-child relationship setting.
It moves as shown in the image above.
By combining a 3D head with a drawing doll, you can set the face and body shape to your liking.
If you also add eyes to that, it will be useful as an illustration aid.
There is an official explanation about this, so please take a look.
Prepare
When you download the featured 3D material mentioned above, the following items are included:
Latest version (240803 update)
3D images
・Eyeball 3D_For your own drawings_Sphere_Both eyes_For version 3.1 and later
・Eyeball 3D_For your own drawings_Plane_Both eyes_For version 3.1 and later
・Eyeball 3D_For your own drawings_Sphere_Single_For version 3.1 and later
・Eyeball 3D_For your own drawings_Plane_Single_For version 3.1 and later
3D layers
・Eyeball 3D_For your own drawings_Sphere_Both eyes
・Eyeball 3D_For your own drawings_Plane Face_Both Eyes
・3D Eyeball_For Original Drawing_Sphere_Single
・3D Eyeball_For Original Drawing_Plane_Single
Layer Template
・Layer Template for Creating Eye Texture
Auto Action
・Creating Eye Texture
Eyes and Drawing Doll_For ver. 3.1 and later
・Eyes (Original Drawing) and Drawing Doll_Male
・Eyes (Original Drawing) and Drawing Doll_Female
That's 12 items.
Until now, materials with parent-child relationships could only be registered as "3D layers", and they could not be pasted as 3D materials into the 3D layer on the canvas.
"3D Images" is a new format added in Clip Studio Paint ver. 3.1, and materials with parent-child relationships can be pasted as 3D materials into the 3D layer on the canvas, making it convenient.
If you are using ver. 2, please use the materials in the 3D layer.
Old version (Updated 240518)
3D Layer
Eyeball 3D_For your own drawing_Sphere_Both eyes
Eyeball 3D_For your own drawing_Plane_Both eyes
Eyeball 3D_For your own drawing_Sphere_Single item
Eyeball 3D_For your own drawing_Plane_Single item
Layer template
Layer template for creating eye texture
Auto action
Creating eye texture
That's six items.
The latest version of Eyeball 3D added an eyeliner, but if you don't need it and are using Clip Studio Paint ver. 2, this is the one we recommend.
There are slight differences between the sphere and the plane, so please use whichever you prefer.
The sphere is easier to handle, so I recommend it.
I included the single item because I thought it would be good for drawing monsters or horror scenes.
It's convenient because you can turn many eyeballs into line drawings at once by copying and pasting, arranging them, and using LT conversion.

Initially, it comes with an example eye texture, but you can create your own eye material by using a layer template and auto action to create an eye texture and pasting it onto the 3D eye material.
This is a paid material, so if you don't want to use that, I think you can make a work of it by using 3D primitives.
Even the 3D eye uses a primitive to paste the texture.
I also made a material with just a single eye, but if you want to line up lots of eyes as shown above, it may be easier to simply paste the eye texture onto a primitive.
However, since the origin of the sphere primitive is not in the center of the sphere as is, it will not rotate well when combined with the 3D head, and you may not be able to move the gaze.
If you prepare another primitive and use the parent-child relationship to adjust the origin, it will rotate nicely.
I think you can use it by adjusting the eye image and pasting it as a texture.
The advantages of this material are that you can shift the origin, there is less effort involved in pasting textures, and there are auxiliary lines.
If you don't know how to do it or want to save time, please download Eyeball 3D.
↑Please see the official explanation for 3D operation.
How to use
If you don't care about the face or body shape, the latest version has a variety of pre-attached materials.
Eyes and drawing doll_for ver.3.1 and later
・Eyes (own drawing) and drawing doll_male
・Eyes (own drawing) and drawing doll_female
If you've customized the drawing figure or 3D head to your liking and would like to add 3D eyes, or if you're using Clip Studio Paint ver2, please follow the steps below.
Paste onto canvas
When using with the head 3D "base", first attach the material for both eyes to the canvas.
Without moving the position of the 3D eye, next paste the "base" onto the canvas.
It will be pasted in the correct position.
When doing this, do not drag and drop, but click the icon in the red frame above.
If you drag and drop, the head will be placed where you drop it, so it will not line up with the eyes.
Naturally, if the placement information for both the 3D eye and 3D head is not the same, their positions will not match.
Because the 3D eye is a material with a parent-child relationship set, it is registered as a 3D layer rather than as a 3D material.
↓For this reason, if you paste the 3D head onto the canvas first and then the 3D eye onto the canvas, the head and eyes will end up on separate 3D layers.
(The latest version of 3D eye materials in "3D image" format can be pasted as 3D materials onto an existing 3D layer)
If you want to add 3D eyes to a 3D head on an existing 3D layer...! In that case, please copy and move the 3D eyes.
When doing so, please also select the child 3D materials in the parent-child relationship before copying.
↑ If you simply select the material as in the left image, the child will not be copied.
This seems to be a specification of Clip Studio Paint, so I think it is the same for other materials.
Please be careful.
(In the latest version of the eye material, select not only the pupil but also the eyeliner as a child material)
Once you have finished placing them, all you have to do is move the camera to get the angle you want.
Rotate the eyeball
When rotating the pupils, select "Right eye_Pupil (select when rotating the pupil)" and "Left eye_Pupil (select when rotating the pupil)" from the object list according to the object names.
Do not select the eye by clicking on it displayed on the canvas.
It will not work properly.
When rotating the eyes, set the multiple operation reference point to "each origin".
As the name suggests, it will move based on each origin = the origin of each eye.
Tool Properties > Sub Tool Details > Operation > Multiple Operation Reference Points

The latest version of Eyeball 3D adds an eyeliner.
Try selecting just the eye, just the eyeliner, or both the eye and eyeliner as needed and moving them.
Adjust the eye position
When combined with a different type of head 3D than the "base", the position will not match at first, but by adjusting the position and size of the eye 3D, it will generally become usable.
Note: This material is a very ordinary 3D material.
There is no magical function that automatically fits the size and position of the eyes to the head 3D.
The eyes are adjusted manually by moving their position and enlarging/reducing them.
Large vertical eyes are difficult to deal with, so you may have to deform the shape of the eyeball and force it into place.
Please note that doing this won't be very useful as it will make it difficult to move the eyes around properly.
As a reference for placement, please check the eye curves of the 3D head we have prepared from the side and above.
This should give you an idea of roughly how big the eyes should be and where they should be placed.
↑I'd like the eyeball to fit within the light blue area as much as possible.
When viewed from the side, it looks like the curve of the eye on the 3D head will match the part slightly below the height of the center of the eye.
When viewed from above, you can roughly estimate the size of the eye from the width of the eye.
Even if the size of the eyes is correct, if the position is different the eyes will stick out and not fit in properly.
The same is true if the sizes are different.
It should be easier if you adjust the position and size while keeping this in mind.
When placing the eyes, don't worry about the position or appearance of the pupils of the eye texture used as reference.
Even so, depending on the shape of the head it may not turn out perfectly, so I hope you'll give it a try with the attitude that it's just for reference and it's mostly right, so it's okay!
When placing the eyes, select "Right Eye (select when scaling or changing the position of the eye)" and "Left Eye (select when scaling or changing the position of the eye)" from the object list according to the object names, and scale them or move them.
Ignore the position and size of the pupils when doing this.
The goal is to align the position of the eyes.
Ideally, you should have auxiliary lines visible in the blue area.
As you can probably imagine, the pupil will be displayed within the visible range of the auxiliary lines.
Try to adjust the position of the eye so that the area indicated in blue and the area where the auxiliary lines are visible are as close as possible.
It is difficult to get the auxiliary lines to fit neatly into the blue part of vertically long eyes.
They will inevitably go beyond the blue part, as shown in the green part in the image below.
↑The curve of the eyes on this head is like the blue curve in the image above, and it seems to fit with the red part of the circle.
If you position the eyes taking that into consideration, they will end up looking quite cross-eyed.
If you position the eyes correctly, the pupil position may not match, but you can continue to create the eye texture.
Do not change "Right eye_Pupil (select when rotating pupil)" and "Left eye_Pupil (select when rotating pupil)" just because the pupil is not the size or position you want.
If you scale it or change its position, the pupil movement will be strange.
The position and size of the pupil will be corrected during the process of creating and pasting the eye texture.
First, pay attention to whether the auxiliary lines are displayed neatly, and prioritize placing the eye in a good position.
↑Create a texture like this, and after pasting it you can adjust the position of the eyes by rotating it, so at this stage even if the position or size of the pupils looks strange, leave it as it is.
Trying to align the pupils is likely to result in the following problems.
↑If the area where the auxiliary lines extend beyond (the green part) is too wide, the pupil will extend beyond the edge significantly when you move your eyes.
↑If the eyeball is too small, there will be areas above and below where the auxiliary lines are not displayed (green areas).
In these areas, the pupil will not be displayed when you move the eye.
↑The eye position is correct, but the "Right Eye_Pupil (selected when rotating the eye)" and "Left Eye_Pupil (selected when rotating the eye)" have been scaled and moved, and the position of the eye has been adjusted.
There is no problem when viewed from the front, but from other angles the eye looks like it is sticking out, and it will stick out when the eye is moved.
The positional relationship between the pupil and the auxiliary line has changed, so it will also be misaligned when creating the eye texture.
It is also tedious to correct, so at this stage
Do not touch "Right Eye_Pupil (selected when rotating the eye)" and "Left Eye_Pupil (selected when rotating the eye)".
Keeping this in mind, select "Right Eye (selected when scaling/changing the position of the eye)" and "Left Eye (selected when scaling/changing the position of the eye)" and adjust the size and position of the eye.
When adjusting the size and position, it's a good idea to start with adjusting one eye.
I personally recommend adjusting the size and position with the root manipulator, and then copying and pasting the position information and other values to the other eye when it looks good.
Please note that the values for the X-axis for position and the Y-axis for rotation will be swapped between positive and negative.
The eye is rotated in the image above, but do not rotate it until you have finished creating and pasting the eye texture.
Doing so will easily result in distortion of the texture.
Adjust the position of the flat pupil by moving it back and forth.
The larger the pupil, the more difficult it will be to match the curve of the 3D head eye, so if you try to make sure it doesn't sink in, it may end up sticking out a little from the eyeball.
It might be a good idea to change the angle to match the curve.
If you are replacing the eye texture with one you created yourself, distortion may occur, so it is better not to change the angle yet.
Please note that flat surfaces are a bit tricky to work with.
This completes the placement of the eye.
Creating eye texture
Once you've finished placing the eyes, you can move on to creating the eye texture.
Paste the "Layer template for creating eye textures" onto the canvas.
It will be displayed filling the entire canvas, so select the "For creating eye textures" folder and reduce it to an appropriate size.
For the sake of auto actions, please draw within the "Put eye images into this folder" folder.
↓For the latest version of the eye material, please draw the eyeliner and pupil separately.
Please use auto actions for the eyeliner and pupil separately to create textures.
We will use the 3D "Sharp" head with the vertical eye width set to -100 as an example.
Create an eye texture and replace it with the reference eye picture.
When drawing eyes, it may be easier to get a sense of size by overlaying a screenshot of 3D material that combines a 3D eyeball and a 3D head.
Draw the eyes.
Vector, raster, color, or monochrome is fine.
The pupil is included in the 3D material, so you don't need to draw it.
Do as you like.
If you use the pupil within the 3D material, if you fill the pupil with opaque paint when drawing the eye for texture, the pupil will not be visible.
Please be careful.
↓ Even if you fill it with opaque paint, you may be able to deal with it by adjusting the opacity of the primitive when pasting the texture.
Once you've drawn it, move the position of the pupil so that it's in the centre.
"Put eye images into this folder" is masked, so be careful not to shift the mask when moving it.
Instead of moving the "Put eye images into this folder" folder, move the layer on which you've drawn the eyes within the folder.
The image below shows the mask range for easier understanding.
Once you have prepared a picture of the eyes, run the auto action to create an image for the eye texture.
Make sure to register the auto action in advance.
Please execute the auto action with the "Put eye images in this folder" folder selected.
When you execute it, the material registration screen will appear, so please register it.
If the right eye and left eye cannot be used interchangeably, please prepare one for the right eye and one for the left eye.
Once you have finished registering the eye texture material, select "Right eye_Pupil" or "Left eye_Pupil" from the object list.
From the Primitives, click on the area that says "Material."
Paste in the eye texture you created.
The texture you created will be applied.
Change the texture of the other eye as well, and adjust the size and position of the pupil.
Select "Right Eye (select when scaling or changing the position of the eyeball)" and "Left Eye (select when scaling or changing the position of the eyeball)" and rotate them with the manipulator to adjust their positions so that the eyes look good.
Create and paste the texture for the eyeliner part of the latest version of the eye material in the same way.
It's fine if you only create the eyeliner for the left eye (sorry if it's a little complicated because the above eye texture example was drawn for the right eye...)
If you've drawn it for the right eye, flip it left and right and create the texture with the auto action for spheres.
If you paste the texture for the left eye on the sphere primitive for the right eye's eyeliner, it will be automatically flipped and displayed.
After pasting the eyeliner texture, you may need to make adjustments depending on the shape of the head, so try scaling and changing the position of the sphere primitive for the eyeliner.
If there are any parts where the head 3D and the eyeline do not match, stretch the sphere primitive or adjust its position.
↑Try transforming the primitive that contains the eyeliner texture like this.
This completes the process.
All you have to do now is select the eyes and rotate them to adjust the line of sight.
For reference, the numerical values for the placement of the right and left eyes are as follows.
bonus
↓I think it'd be fun to do something like this with the 3D eyeball spheres.
You can make an eyeball monster with bulging eyes.
Try using it in fantasy or horror scenes.

You can do this by duplicating "Eye_Sphere" and using it to add the outer texture of the eye.
Make sure to place the duplicate ("Outer Eye_Sphere" in the image below) outside of "Eye (select when rotating eye)" in the object list.
Slightly reduce the size of the "Eye_Sphere" that will hold the eye texture.
Creating the texture for the outside of the eye can be a bit troublesome, but once you've finished drawing, run the auto action, and cancel it when the material registration screen appears.
Convert the layer of the eye texture image adjusted for registration created by the auto action into a raster layer.
After that, create a selection from the mask of the "Put eye images into this folder" folder.
Fill in everything within the selection area except for the red areas in the image below.
By leaving the red areas unpainted and making them transparent, you will be able to see the eyes.
Just register the material as is.
You can register it by going to Edit > Register Material > Image
and pasting it into "Eyeball Outer_Sphere" will complete it.
I recommend turning off the shading settings.
For the latest version of the eye material, I think it's easiest to use the eyeliner sphere primitive.
The End
Even though you are the one who draws the eyes, there are times when you can't tell how they will look depending on the angle or the perspective.
I hope this will be helpful in those situations.
It's fine to receive inquiries about how to use the material, but if someone suddenly says, "I wasted some Clippy with this material. Tell me what it means," I feel like I've been punched in the face by someone I've never met before.
I'm human, so it hurts.
Even if you are angry, please start by communicating in calm text.
I only speak Japanese, but if there is what sounds like an apology followed by "lol," I can tell that there is no real gratitude, so please refrain from sending such messages.
Because this material is a GOLD material, it is reviewed when it is listed.
If the material cannot be used according to the instructions, it will be difficult to pass the review.
If you contact us, we will work together to find any unintentional differences in operation.
We cannot reply to messages that contain offensive or insulting text.
Thank you for your understanding.
Users who liked this post


Comment