
Hello! Welcome to this art tip, this time the subject is “SHADING TECHNIQUES”! I’ll share with you my favorite way to paint and it is with two tools: Soft Airbrush and Lasso!! Let’s do it!!
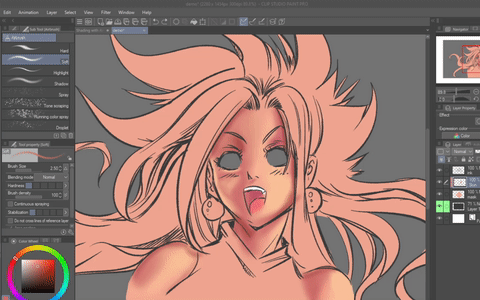
Painting Skin
The first step is to create a mask. It helps a lot to control all the painting. The minimum setup for this is: One layer for the drawing (ink), one layer for the mask and a new layer clipped to the mask.
Now click in the airbrush tool, choose the Soft Airbrush and we can start painting! A larger brush will scatter the color. It is good for blending and we’ll first add the shadow. The pressure on the Stylus will also define how the tool behaves. Choose one side of the face and add the shadow. The opposite side will be brighter.
Hints: See if there are elements around that are casting shadows, like the hair for example.
A small brush will render sharper colors and tones. You can use it to create a variation of borders on your drawing. Even with a darker color, switching the size of your brush will help you to blend your colors.
Painting Hair
Still with the Air Brush, but this time, we are going to use the lasso tool. Create a new layer for the hair and clip it as well. You can position the layer behind the skin if you want. Now, we will paint all the hair with one color and after this step, let’s lock the transparency of the layer. By combining the two methods, we‘ll have less trouble to paint each layer.
So this is the fun part! With the lasso tool, draw a shape that resembles a distorted triangle. You can draw multiple shapes if you hold the Shift key and can reshape it holding Alt.
With the airbrush, you can paint inside the selection. A variety of pressure will help to get softer tones. You can also use the gradient tool to fill these areas
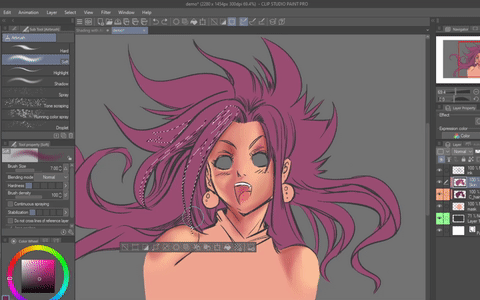
We do the same for highlights and in another layer, you can make a brighter light by selecting the Add-Glow Blending Mode. If this layer is above the ink, it will blend the character into the canvas, which is a really cool effect!
Painting Eyes
Create a new layer and fill the eye area. This layer can be on top of the skin layer. You can add a low saturation color on the white part of the eye (or you can leave it white!)
Now, choose a color for it. Pick a Darker and Lighter color too. You can also shift the Hue.
There are many ways to render an eye, I’m going to use this one. First, create this shape.
Then, fill the upper part with your darker color. The low portion will receive the lighter version. Remember to alternate the pressure of your hand. With a darker color, you can add the iris and some other details.
You can set a layer above the inking to Add Glow and with the G-Pen, draw an oval shape on the eyes. There are styles with many highlights. In this eye, we are going to add 2 spots and maybe some dots as well.
Now with the Airbrush, paint over the biggest oval, to generate a really cool glowing effect. And here’s the eye!
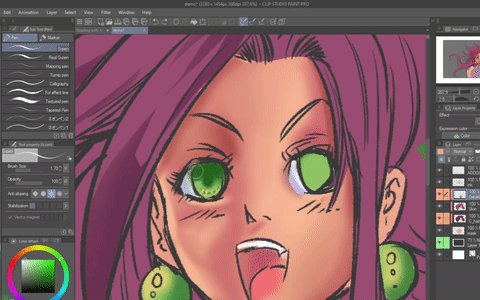
Hint. The overlay layer is really good to make an ambient light.
Thank You!
That’s it for today, I hope this tip can help you and feel free to download the files for this tutorial! You can apply these techniques to your drawings and get quick results! See you in the next Tutorial!!
This final video is a Take Away over everything that we talked about in this tutorial. Bye!!
この投稿を「いいね!」したユーザー


コメント