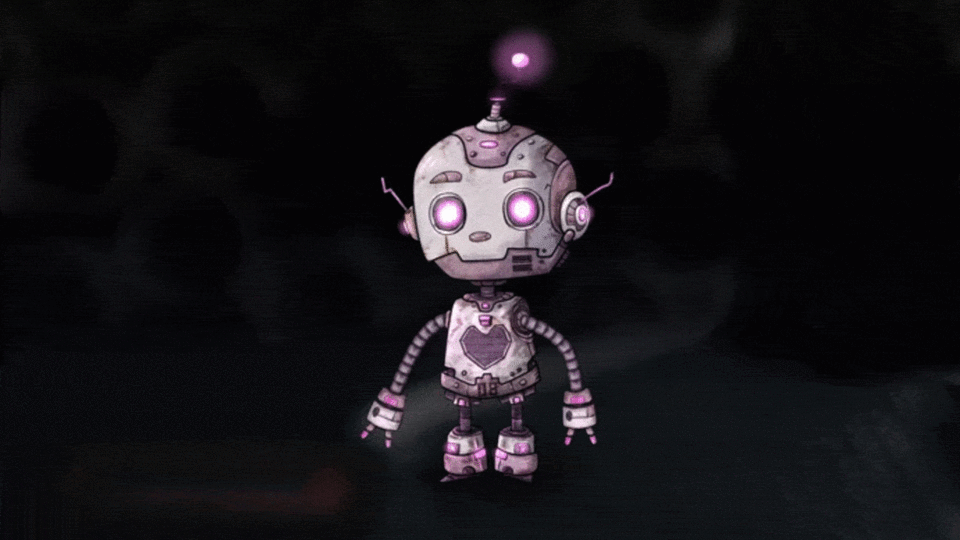
Simple cartoon robot (design & animate)
Hello, in this tutorial i will show how to design a simple humanoid robot in a cartoon style & my workflow to prepare the illustration & create a simple animation loop using some useful clip studio functions.

Video Tutorial
Please check the video tutorial to see the whole process in action▼
1. Initial Concept
General tips to create different designs:
First as always gather reference & inspiration, try to look at more things than the work of other artists. Research real life robots & machines, how they work. Get inspiration from nature, animals, insects etc. If you want inspiring robot work i recomend you the work of DaCosta Bayley, creator of MarchOfRobots.
Define the character personality & function. This will determine the overall shape and concept.
It is a war robot? an assistant? its is friendly or menacing? Big or small, etc. Try to imagine how it behaves in its world. The more details you define before drawing the easier it would be to make design choices.
Start by exploring shapes & silhouettes. Focus on the overall fealing of the character instead of details. For this stage, i prefer to use a big textured brush to help me focus on the shapes.
I base the designs on simple geometrical shapes. As a general rule sharp angles are good for menacing robots, big robots with square shapes seem strong & stable while oval and circle shapes work for friendly or cute characters. Of course this all depends on the final design but its a good practice to follow general perception of shapes to better convey the design.
I decided to go with a friendly cartoon shape thas easy to animate. ▼
2. Sketching
To refine the design i created a new layer above the shape & lowered the opacity of the base.
Then with a pencil brush i started refining the shapes.
Take your time in this stage to experiment, play with different amount of details to achieve a good balance before coloring the illustration.
Here is my final sketch.
I added paneling, small details & prepared glowing parts i will create in the coloring stage.
I decided to go with a bender style tube arm. To make it easy to animate & to show you a cool technique with ribbon brushes & vector layers.▼
3. Inking
I will prepare the character to ink. Since i want to animate first i will define folders for each part of the robot. The head, the body, the legs & the arms. This way we can animate the robot using keyframes.
To ink i create vector layers, then use a combination of the curve bezier tool to create smooth lines and the pen tool to add details. This way i have full control of the lines, and since its a mechanical design it works well to have a consistent line.
To learn more about the curve bezier you can read my tutorial▼
4. Add color
Now lets color the head. First i rasterize then set the inking layer to reference mode. Using the marquee select tool i fill an area around the lines. Then delete the extra color with the bucket fill tool set to reference mode & transparent color
Create a new layer above the base mask, then make a clippling mask. Start adding the local colors.
Create 2 shadows layers above set to multiply & paint the shadows. Then i added a rust texture set to soft light for an overall textured look then another rust texture with a mask to add details.
Finally add the highlights & glowing parts.
Repeat the same steps for the body & legs▼
5. Ribbon Brush
To make the arms posable im going to show you a cool trick.
We are going to create a full color ribbon brush for the hand & metal tube arm.
First using the sketch & a symmetry ruler i create the tubes making sure they connect to each other seamlessly. Then using the same process as the other parts i inked then colored the tubes.
Repeat the same steps with the hand. To make sure its seamless with the tube duplicate it then use the rigth part of the tube to attatch the hand.
Group the two layers within a folder then create a file object of the folder. Open the file object.
CTRL+Click to select the hand then make sure the selection goes to the edge of the canvas with the rectangle marquee. This is important to align the brush tips.
Register the hand as an image materia. Select to use it as brush tip shape.
Repeat the steps for the tube.
Now that we defined the 2 shapes find a ribbon brush and duplicate it then edit the settings. Set the hand as the first brush tip then the tube as the second.
In the stroke make sure ribbon is selected and the repeat method set to none
Create a new vector layer & try the full color brush.
We can use the operation or the control point tool to modify the arm after drawing. This cool trick give us a lot of control to the arm pose.
Pose both arms & add a mask to the joint
This is the final robot steps & i added a simple background for the animation ambience.
6. Simple Animation
since we have all the parts separated & the vector layer arms is really easy to create simple animations using fram by fram & keyframes. i recommedn you read these tutorial for a more indepth intro to animation.
Use keyframes to move all the parts except the legs.
Repeat the steps for the opacity of the glowing parts to create a pulse animation & animate th position of the mask in the heart of the body to simulate a charging battery.
Then animate frame by frame the hand. Watch the video to learn more!

Thank you for reading!
I hope you learn some tricks from my video!
See you next time.


댓글