The Magic of REFERENCE LAYERS (including Video)
Intro + Videos
If you haven't been using reference layers yet so far, I highly recommend that you change that! Especially if you work with lines. It makes filling them in far easier and quicker.
In this tutorial I will show you how to set layers as reference layers, and introduce all the tools I know of that make use of them. Even some that are lesser known.
There is also a YouTube video version of this tutorial right below, where you can see all of those tools in action. Just like in this article I explain everything step by step in the video.
Since it is relevant to this tutorial, I also want to suggest another video of mine, where I explain all the tools that can be used for filling in lines and all the settings that come with them, like Area Scaling, Tolerance, Refer Multiple, Close Gap, Fill up to vector path, and much more!
Those will be relevant in this tutorial.
How to set layers as Reference Layers
First up we need to learn how a layer can be set as reference layer. It is very simple and straight forward.
Simply select a layer, and click the little light house icon in the menu above the layers. (At least I think it is supposed to be a light house)
Then that little light house icon will appear on the layer itself.
Alternatively you can right-click on the layer, go to "Layer settings" and select "Set as reference layer".
You can actually set more than one layer as reference layer!
Simply click on the layers you want while holding CTRL, and then set them all as reference layers at once, as shown in the GIF below.
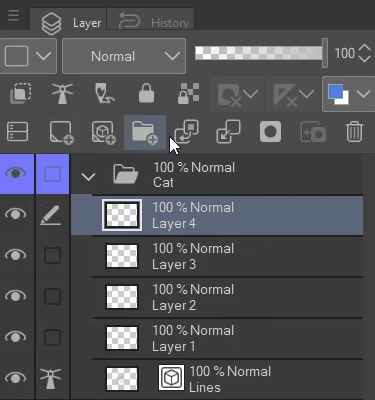
Or hold SHIFT, and select all the layers between the one you have selected, and the one you clicked on.
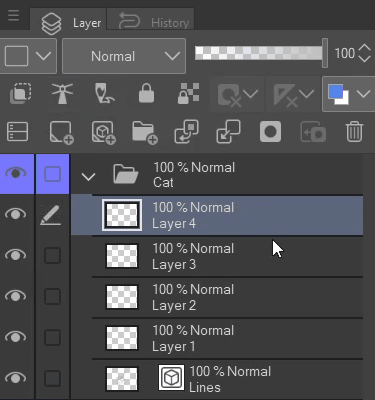
Also, any type of layer and folder can be set as reference layer! Except for correction layers.
Fill Tools referring to Reference Layers
Now that we know how to set layers as reference layers, let's actually make use of them!
As the first example we take a look at fill tools.
One of the most common ways of using reference layers is to fill in line-art.
So let us do exactly that at first!
Here I have a drawing of a cat. Only the lines, drawn on a vector layer.
Now we need to set the line layer as reference layer and create a new layer below for the colors.
In order for the fill tool to work with the reference layer the "Refer Multiple" option needs to be turned on and set to "Reference Layer".
Then the tool will specifically look at the Reference Layer.
And if you want the tool to also ignore the layer you currently have selected, then select the "Exclude editing layer" option right below.
With those exclusion options you can truly make sure that only the reference layer gets looked at by the fill tool, and no other layers. If you so desire.
I won't go into detail for the rest of the settings, since as I said in the Intro Section of this article, I already made a tutorial about those. So for now let us mainly focus on the reference layer aspects.
Well, the rest is pretty straight forward. While having your color layer selected, just click right into the areas you want to be filled in, and the fill tool will do exactly that for the areas encircled by the lines on the reference layer.
And not only does this work with the regular fill tool, but also selection fill tools like "Close and Fill" and "Paint unfilled Area"
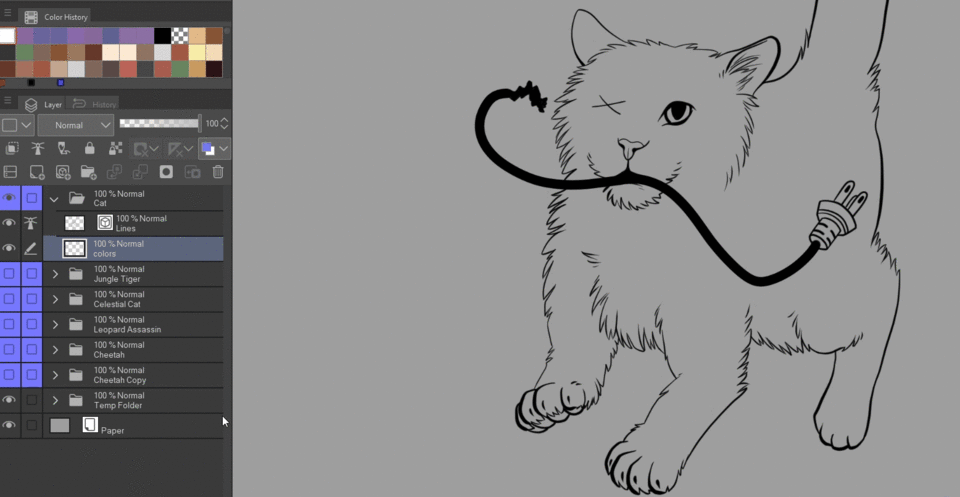
Filling in Lines is not the only way reference layers could come in handy though. There are many different other ways. Probably a lot that I don't know of either!
To give you another example, I have this 3D model of a knight chess piece, provided for free by Clip Studio. The outlines are turned off.
I simply set that 3D layer as reference layer, make a new, normal raster layer above it, and switch to the fill tool.
Then I click right into the shadowy part of the 3D model, and the tool makes a pretty neat looking solid shade with the color I selected.
The Tolerance value here determined how much of the model got filled in. The higher the value, the more area would get covered.
So, even though in this tutorial I mainly focus on filling in line-art, do not think that reference layers are limited to that one singular purpose.
Auto Select referring to Reference Layers
Next up let's take a look at the convenient Auto Select tool!
It also has the "Refer Multiple" option, including "Reference Layer".
Once again, I have some line-art to fill in. By making selections with the Auto Select Tool I can fill it in with brushes this time! Or whatever other tool I want. That is one advantage over the Fill Tools.
Before I set up any reference layers though, I will show you how you would make the selections WITHOUT reference layers and compare the methods afterwards. You will see that reference layers make that whole process much easier.
So, firstly let's keep "Refer Multiple" turned off. That means that the Auto Select will only refer to the layer you currently have selected.
That would mean you would have to do the following steps in order the select areas and paint inside them:
Select the line layer
Switch to the Auto Select Tool
Make your selections with the Auto Select Tool
Go back to the color layer
Switch to your brush of choice
Paint with your brush
Go back to step 1 if you need to make new selections to work on other areas.
That's a lot of back and forth...
Now let's turn on "Refer Multiple", but set it to "All Layers".
If you only have your line and color layers, then it works pretty efficiently too. You just need to switch between the tools, but not between the layers. You can stay on your color layer.
However, if you have some other stuff going on above or below, like textures, some background, shading, or such, then that would also get referred to by the Auto Select tool.
You might be able to counteract that with a higher Tolerance value, but in some cases that won't work well either.
So you would have to turn off all those interfering layers and THEN make your selection. Also a bit of a hassle.
Well, you won't have any of the downsides of the previous methods if you simply use reference layers!
Just set the line layer as reference layer, and you can stay on your color layer while the other layers don't matter!
And then you can freely paint away without worrying about painting over the lines!
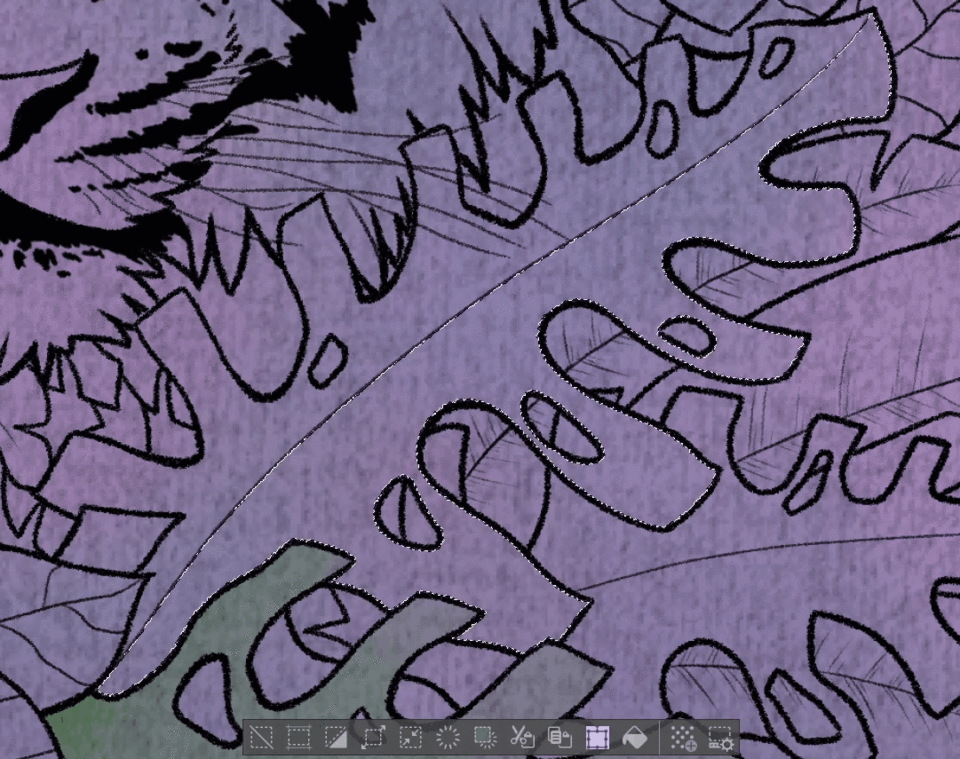
Here are some extra tips for making selections:
If you drew your lines on a vector layer, you can turn on "Fill up to vector path" and the texture of the lines doesn't matter. Only their vector paths.
I also recommend turning on "Include Vector Path".
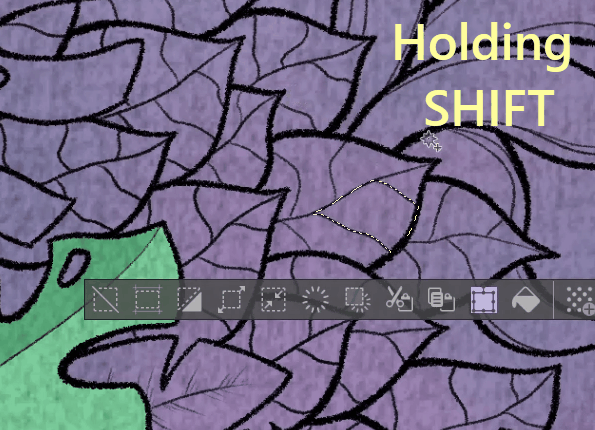
You can add selections to your already existing selection by holding the SHIFT key and clicking into the areas you want to add.
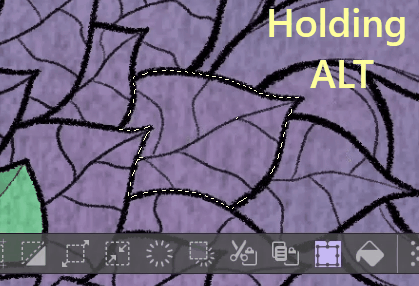
It is also possible to remove selection areas the same way by holding the ALT key.
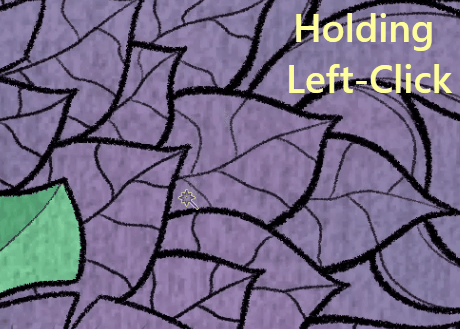
And if you want to select several areas that are adjacent to each other, just hold left-click and drag your cursor across those areas. When you let go, all of those areas will be selected!
"Do not cross lines of reference layer" - Easily stay within the lines with your brushes!
Making selections and then using your brushes is neat, but can become tedious if you need to do that for a lot of small areas. You still have to switch back and forth between Auto Select and your brush.
However, there is a setting for brushes that enables you to stay within the lines even without making selections!
It's called "Do not cross lines of reference layer".
Doesn't quite roll off the tongue I admit, but it's a super neat feature!
Every single brush has it. Your pens and pencils, airbrushes, texture brushes, pattern brushes, and so on.
If you cannot find it in the Tool Properties, simply click on the little wrench icon in the lower right corner of it, which opens up the Sub Tool Details.
Then go to "Anti-Overflow", and there you can find it!
If you want it to show up in your Tool properties, just click the rectangle box to the left of this setting to make an eye symbol appear.
The other settings right below enable you to do some fine-tuning, so that you can paint very cleanly. Again, if you want to learn more about those kinds of settings, check out the 2nd video in the Intro Section of this tutorial article.
So, when you have that option turned on, simply set your line layer as reference layer, and paint on your color layer! No switching back and forth needed. Neither between layers, nor between tools.
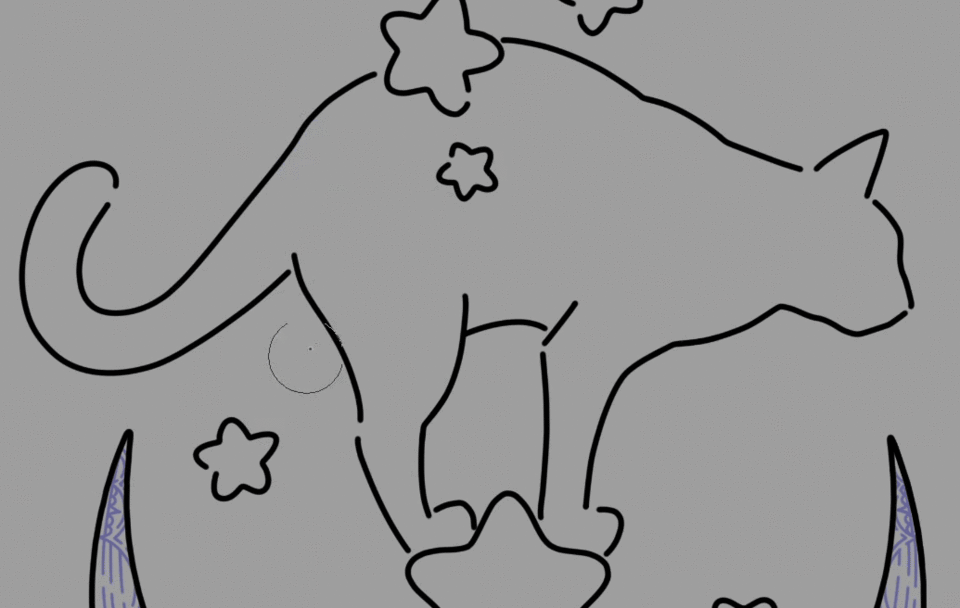
As you can see, the paint simply stops when it touches the lines on the reference layer.
Be careful though! The little center dot of the brush needs to stay within the lines!
If that center dot goes over the lines, then the color will switch sides.
(If your cursor doesn't show a center dot, you can change that in the Preferences under "Cursor")
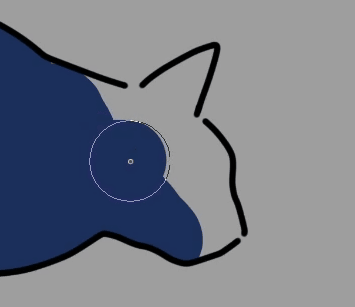
Also, if the lines simply end, you also need to pay attention.
I chose a drawing with gaps in the lines to exactly show that problem.
Look closely at the GIF below. You can see that once the color gets to the end of the line, it overflows.
Only when the actual color, the >current< brush size, gets to the end of the line though. The >maximum< size of the brush, indicated by the circle around the cursor, is not relevant here.
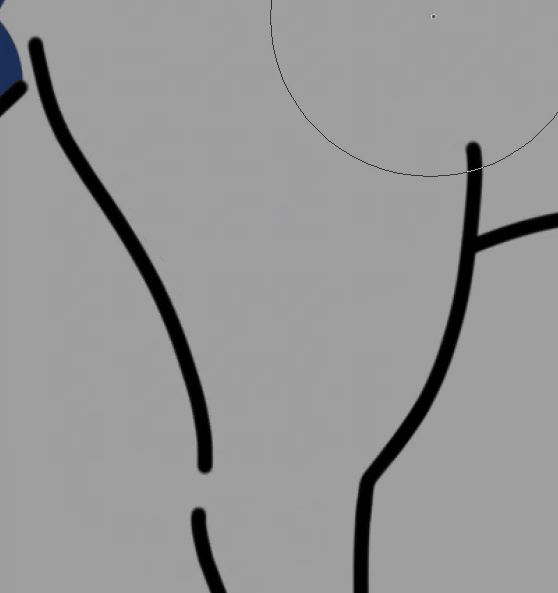
So the "Do not cross lines of reference layer" setting can be incredibly useful and versatile!
You just need to make sure that your brush stays within the lines, and it is a bit harder to work with if your line-art has gaps. Unfortunately it doesn't have a "Close Gap" option, unlike the Fill Tools or Auto Select.
Contour Line Paint / Freeflow Gradient
Now here is a tool that is, as far as I can tell, a bit lesser known. It's called "Contour Line Paint", or also referred to as "Freeflow Gradient".
Let me give you a short, rough introduction to this tool so that we all have at least a basic understanding of what it does, before we look at how reference layers can come into play.
Also, I think this tool can be quite convenient, so learning more about it is worth it in my opinion.
Basically it paints gradients between lines that you drew beforehand on the same layer. It can quickly create gradients that are much complex and flexible than what the regular gradient tool could ever achieve.
So the first step is to draw some lines. And not just any kind of lines.
The most important thing is that "Anti-Aliasing" is turned of, and that you use a completely opaque brush.
I also recommend using a very small and constant brush size.
For demonstration purposes I just drew a few wavy lines with different colors across the entire canvas. Those are going to be the borders of the gradients we'll paint.
I'll show you what that means soon.
Then I simply use the "Contour Line Paint" tool with the default "Normal Paint" settings and use it straight away.
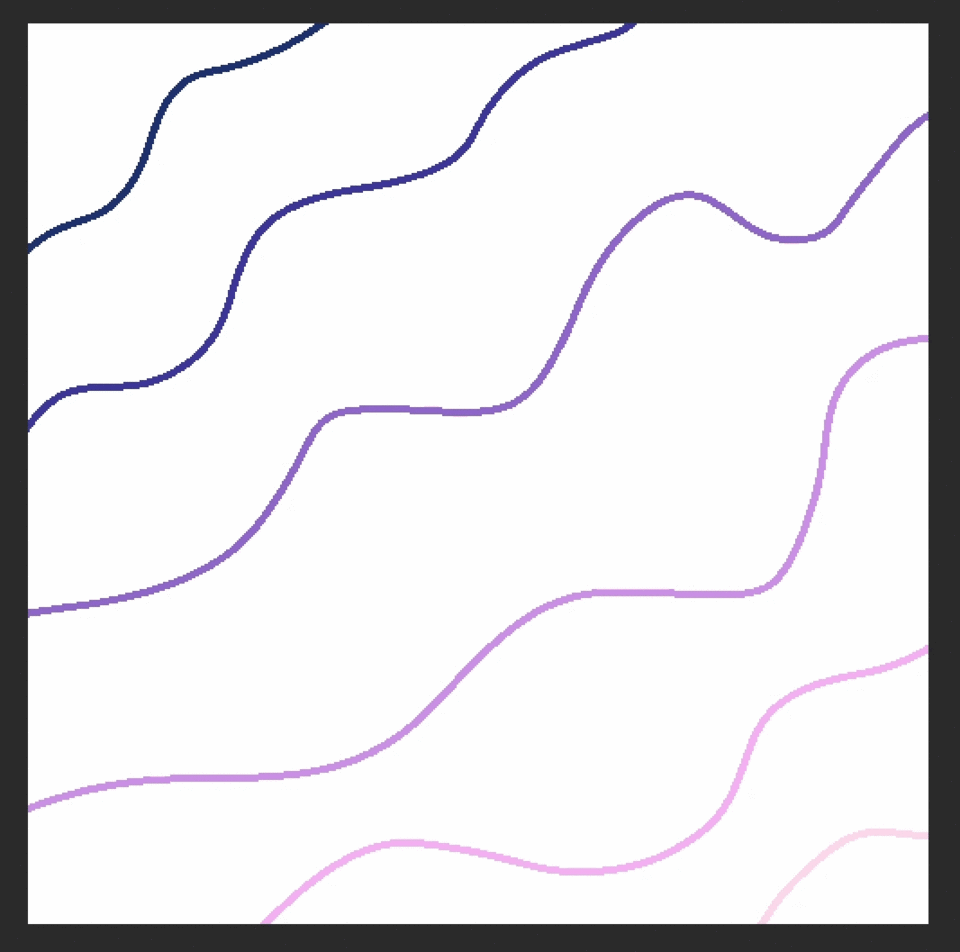
Ok, so what exactly happened just now?
The Contour Line Paint tool analyzed those areas between the lines and checked what colors those areas are connected with. Let me show you show you the same image, but with the original lines highlighted. The arrow show the color flows, indicating how the gradients were drawn.
The two corners only had one color connected to those areas. The borders of the canvas don't count as color. Therefore the corners were simply filled in with only that one color.
The areas in between that were connected with two colors were filled in with gradients instead! The tool took the colors of the line borders and painted the colors with the pre-defined gradient settings.
So, as you can see, you just draw some lines, and the tool automatically draws gradients from one line to another with those line colors. Pretty neat!
Now let's talk shortly about the settings of that tool.
"Black" and "Transparent color" can normally be left at their default settings. They are also pretty self-explanatory.
The "Output Settings" pre-determine how the gradients are drawn. You can add as many control points in the graph as you want by just clicking right into it. Or remove the points by dragging them out of the graph.
"Close Gap" automatically closes gaps in the lines.
"Tolerance" determines how many pixels that are similar to the one you clicked on get filled in.
And then there is the "Refer Multiple" option, which includes "Reference Layer"!
Exactly what this tutorial is all about!
So let's conclude the introduction of this tool and get to the more relevant part.
Once again I have another line-art piece ready. A drawing of a baffled cheetah. The spots are on a separate layer.
I want to use the Contour Line Paint tool to help me fill in some basic colors for the drawing.
The line layer is set as reference layer, and therefore the lines will be treated exactly like the borders of the canvas in the demonstration above.
A color layer also has been created and put below the other layers. That's the layer we'll work on.
The plan is to create soft gradients for the cheetahs fur. It doesn't have just one singular light brown color, but areas like the snout, the belly, the chest and other parts are lighter, almost white.
By the way, I actually made a tutorial about how to draw cheetahs. It's a more general tutorial, so not limited to digital art, and therefore focuses more on the anatomy aspects. Maybe you are interested.
So with that information in mind I drew the lines with the same brush as before.
I gave the lines some shakiness so that the gradients will look a bit more natural at the end.
The distance between the lines determines how wide the gradients are going to be, so I tried my best to pay attention to that too.
Keep in mind that areas that are connected with only one color will be filled in with just that one color. For example the middle of the chest and the lower jaw would only be filled in with the lightest color, because that's the only color that it is connected with. The black outlines on the reference layer don't count as color.
If you want to fill in an area surrounded by lines with just one color, it suffices to simply draw a tiny dot into it. The Contour Line Paint tool will then fill in the rest with that one color. I did that for example with the eyes.
So this is the result after I went over the entire drawing with the Contour Line Paint tool:
Not too shabby looking. Especially considering that I didn't spend all that much time on it!
I do have to say though that small details can be quite difficult with it, so you might want to do that detail work with other tools.
But this tool is super convenient for quickly getting some basic colors and establishing some more complex, large gradients! Especially if used in combination with reference layers!
Let the computer automatically Colorize a Reference Layer
The last tool that I found that makes use of reference layers is probably even less known than the previous tool.
I have yet another line drawing that is going to be filled in with colors. One from my Tabletop RPG character online shop.
Using this tool is very simple. Just set your line layer as reference layer and go to "Edit", "Colorize (Technology Preview)" and "Colorize All".
A window will pop up, informing you that your image will be sent to Clip Studio, but only temporarily, and without any personal information. So nothing really to worry about.
Click OK, and wait a short while for it to process.
And then some immediate results will be sent back to you.
A new color layer has been created above the reference layer with the results.
Not too bad. And it only took a few seconds, so that's pretty convenient!
It's not quite perfect. You can see that the fill in job wasn't quite perfect. That can be especially seen at the dark parts of the coat. And of course it cannot know that some enclosed areas weren't supposed to be filled in, like some around the crossbow.
But it could be a nice starting point for more detailed coloring.
If you are not satisfied with the seemingly random colors that were picked, you can give the tool some initial colors to work with. Some "hint colors", as they are called.
For that purpose create a regular layer below the line layer and roughly fill in some colors.
And when I say roughly, I really mean it. Trying to do any detail work is just a waste of time. The end result is going to be too blurry for those details to show up.
Also slightly painting over the lines in totally fine too.
Then go to the same menu as before under "Edit" and "Colorize (Technology Preview), but this time select "Use hint image and colorize".
Make sure that the line layer is set as reference layer, and the layer with the hint colors is selected.
Once again wait a bit after clicking OK on the pop-up, and you get some immediate results, but this time the colors roughly followed the hint colors you provided. Not perfectly, but there is a clear difference to the version without any hint colors.
Alternatively you can choose "Use more advanced settings" under the same menu as before, which gives you a couple of extra settings for altering the results.
Blur strength: How blurred out the colors are going to be. Too low and it doesn't look smooth enough anymore, too high and it ends up looking washed out.
Blur accuracy: According to the official description: "Specifies the number of times to calculate the blur. The larger the number, the smoother the blur effect will be."
I honestly cannot notice a difference though.
Remove main lines: the resulting image actually includes the lines, to some degree. You can alter that with this setting.
Analyze colors and colorize: Creates a palette from the colors you used, with a maximum of 10 colors, and you can individually adjust how strongly those colors are being represented with the graph below.
Well, even with all of those settings I do have to say though that this feature is not the most accurate. It will not replace a professional coloring job. Technology isn't that far. At least not yet.
However, the Colorize tool can give you some quick colors to work with. Or you can just have fun and play around with it.
Conclusion
So, as you can see, reference layers can come in handy in many different ways, and can be utilized by many different tools.
They safe you quite some time, because with their help you won't have to juggle around layers and tools that much anymore. I personally use them all the time and got completely used to them.
Highly recommended!
I tried my best to find every single tool that somehow works with reference layers, but Clip Studio Paint has quite a lot of tools, so it could totally be that I might have missed one or a few. If that's the case, please let us know in the comments! The YouTube comments are even better suited!
Alright then, thank you a lot of reading / watching!
Have fun drawing!





コメント