A fast and easy way to apply manga screentones
0. Introduction
When watching this video, please display subtitles in each language.
The explanation in Japanese is easier to read on my blog, so please see here.
This time, I will carefully explain how to apply the basic screentones of manga in a quick and easy way.
First, I will explain how to apply screentones to a basic character, and finally, I will explain how to draw snow with screentones as a small application to backgrounds.
What I'm going to introduce this time is not a big deal, but rather plain knowledge, but the accumulation of such small work efficiency improvements will improve the speed at which the manga is completed.
I would appreciate it if you could refer to the production even a little.
We added subtitles in each language to the video, so please turn on the subtitles and watch.
However, this TIPS contains a GIF made from the above video, so I think it's easy to understand without watching the video.
1-1. Basic pasting [Fill] tool and mask display switching
The first is how to apply the screen tone.
Create a tone layer from the new layer and fill it with the [Fill] tool.
This is the most common method of painting.
As is the case with painting with other tools, it is good to draw the line art so that it is closed as much as possible.
If you want to draw pictures with gaps in the lines, it is better to increase the value of [Close gaps] in the [Fill] tool settings.

Check whether there are any protrusions and what kind of finish it is by switching the display/hide of the mask with the red mark.

This confirmation work is done many times during drawing, so it is convenient to register it as a shortcut.
It is a good idea to register a shortcut for [Layer Mask]-[Show Mask] in the [Layer] menu so that you can switch between showing and hiding with one touch.
1-2. Basic pasting method After painting a large area, erase it with the [Fill] tool.
The second method is to paint a large area that extends beyond the line, and then erase the excess with a transparent [Fill] tool.

1-3. Basic pasting method [Close and fill] tool
The third way to fill is with the [Close and fill] tool in the [Fill] tool.

For the tool settings, set the [Target color] to the 5th [Part surrounded by black] from the top.
If you enclose the target area, it will automatically paint.
1-4. Basic pasting method Drag with the fill tool
As for the [Fill] tool that I used at the beginning, if you drag it like this, it will skip over the lines and paint.
No more clicking.

2-1. Add a tone to the character
Now, using these pasting methods, we will put a screen tone on the line drawing of this character.
A girl warming her hands with coffee in the cold weather.
2-2. Separate the line drawings
The line drawing is divided into parts like this. If the line art is separated, it will be a little easier when pasting the screentone.
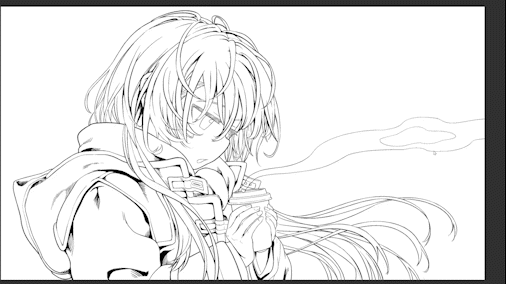
2-3. Make a mask with white
Before applying the screentone, make a mask on the character with a solid white layer so that the character does not overlap the background.
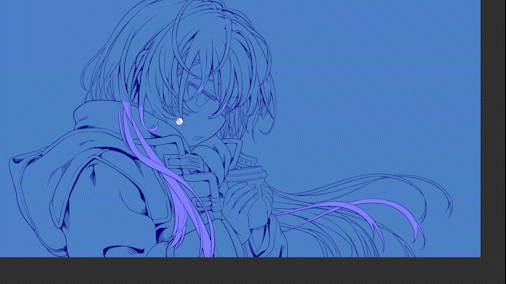
This mask can also be used later to add borders to the character or to make a selection from the mask.
2-4. Create a folder for screentones
Create a folder for the screen tone layer above the line drawing layer and set the blending mode to multiply.
This prevents the lines from becoming faint when pasting gradation or gray screentones.
2-5. Paste the screen tone of the hair
Now that the preparations are complete, it's time to apply screentones to the character's hair.
Hide everything except the hair line art, and roughly paint with the [Close and fill] tool.
The green part is the part I painted by mistake.
It's okay if it's not completely painted at this point.

Click the thumbnail of the white mask while holding down [Ctrl] to make a selection, select [Invert Selection] from the [Selection] menu, and [Erase] from the [Edit] menu.
With this, you can erase the screen tone of the green part other than the white mask part at once.

I was able to erase it faster than erasing the green part one by one.
It is convenient to register [Invert selection] and [Erase] as shortcuts.
I displayed the other line art and painted in the parts that weren't painted, then hid it again and erased the extra parts... Repeating this work, I was able to apply the screen tone of the hair in about 3 minutes.

This is the method I recommend for applying screentones.
2-6. Paste the coat screen tone
Apply the screentone to the coat in the same way.
Hide the other parts of the line art, fill in a large area, and then erase it with the [Fill] tool.

The part where the hair and the screen tone overlap,
Erase the coat screentone by Ctrl+thumb-click-selecting the hair screentone.

2-7. Preparing to apply the muffler screen tone
I'll put a checkered screentone on the muffler later, but I'll put it aside for now.
Create only a mask on the selection layer.
A selection layer is created with [Stock selection] in the [Selection] menu.

After roughly painting, the part that protrudes into the coat,
Select the coat screentone and erase it.

Just like with the coat, once you apply the screen tone, you can use it as a selection area to apply the next screen tone as easily as a die cut.
How to create a selection from a layer is explained in detail in the previous TIPS, so please refer to that.
2-8. Paste eyes and coffee tone
Finally, apply a screen tone to the eyes, eyelids, and coffee to complete the basic tone application!
2-9. Add black
In the case of manga, forget about the actual direction of light for a moment,
Adding a shadow in the direction the character is not facing often makes the screen easier to see.
This time there is only one character, but it's a good idea to keep this in mind when working with a large number of people.
2-10. How to cut screentones that can be redone
Next, I will introduce a useful technique when removing solid blacks and screen tones.
Set the blending mode of the screen tone layer you want to scrape to multiplication, lower the opacity of the white solid layer on top of it, tone it, clip it, and draw it, leaving the original layer and scraping it I can feel it.
With this, you don't have to repaint when redoing, and it's convenient when you create a selection from a layer.
This time, I draw with a 40% screen tone, a multiplied black layer, and 3 white layers.

You can also get the same result with two layers, a black layer with multiplication and a white screen tone with opacity lowered to 60%.

Black hair highlights and so on may be easier to understand and draw here.

2-11. How to apply the pattern screentone
Finally, I will paste the patterned screen tone on the left muffler.
Double-click the thumbnail of the selection layer that was created earlier to create a selection, and drag and drop the pattern screen tone from the material palette.

2-12. Processing the screen tone of the pattern
It's fine as it is, but this time, I'll take a little more time and try to make the flat pattern three-dimensional.

First, paint the pattern tone so that it protrudes greatly from the muffler, cancel the screen tone, and make it a color layer.
Right-click on the mask thumbnail to apply the mask to a raster layer.
Then use the [Liquify] tool to transform the pattern and apply a mask to tone it.

I'll give it another try.
Copy the pattern layer, separate the front and back of the muffler, and shift the pattern slightly.

Even if the pattern is flat, it doesn't look unnatural when viewed on the whole screen of the manga.
Even so, in scenes where the highlight or the character is close to the camera, the flat pattern may look strange, so please keep this processing method in mind.
2-12. Completing the character screen tone
The character's screentone is complete.
3-1. Draw snow with screentones
Next, I'm going to use screentones to draw snow as a little application.
First, apply a gradient screen tone to the background.
Next, paint the whole thing white with a solid layer, make it a screen tone, and lower the opacity to about 5.
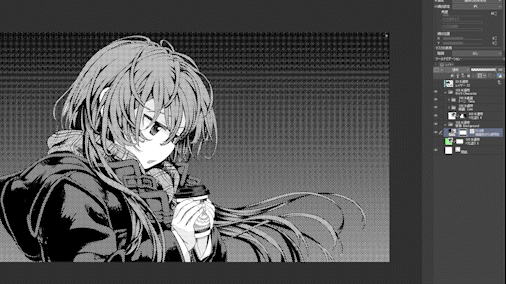
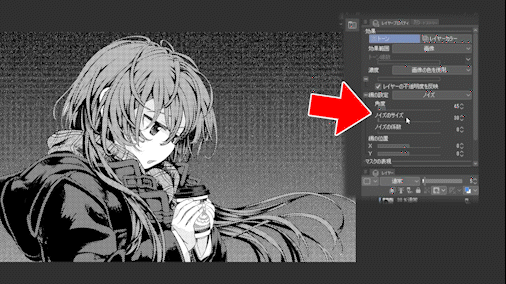
Change [Net setting] to [Noise].
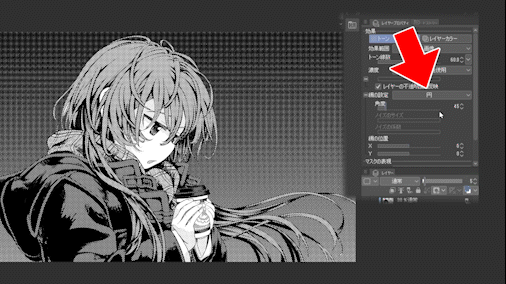
If you increase the [Noise size], each grain of the screen tone will become bigger, and you can make it look like snow.
By the way, you can make it look like it's raining by increasing the [Noise factor].
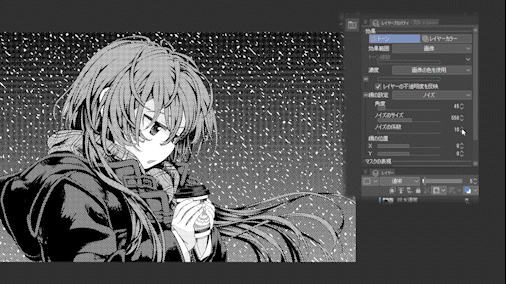
Adjust the numerical value and rasterize.
At this time, the size of the noise will change on its own, so try again until you get the finish you like.

3-2. Blur the snow.
The outline of the snow is a little hard, so I soften it with a little filter.
Copy the snow layer, remove the edges, apply Gaussian blur, then move in the direction of the wind and blur to tone.
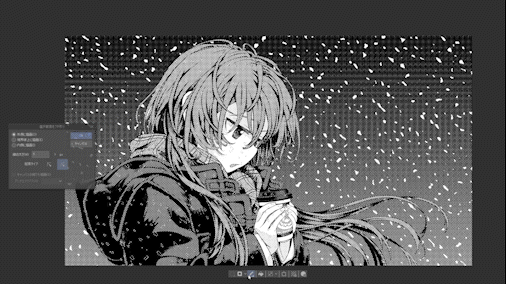
I explained how to use the blur filter in the screen tone in the previous TIPS, so if you want to know more, please see that.
3-3. Making snow fall on characters
Next, let's make snow fall on the character as well.
Copy the snow layer and bring it over the character.
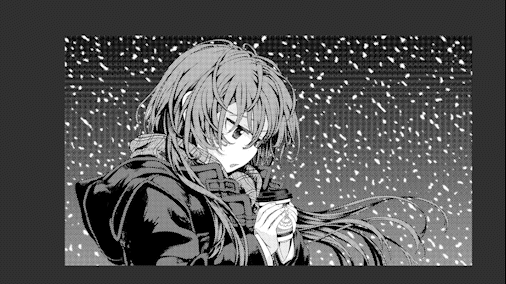
Make the snow bigger than the background with deformation,
Clip to your character's screentone folder.

I also slightly blur the snow on the character.
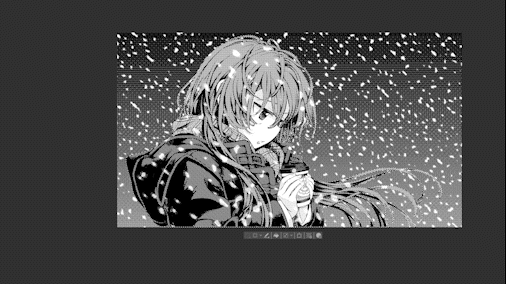
Apply a gradation screen tone to the character so that the snow is easy to see.
At this time, I am making a selection from the white mask I made first.
Delete the gradation screen tone only for the highlights of the nose, eyes, and fingers.
Apply the following auto action to shift the screen tone so that the gradation screen tone does not overlap with the basic screen tone.
Finish
Finally, apply a white gradation screentone to the coffee smoke and you're done!
at the end
This time it was TIPS about how to paste the screen tone.
This time I used screentones of many densities,
In actual manga production, the manga artist registers several types of screentones with predetermined densities in the template, and strives to express everything with only those few types.
Because it is better not to paste the screen tone as much as possible.
This is because there are three barriers to manga drawing.
The three barriers to manga drawing are the cognitive barrier, the drawing barrier, and the printing barrier.
In layman's terms, it's whether the reader finds it difficult to read, how much effort the manga artist has to draw himself, and whether there are any errors when printing.
I couldn't talk about this barrier in detail this time, but
When deciding how much screentone to put on your manga, carefully consider these three barriers and what you want to draw!
Screentones are too easy to apply to digital comics, so the amount of drawing tends to increase.
Remember, drawing manga is a long-distance run, not a sprint.




Comment